
In this article, we shall show you step by step, easy to understand guide for setting up an always online, highly reliable and production ready Nextcloud server with Proxmox using a Desktop or Laptop computer for small or media business and offices in India.
Prerequisites
Before you can proceed, let’s checkout the prerequisites that you may need for this setup
Hardware
- Router (TP-Link / D-Link / NetGear, any consumer router)
- Fiber Optics Internet connection
- Any Laptop or Desktop PC with SSD (size depends on your requirement) and 16GB RAM & LAN (RJ45) Port
- One External USB Hard Disk or SSD (same or larger size that what it is in the computer)
- One Pen Drive (8GB or higher) -> Temporary for OS install
- Domain Name (Subdomains will do just fine)
Software
- Internet Connection Speed 100mbps or higher is better (especially uploads)
- Dedicated Static Public IPv4 (from your ISP)
- CloudFlare Free account
- Proxmox Server
- Ubuntu Server 24 LTS
- Docker / Docker Compose
- Nextcloud AIO Docker Edition
- Nginx Reverse Proxy
- Rufus (for Bootable USB creation)
In this tutorial, we are going to use any old or new laptop or desktop pc, which is connected to your office LAN network using ethernet (LAN) cable, to turn that into a Proxmox server and deploy an Ubuntu VM with Nextcloud.
Get the software
First step is getting the software download into your personal or office computer. So download the following,
Proxmox
Go to the official website of Proxmox -> https://www.proxmox.com/en/downloads
Download the latest version of Proxmox VE ISO Installer file and save it within your work / personal computer. At the time of writing this article, the latest version is 9.1-1

Ubuntu Server 24 LTS
Go to the official website of Ubuntu Server download -> https://ubuntu.com/download/server

Download the latest version of Ubuntu Server 24 LTS ISO file and save it in your work or personal computer. At the time of writing the article, the latest version is Ubuntu Server 24.04.3
Rufus
Go to the official website of Rufus -> https://rufus.ie/en/
Download the latest version of Rufus utility. Alternatively, you can also install this in your work or personal computer from Windows App store.
We need this temporarily for creating the OS installation USB. It can be uninstalled afterwords.

Creating Proxmox Bootable USB
In the work or personal PC, in which you have downloaded the ISO files and installed Rufus, there, connect the USB Pen Drive and launch Rufus.

Within Rufus, click Select to locate the previously downloaded ISO file of Proxmox VE, ensure to select the plugged in USB and click start flash the USB Pen Drive to make the bootable USB installer of Proxmox.

Choice of PC & MAC Address Copy
We can use any Desktop or Laptop for this purpose. Just ensure it is having a virtualization enabled CPU, 16GB or more RAM, a SSD Disk Drive and LAN Port. Any computer with Intel 4th Generation i5/i7 or higher will work just fine. Remember, in this process, we are turning this computer of yours into a server. So there would be no other use of it.
In our case, we are selecting this Lenovo ThinkPad L1 (Gen1) with Intel 10th Generation i5 10300u CPU along with 16GB DDR4 RAM and 256GB NVMe SSD and connecting this to our office LAN Network using LAN Cable via it’s onboard RJ45 LAN Port along with it’s power cable.

Before we can proceed with Proxmox, we need copy the MAC address of it’s physical LAN Card. Start this Laptop or PC, assuming it is running Windows, just open settings, then network and then Ethernet. There under details you can see the mac address of the LAN Card of this computer. Write it down, since we need it for network setup.
MAC Binding / Static LAN IP
Our Proxmox server and all VMs within it needs static lan ip. We can ensure to assign a Static LAN IP from our router DHCP settings page. Usually it is called MAC Binding or Local Address Reservation and found under the network or DHCP settings page of your router admin panel. I am using a TP-Link router so let’s go to the DHCP section of the admin panel of router page and add the MAC address against one fixed LAN IP for the laptop.

In my case, I am assigning IP address 192.168.1.46 as my local lan IP for this laptop, in which I am going to install proxmox.
Installing Proxmox
Plug in the Bootable Proxmox installation USB into the computer which you plan to convert into the server. Ensure that all important data is copied out. Start the computer, go to BIOS, change the boot device to USB and boot from the USB drive.
In case you don’t know how to change the boot device of your laptop or pc, search the internet using your laptop model number of pc motherboard model number. Also ensure to turn off “Secure Boot” and enable virtualization from BIOS.

Select install Proxmox VE Graphical and proceed by pressing enter. Accept the terms and condition to procced and at next screen you would be presented with harddisk selection option. In our laptop we only have one, so it is selected by default, but we are going to partition disk. For that click option and there under “maxroot”, enter 32 and leave everything blank. This action will create 32GB OS partition and assign rest of the disk for VM usage.


Now simply proceed with the installation by setting up your local time zone and password for the proxmox server admin account. Under network section, there is an option manually setup Local LAN Static IP but we have used router DHCP to setup our local lan static ip so we dont need to modify anything except the FQDN, there I am writing OfficeServer.lan


Depending on your computer configuration, it may take around 15-20 mins for the installation to complete. Your computer may reboot automatically during this process. Once it starts up, there is nothing more to do in this server physically since we are now going to access proxmox via network from any other PC connected to this same local lan network
Configuring Proxmox Server
To access proxmox, from our personal or work pc or laptop, which is connected to the same network via LAN or WiFi, open the web browser (Chrome / Firefox / Edge / Safari) and visit https://IP:8006 -> here the IP address is the fixed lan IP of our proxmox server. In my case, it is https://192.168.1.46:8006
It may throw SSL error since the server is using self signed certificate so proceed by ignoring the error to access the login page. Your log in user ID details are as follows,
User Name -> root / Password -> your own password


After login, select officeserver from left menu, then in side menu, select shell to bring up the console. Here, we are going to paste the PVE Post Install Script to configure a “Free to use” proxmox server. You can find the command here -> Proxmox VE Helper-Scripts
Just copy this below script and paste within the console the to start the configuration process.
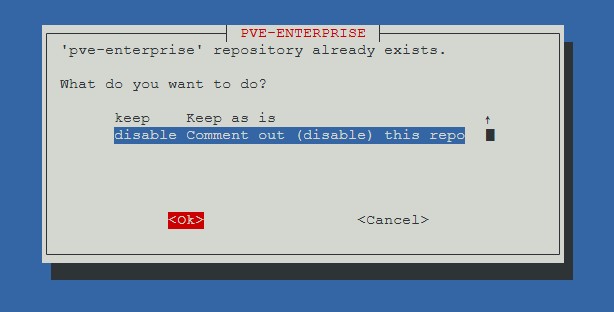
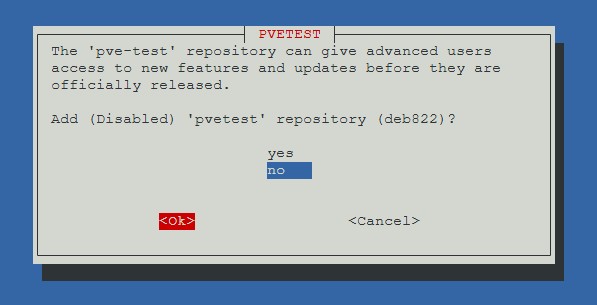
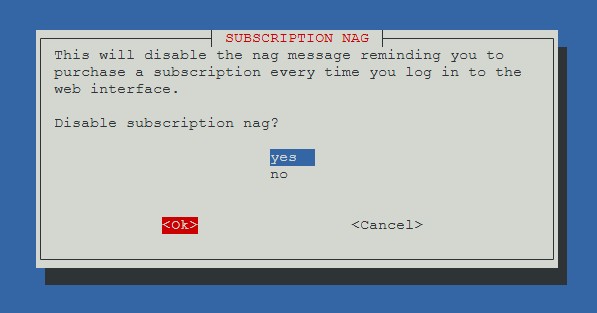
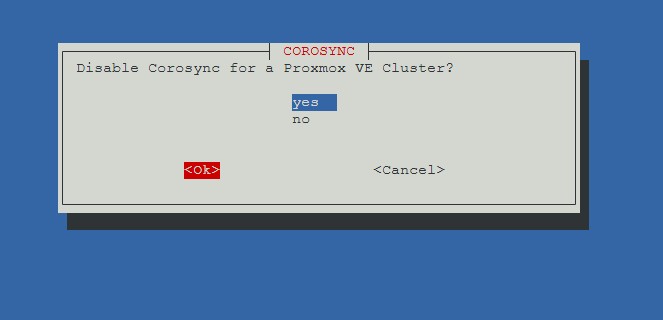
bash -c "$(curl -fsSL https://raw.githubusercontent.com/community-scripts/ProxmoxVE/main/tools/pve/post-pve-install.sh)"Follow the on screen install and enter following values,
| Start the Script | y |
| PVE Enterprise | disable |
| CEPH Enterprise | disable |


| PVE-No-Subscrioption | yes |
| PVE-Test | no |
| Disable Subscription Nag | yes |

| Disable High Availibility | Yes |
| Disable CoroSync | Yes |
| Update PVE | Yes |


Configuration setup process will now setup, update and prompt us for rebooting the server. Proceed with the reboot. Once done, the server is ready for VM deployment.

Creating VM in Proxmox Server
In our setup, we need 2 VM. One small for running Nginx Reverse Proxy via Nginx Proxy Manager (Docker Deployment) and another large for Nextcloud (via Nextcloud Aio Docker). Both our virtual machines will run Ubuntu Server 24 LTS as their Operating System along with Docker for software deployment.
In my case, the laptop has 256GB SSD, out of which 32GB is assigned as Proxmox boot disk so that leaves us with roughly 220GB of disk for VM vDisk. Nginx VM would require 16GB so we can safely assign 200GB for the Nextcloud VM in this setup.
Uploading the Ubuntu ISO
For VM deployment, first step is to upload the installation ISO of Ubuntu Server 24 LTS from our work/personal computer into the server. For that, login to Proxomx Web UI via your work/personal PC using the browser. Under proxmox server web ui, select “local” then “ISO Images” then click upload to select the ISO file from your work/personal computer and upload that into the proxmox server.

Creating VM
We need to create 2 virtual machines here.
VM 1 -> For Nginx Reverse Proxy (Ubuntu + Nginx Proxy Manager)
VM 2 -> For Nextcloud (Ubuntu + Nextcloud AIO)
To create a VM, click on the “Create VM” button located top right corner of the Proxmox Web UI. This will bring up the VM Creating Wizard.
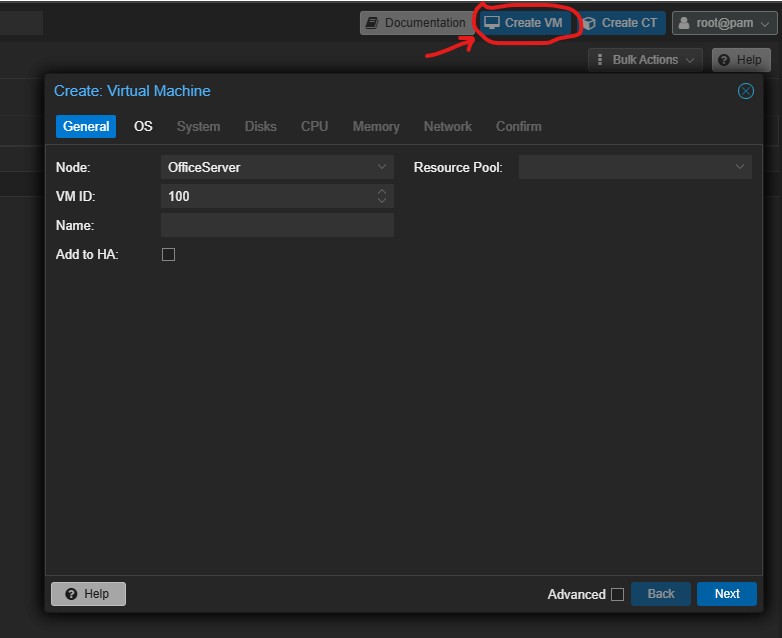
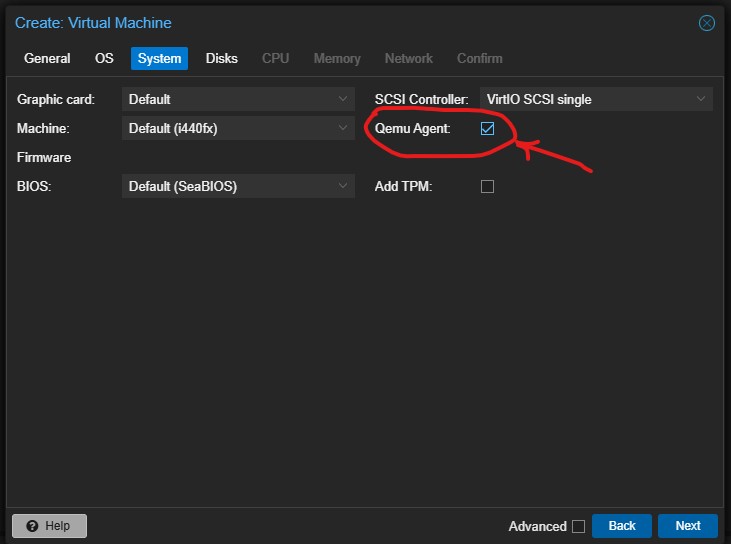
Under “General” Tab of Create Virtual Machine, everything will be default, just enter the name of the VM. Since this is our Nginx VM, so I am naming it, “VM-Nginx” for easier identification. Click next, and under OS Tab, select the ubuntu iso from drop down list. Then under “System” Tab, everything stays default, just turn on the QEMU Agent.


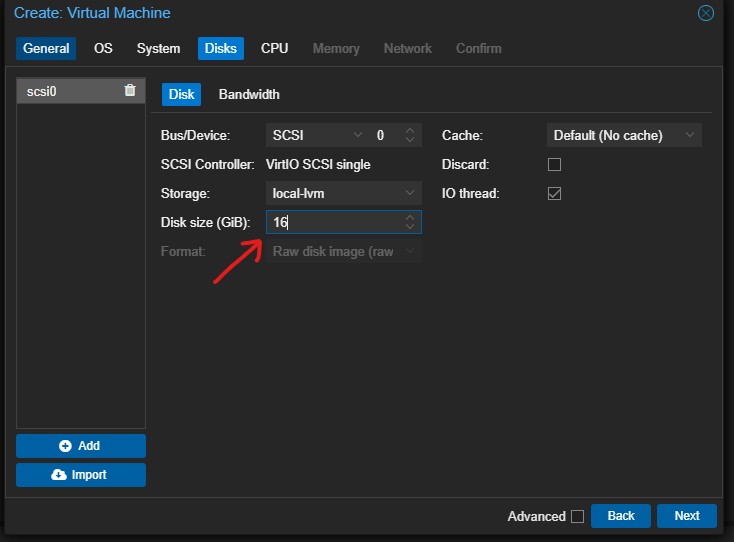
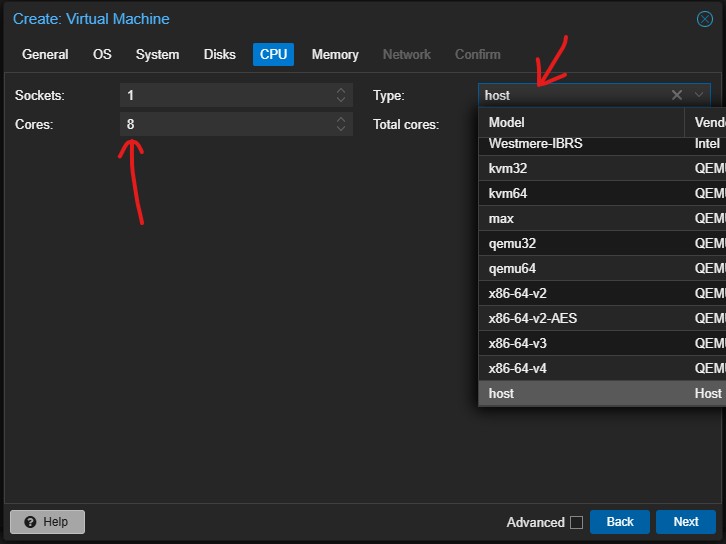
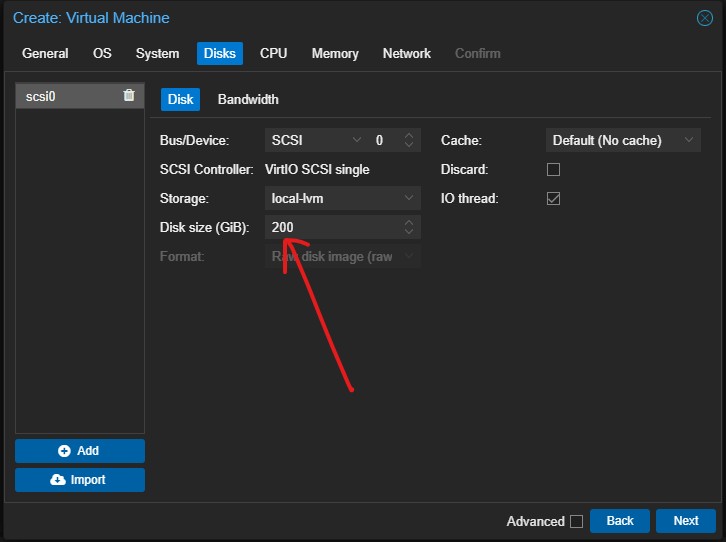
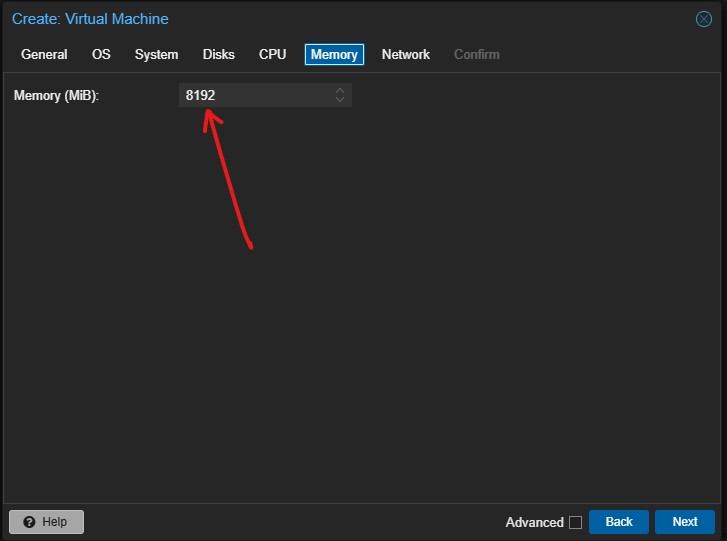
Now on to Disk tab, everything stays default, just change the disk size to 16GB for this VM. For CPU Tab settings, change core count to match your server’s thread value. In my case, it is a 4 core 8 thread CPU, so I am entering 8 and select the CPU Type as Host. Then on to memory, there for this VM, allocate 2GB (2048MB) or RAM.

Moving on to the Nownext option, that is Network. Here, everything stays default, but we need to enter a mac address. Visit https://dnschecker.org/mac-address-generator.php and generate a random MAC address and copy that to enter in your VM network MAC.


Keep clicking next to complete the VM Creation to create the VM. After the VM is created, we need repeat the IP address / Mac binding process from router to assign a Static LAN IP for this VM. We have mentioned the process earlier for proxmox server, follow that same process and assign a static local lan ip for this VM. In my case, I am assigning 192.168.1.48 for this Nginx VM using the MAC Address from my router.
Creating the 2nd VM
The process is exactly the same as before, just here some parameters are different. I am naming the second VM as VM-NC then allocating 200GB disk space and 8GB (8192MB) or RAM along with another Random MAC address and then using that MAC address to assign static lan ip 192.168.1.49 for this VM.

Proxmox VM
OS & Software installation
First we shall setup & configure the VM for Nginx Reverse Proxy. It will run Ubuntu Server LTS along with Docker and then Nginx Reverse Proxy Manager.
Step 1 -> OS Installation
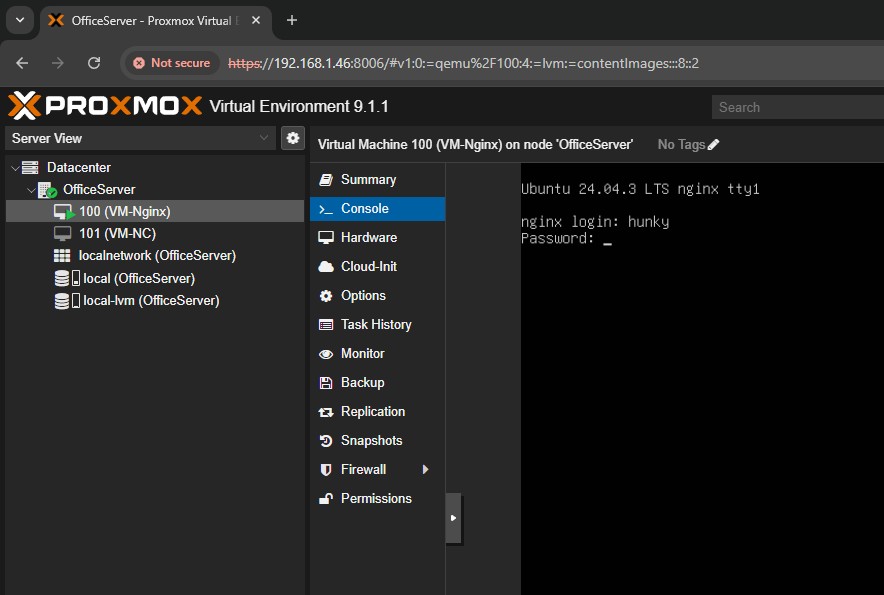
Select the VM in Proxmox Web UI, in this case, we are working with Nginx VM. Select Console and then click start now to start the VM.

It will launch the VM, boot into the Ubuntu Server installation ISO. So proceed with the installation.

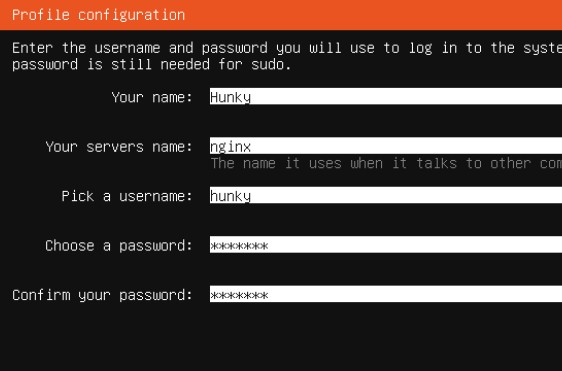
Installation wizard is very straight forward. Everything stays default, just keep proceeding next at all screens, except 3 places, where we need to make change or enter our own details.
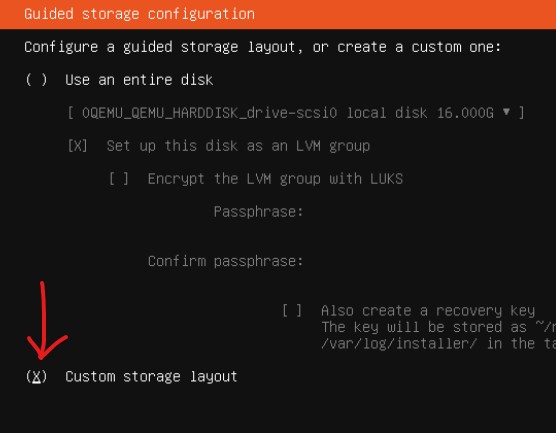
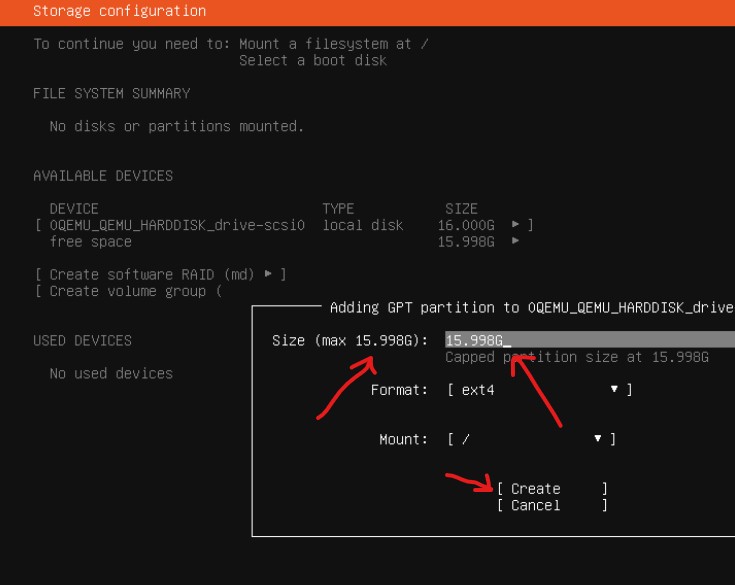
- During the Disk Partition -> Here select “Custom Storage Layout” then select “free space” then “add gtp partition” and enter the max size manually to create the partition.
- User Name / Password -> Self explanatory. Ensure to create a strong user name and password for better security. Write it down, dont forget as otherwise wont be able to access this VM.
- OpenSSH -> During the install wizard, when this screen comes, ensure to turn on the check box to install OpenSSH Server.

Keep everything else as default and proceed with the installation. Depending on your server hardware configuration, it may take some time to complete the installation. Once done, the screen will ask you to reboot the VM. Go ahead and reboot it.
VM Remote Access
There are two ways of accessing this VM. You can access it via Console in Web UI or your can remote access it from any PC within same LAN network via SSH using the Windows CMD (command Prompt). Both ways works fine, choose any of the ways which you feel comfortable with. I am accessing the VM from my work/personal PC, which is in the same network via Windows CMD.
For this, all you need to do is open Windows CMD, type command ssh username@VM.Local.LAN.IP In my case, it is ssh hunky@192.168.1.48
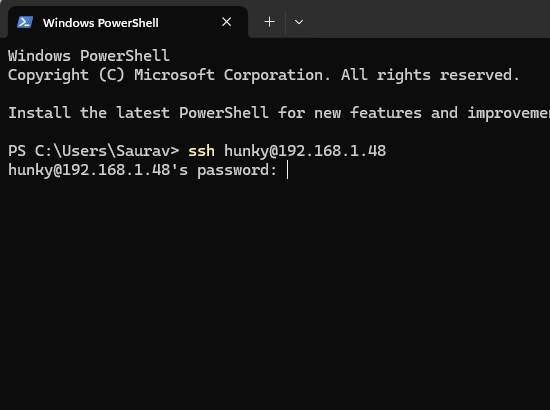
Enter your credentials as prompted and you are now logged in
Update & Docker Installation
Let’s run the bellow commands one by oNginxne, to first update the VM and then install Docker with Docker compose for container deployment.
Ubuntu Server LTS Update
Run the bellow commands one by one to update Ubuntu Server.
sudo sutimedatectl set-timezone Asia/Kolkata -> Adjusting Date & Timeswapoff /swap.img && dd if=/dev/zero of=/swap.img bs=1M count=512 && chmod 600 /swap.img && mkswap /swap.img && swapon /swap.img -> Adjusting Swap Fileapt update && apt upgrade -y && reboot
The VM will now update and reboot after the last command. So log in again after reboot for next process.
Installing Docker / Docker Compose
Run the bellow commands one by one to install docker and docker compose.
sudo suapt install apt-transport-https ca-certificates curl software-properties-common -ycurl -fsSL https://download.docker.com/linux/ubuntu/gpg | sudo gpg --dearmor -o /usr/share/keyrings/docker-archive-keyring.gpgecho "deb [arch=$(dpkg --print-architecture) signed-by=/usr/share/keyrings/docker-archive-keyring.gpg] https://download.docker.com/linux/ubuntu $(lsb_release -cs) stable" | sudo tee /etc/apt/sources.list.d/docker.list > /dev/nullapt update && apt install docker-ce -y && reboot
The VM will now update and reboot after the last command. So log in again after reboot for next process.
Nginx Proxy Manager
Docker Container Deployment
So far, we have installed proxmox in our PC/Laptop & converted that into a server. Created 2 VM and installed Ubuntu + Docker with 2GB RAM & 16GB boot disk in VM 1. Now it is time to install and deploy the software which we are going into run this is 1st VM, that is Nginx Reverse Proxy via Nginx Proxy Manager. For this, we are going to use the official docker container of Nginx Proxy Manager. To do that, simply login to VM and run the below commands one by one.
sudo sumkdir -p npm && cat > npm/docker-compose.yml << 'EOF'
services:
app:
image: 'jc21/nginx-proxy-manager:latest'
restart: always
ports:
- '80:80'
- '443:443'
- '81:81'
volumes:
- ./data:/data
- ./letsencrypt:/etc/letsencrypt
EOFcd npmdocker compose up -d
Accessing Nginx Proxy Manager GUI
To access the Web UI, open your browser from work PC and visit http://VM.Lan.IP:81
In my case, it is https://192.168.1.48:81 The default login User ID / Password is admin@example.com / changeme


Once logged in, you would be asked to change the user name and password. So go ahead and setup a strong User ID and Password.
Domain DNS Setup
Using CloudFlare
Before we configure the Nginx Reverse Proxy, we need to setup our domain or subdomain to point to our local router’s Dedicated Static Public IPv4. This is an additional paid value added service, which you need to obtain from your ISP. AirTel offers free Static Public IPv4 in their business fiber broadband plans and you can request Static Public IP from any local cable internet with additional charge on top of your monthly internet bill. 1 Static IP is around Rs. 2000/- to Rs. 4000/- per year, depending on your location and ISP in India.
First step here is to point the domain or subdomain to your Static Public IPv4. You can do that via your domain registers control panel, if they are offering DNS Manager. If they don’t, you can also use cloudflare free account. In our case, we are showing you how to do this using a fresh domain.
Step 1 -> Get / Register a domain
If you already have a domain name, you can use a subdomain of that, otherwise, let’s assume you dont have any. In that case, let’s proceed with a domain name purchase. You can use any domain registerer like Godaddy, NameCheap, BigRock or any other you prefer. For this project, we are purchasing a new domain name LazyTourer.PW for 1 year.
Step 2 -> Creating Free CloudFlare account
You will need to create a free cloudflare account from cloudflare.com

The process is really simple like creating a new email account or such. Just feeling up the form and your account will be ready. Remember, they will offer many trials or this and that, do not activate any trial. Stay on the FREE cloudflare account only.
Adding domain to CloudFlare Dashboard
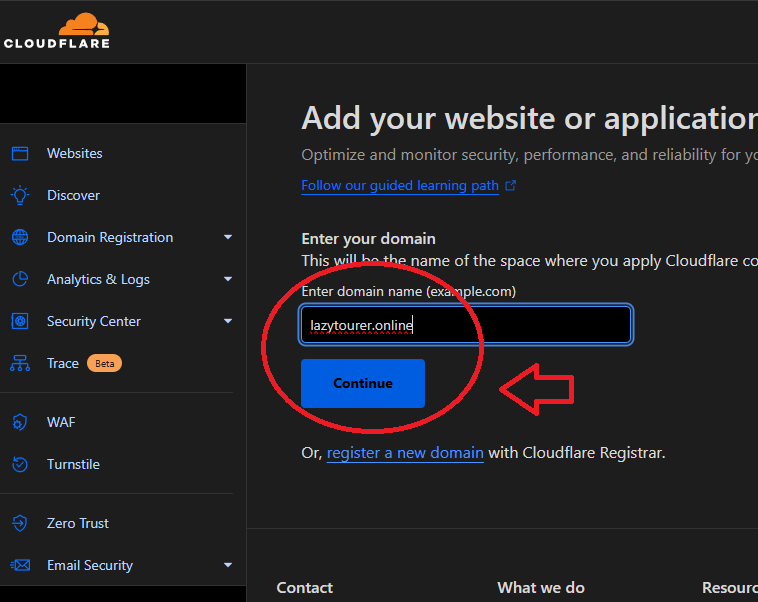
Open the CloudFlare.com website and click login to enter your user name and password to sign into your Free CloudFlare account. In the main dashboard, at your right hand side, you can find an option to add a new site, click that.

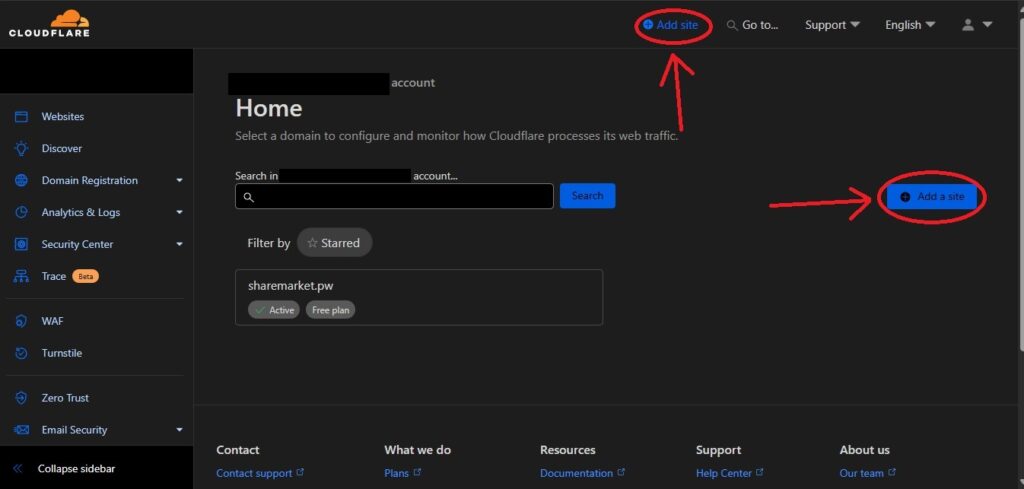
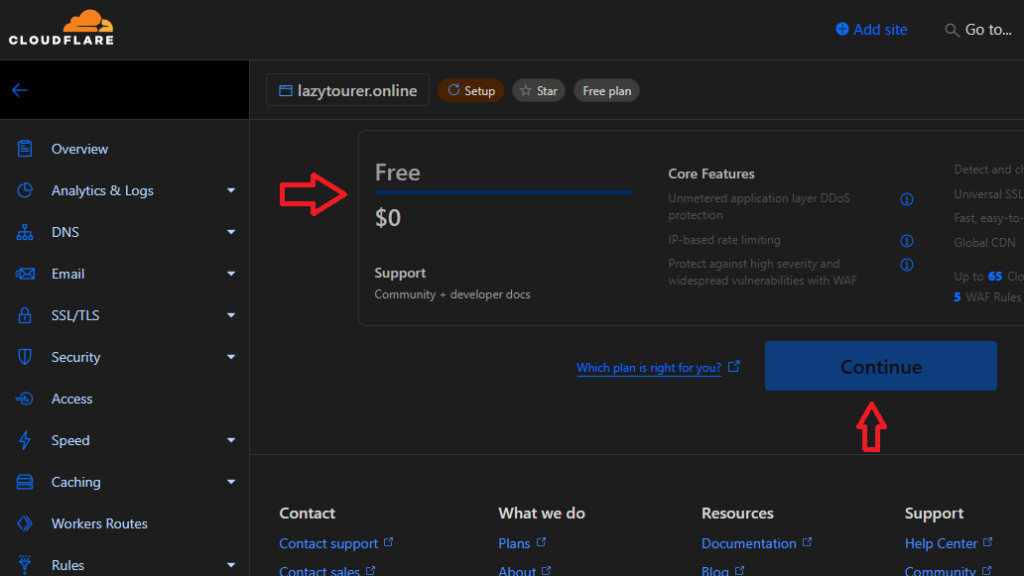
Enter your domain name and ensure to select the FREE plan and click continue. Remember, we only need the free plan, do not avail any trial or such options. Just select the free plan, that is sufficient for the project and our need.
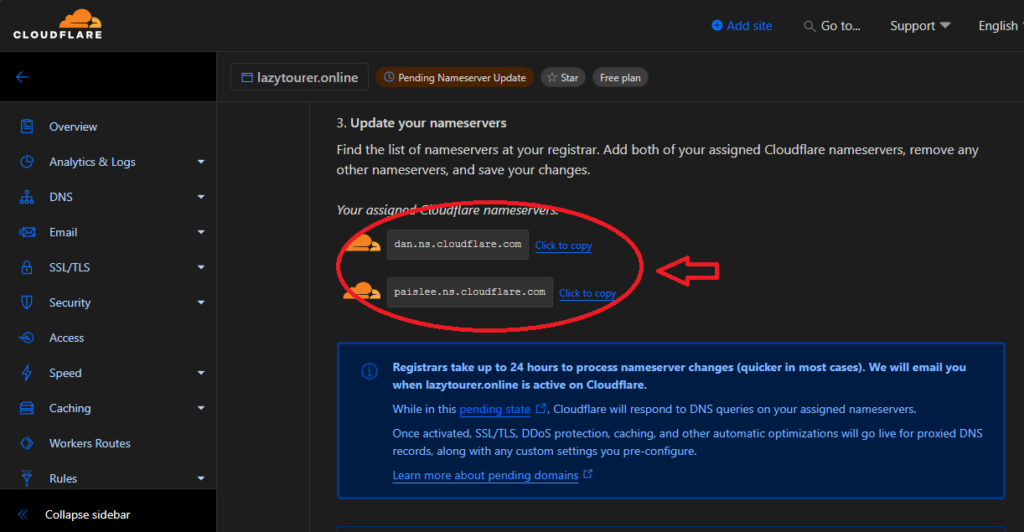
On the next page, delete if any previous / existing DNS record is found. Ensure that there are no DNS records by deleting any such entries and continue to next step. In the next step, cloudflare will generate two NS record entry for your domain. Copy those two records into a notepad file. Then click continue in the bottom to complete the domain addition process.

Adding CloudFlare NS Records to your New Domain
Process is very similar in every domain selling company or domain registrar but their website navigation would be little different. You can refer to their help section or simply search on how to change NS (Name Server) record for the domain registration company you have used. You need to delete the default NS entry for this new domain of yours and add the cloudflare given values. For our case, we have done so for this new LazyTourer.PW domain.

Usually it takes around 10/15 mins for the records to get updated, but for some rare cases, it may take upto 48 hours for the records to update and the domain is shown active in your cloudflare account. You have to wait till the domain is shown active in your cloudflare account.

Once changes are applied, you can see your domain as active status in cloudflare account page.
Creating DNS Records
Once the domain is shown active within cloudflare panel, we can now proceed towards DNS record creation to point the domain and required subdomains to your local Static IPv4.
For that, under cloudflare panel main page, click on the domain name. There, under Left hand Side navigation panel, click the option DNS and then records. Here at this page, we can now add our desired DNS Records. For our project, we want our domain & all subdomain names to point to our ISP given Static Public IPv4 address. So click the option add record all add following two entry
| Type | Name | IPv4 | Proxy | TTL |
| A | @ | your.static.publc.ip | Off / DNS Only | 1 Mins |
| CNAME | * | your.domain | Off / DNS Only | 1 mins |


CloudFlare API Token for SSL
For traffic encryption, we need to have SSL certificates. Our Nginx Proxy Manager will do the job using Let’s Encrypt and via CloudFlare API Token. So we need to create and obtain our CloudFlare API Token to use it within our local server Nginx Proxy Manager.
Under CloudFlare account, click “profile” at Top Right Hand corner of the screen. In the profile page, at left hand side menu, select API Tokens and within API Token page, click “Create Token” and Select “Edit Zone DNS” to use that template.


Now in the User API Token page, select following options to generate the token.
Permissions -> Zone / DNS / Edit
Zone Resources -> Include / Specific Zone / Your.Domain

Rest Stays Default. Continue to summery and create the token. Copy the token in a note pad file, we need to use it within our Nginx Proxy Manager
Port Forwarding to Nginx VM
We need to forward ports from our router, which has our ISP given Static Public IPv4 to our Nginx VM. Very simple process, all consumer end routers have this port forwarding feature but it only works, when you have a dedicated public static ip.

We are forwarding 3 ports, 80 / 443 & 3472 from our Public Static IP to our Nginx VM Static LAN IP.
Nginx Proxy Manager Configuration
Login to the dashboard of Nginx Proxy Manager (located at http://your.vm.lan.ip:81) and click certificates. There, click Add Certificate Button and select the option called “Let’s Encrypt via DNS”. That will bring the configuration window, there enter following details,
Domain Names -> YourDomain.TLD and *.YourDomain.LTD
DNS Provider -> CloudFlare
API Token -> Replace the token value with your own that we have just generated at CloudFlare setup process.
Click Save to allow Nginx generate the SSL Certificates from Let’s Encrypt via CloudFlare.


Adding Host
Now click on Host, then Proxy host and “Add Proxy Host” in the next page. This will bring up the configuration page to add the domain / subdomain for our Nextcloud Server access.


Here are the details we need to enter.
Under “Details” & SSL Tabs Tab,
| Domain Names | Yourdomain.TLD |
| Scheme | http |
| Forward Host / IP | Your.NC.VM.IP |
| Forward Port | 11000 |
| Websocket Support | Turn On (YES) |
| SSL Certificate | Select Your SSL |
| Force SSL | Turn On (YES) |
| HTTP/2 Support | Turn On (YES) |
Rest Stays Default, click save to activate the Host under Nginx Proxy Manager.


Proxmox Server
Deploying Nextcloud AIO
Now it is time to deploy nextcloud aio in our second virtual machine. We have previously created 2 VM, but installed Ubuntu along with docker and nginx software to prepare the 1st VM. Process is exactly same till installation of docker. So follow that previously shown process to install Ubuntu & Docker.
Once you have finished the process of Ubuntu installation, updating then docker installation and rebooting the VM, login in to run following commands by the one to deploy the Nextcloud AIO.sudo su
mkdir -p nc && tee nc/docker-compose.yml << 'EOF'
name: nextcloud-aio
services:
  nextcloud-aio-mastercontainer:
    image: ghcr.io/nextcloud-releases/all-in-one:latest
    init: true
    restart: always
    container_name: nextcloud-aio-mastercontainer
    volumes:
      - nextcloud_aio_mastercontainer:/mnt/docker-aio-config
      - /var/run/docker.sock:/var/run/docker.sock:ro
    network_mode: bridge
    ports:
      - 80:80
      - 8080:8080
      - 8443:8443
    environment:
      APACHE_PORT: 11000
      SKIP_DOMAIN_VALIDATION: true
volumes:
  nextcloud_aio_mastercontainer:
    name: nextcloud_aio_mastercontainer
EOF
cd ncdocker compose up -d

Now open up your browser and visit https://nc.vm.ip:8080 in my case, it is https://192.168.1.49:8080 This will bring up the installation page for Nextcloud AIO. This page will show you the temporary password, which is needed to proceed with the installation. Copy that Passphrase so that we can proceed by clicking “Open Nextcloud AIO Login”. There at that login page, enter or paste your passphrase to log in.


Now for the installation configuration page, first is to enter your domain or subdomain, which you have DNS configured for your public static ip and done setup in Nginx Proxy Manager. In my case, here, it is nc.lazytourer.pw so I am submitting that to proceed to the next page. Here at the next page, select the following under optional containers,
Collabora (Nextcloud Office) / Imaginary / Nextcloud Talk / Docker Socket Proxy / Whiteboard
Then hit save changes, and click download and start containers.


Depending on your internet connection speed and server hardware configuration, it may take a while for the installer to download all the container images, install the dependencies and start the services. Rarely, but it happens, the page may return this kind of error, where you may be asked to stop / update and run again.

Once the installation finishes successfully, you will be presented with the link and initial password for Nextcloud administrative Login credentials. Ensure to copy that password for future use. Now click that login.


That’s it, we have our nextcloud server up and running. Anyone with user account in this server can now access it via internet from anywhere in the world.

VM Start at Server Boot
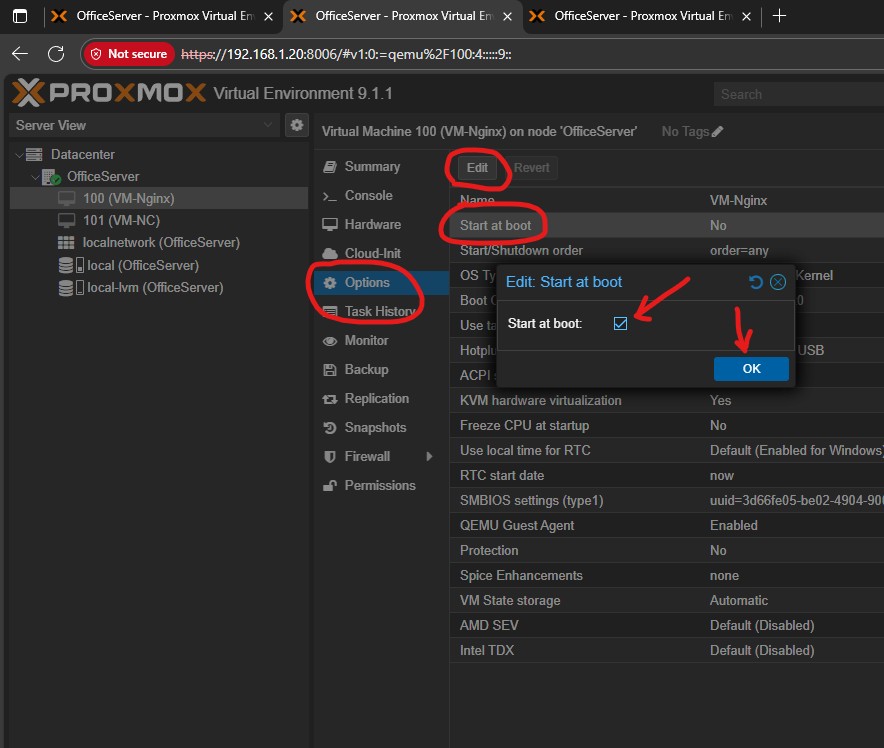
After the setup process is complete and we have successfully tested everything to our satisfaction, we need to edit both VM setting at proxmox to ensure that the VM start itself automatically during proxmox server boot.
In Proxmox Web UI, right click on each VM and select shutdown to shutdown each VM. Then select the VM -> Option -> then select Start at Boot and click the edit button to turn on the option to start the VM during server boot. Do this for both VM.

Data Backup and Disaster Recovery
We are using a laptop or a desktop with single drive as our server. Hardware can fail at any time. If CPU, Power Supply, RAM or Motherboard type part fails, you can simply replace the item and server will be running again. But with single storage drive, storage disk failure means complete loss of data. So, we need to have regular backups. For that, we are going to use an external USB storage disk. It can be SSD or Hard Disk and as mentioned earlier but it should be at least 2x the size of server disk to allow at-least 2 copies of backup.
Adding USB Disk for Backup in Proxmox
For our case, we are using an USB C Type External NVMe Drive. To use this, simply connect the drive to the correct (fastest available) USB Port of the server. Then at Proxmox Web UI, click on your server name, in our case it is “OfficeServer”, then go to “Disks”. Here, the new Disk should be visible. If not, you can hit reload to check.

Select the Disk, click “Wipe Disk” to format and clean all data to prepare it for use in Proxmox. After that, select the disk, click “Initialize Disk with GTP”.


Now go to “directory” option below disk, there click on “Create Directory” and at the pop up, select following,
Disk -> Select USB Disk
FileSystem -> ext4
Name -> Give it a name
Add Storage -> Turn on
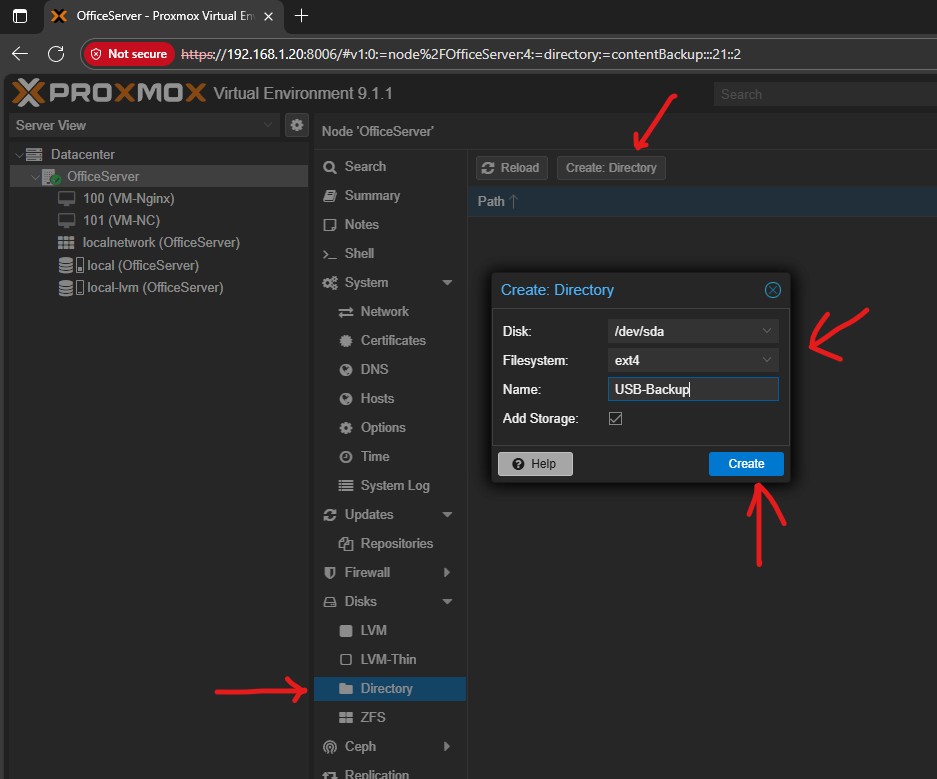
Now the external USB disk drive is available for use as backup in our proxmox server.

Backing up VM to External USB Drive
Once the disk is setup and connected, we can proceed towards backup of two of our VM. For that, select the VM you wish you backup. Then click on backup in the right side menu and click on Backup now. This will bring the backup settings pop up. There, everything stays default, just ensure to select the USB Backup disk and change the backup mode to “stop”. You can write note, like for us, we prefer putting the date as easy identification.

Repeat the process for each VM.
Once the backup is done, shutdown the server, disconnect the USB Drive and start the server. Our VMs are configured to auto start with the Server.
VM backup Restoration in Proxmox Server
Ensure the USB Disk is connected and storage is visible in Proxmox Storage Section. There, select Backup in right side menu. That will show all the backups along with the note your wrote. Select your desired backup which you wish to restore and simply click restore to start the restoration process.

Update & Maintenance
Once every 2 to 3 months, consider updating the setup to keep it safe, secure and proper performing with latest security & feature updates of the software. There are 4 things to update here.
* Proxmox Server (Host HyperVisor)
* Ubuntu Server (VM Guest OS)
* Nginx Proxy Manager Docker Container
* Nextcloud AIO Docker Container
Before you proceed with update, always ensure to take a fresh backup first and then update. In case something goes wrong during update, you can always restore the backup and come back.
Proxmox Server Update
Select the server in Proxmox Web UI left hand side menu. Then click update and in working pane, you can click refresh to check the list of available updates. The upgrade button is to proceed with download and installation of the updates.

Ubuntu Server Update
Log into each VM then run the following commands one by one to update and reboot the systemsudo suapt update && apt upgrade -y && reboot
Nginx Proxy Manager Docker Container Update
Log into Nginx VM. Run the following commands one by one by simply copy pasting them,sudo sucd npmdocker compose stopdocker compose pulldocker compose up -d
Nextcloud AIO Docker Container Update
Log into the Nextcloud using your admin account (which you have received during installation). Click on the user icon at top right hand side corner of the page and click “Administration Settings”. There, under administration over view in left hand side menu, you can find the link to open Nextcloud AIO management page.


Now if any update is available, this page will inform you that. If there is update available, then click stop containers and then click update containers to download and install the updates.


Have Questions?
If you have any question or suggestion or want to say something, below comment section is open for you. Feel free to drop us a comment.