Whenever we are searching for any content relating to Home Server or Self Hosting, often we see people showcasing setups with Linux or FreeBSD based operating systems for their built or virtualization. Not only that, for anything relating to Virtualization, we may see people using VirtualBox and VMWare for Windows based computers.
Rarely we may see someone highlighting the use of Microsoft Hyper-V.
What is Microsoft Hyper-V
Microsoft Hyper-V is a hypervisor. Just like VirtualBox or VMWare, it is a tool to create, run, manage and maintain Virtual Machines in your computer. Microsoft Hyper-V is really a powerful tool having similar feature or performance like what you may expect from Proxmox or UnRaid based VM in a server environment.
You may wonder, if this is such a great software, then why is no one talking about it?
Short answer is licensing cost. Microsoft Servers are really costs compared to Free Linux based Operating systems like Proxmox. In fact, it is so costly that paid options like Unraid feels super cheap when compared to an open retail license of Microsoft Server Datacenter Edition.
However, you dont need to have Windows Server edition to use Microsoft Hyper-V. Pro and Enterprise versions of Windows 10 or 11 comes with Microsoft Hyper-V built in. A large business or organization wont run their servers with Windows Consumer Edition software like Win10 or Win11 but for a small business or home server environment, Windows 10 or 11 licenses are dead cheap and often our desktops or laptops are already preloaded with Win10 or Win11
In this article, we shall learn the basics of Microsoft Hyper-V for Windows 11 Professional. However to install Microsoft Hyper-V on Windows 11 and then how to create, run, manage and maintain the VMs with Microsoft Hyper-V.
How to Install Microsoft Hyper-V in Windows 11?
First of all, you need to have a PC (mainly CPU) supporting Virtualization. Good thing is that anything built in past 10 years is compatible with this. But for older Intel or AMD systems, you need to check if your CPU supports Virtualization. Secondly, you may need to ensure that virtualization is turned on in your computer BIOS. Mostly it would come turned on but just in case. Ensure to consult your motherboard or laptop manual to check how to do it.
Microsoft Hyper-V is a built-in tool of Windows 11 but it is not enabled by default. To install it, you just need to enable the feature.
Go to Control Panel of your Windows 11 by typing control panel in start menu search bar. Click & Open the control panel as the results come up. Now in the Control Panel, click “Programs” and then “Turn Windows Features on or off”


It will open up a small Window, there scroll down to find the option Hyper-V to click the check mark to turn it on and click ok. Windows now will download the needed files from Microsoft Update Server and complete the installation. Depending on your Internet Connection Speed, it may take some time for the installation to complete and then reboot the PC.

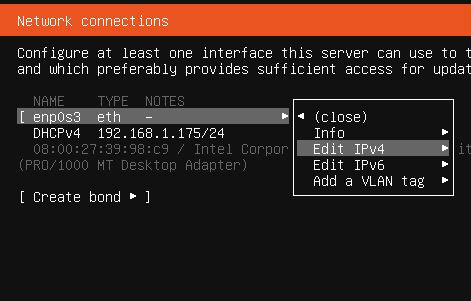
Network Bridge / External Network
Hyper-V is now installed and you can open the software from start menu icon called Hyper-V Manager. Open the Hyper-V Manager and there in Right Hand Side Menu, you can find an option called “Virtual Switch Manager”.


Click it to open the Virtual Switch Manager and there we need to create an external virtual network switch. Select External, click “create virtual switch. Name your switch, in our case, we are calling it Hyper-V and Select External Network and select your LAN Card then click apply to complete the virtual switch creation.


Create a VM in Hyper-V

In the Hyper-V Manager, click “Action” in top menu then “New” and then “Virtual Machine”. You can also do the same via right side menu, there click new and then virtual machine to bring up the Virtual Machine Creating Dialog Box.
This wizard will now guide us on creating the basic Virtual Machine Template. So lets fill up the details. First thing we need to do is name the VM. In our case, we are naming it, VM-U24-WP as for easy understanding. You can name it anything that you wish. Then is to select the location of VM, in our case we are selecting a folder named Hyper-V in one of our SSD for faster loading. Click Next to specify the generation, we are going to select Generation 2 here and then click Next Proceed.


Now is the time select RAM, here we are going to enter 2048 as for 2GB and ensure to check that Dynamic Memory option on. Then proceed next to select our virtual network switch. We shall select the External Switch that we have created. In our case it is named “Hyper-V” and click next to proceed forward. Now in this next Window, Hyper-V will automatically fill up most of the needed details for virtual disk creation. We just need to adjust the Disk size. For our use case, 16GB should be good enough. You can give as much as your website would need. In the next Window, we would select “Install Operating System Later” and click next to proceed to complete the VM Creation.


Download Ubuntu 24 LTS Server
Our VM needs an OS to run. We can install any Operating System of our liking. It can be Windows or Linux of your choice. In this example, we are installing Ubuntu Server 24 LTS. So for that, open up your browser and go to Ubuntu Download Website and download the latest LTS release of Ubuntu Server Edition. At the time of writing this article, the latest version if Ubuntu Server 24 LTS. You will get an ISO file for OS Installation.

Prep The VM
At this point, we have a VM created and downloaded the Operating System ISO file for OS installation. But before we can proceed towards the installation of Ubuntu in this VM, we need to make some minor changes in the configuration for optimized operation.

For that, open the Hyper-V Manager, then select the VM and in right side menu, click settings to bring up the VM settings Window. In that Window, we start from the bottom.
| Automatic Stop Action | Shutdown the Guest |
| Automatic Start Action | Nothing |
| Checkpoints | Disable the Checkpoints |


| Integration Services | Turn Everything ON |
| SCSI Controller | Select DVD Drive -> Click Add -> Select Image -> Select your Ubuntu ISO |


| Processor | Enter your CPU Thread count in Number of Virtual Processor -> For us, it is 12 for our Ryzen 5 CPU |
| Memory | Maximum RAM -> 2048 |
| Security | Disable the Secure Boot |


Now click apply to implement the changes but don’t click OK to close the Window. Once the changes are applied, click on the first option called Firmware and then move up the DVD Drive with Ubuntu ISO file to the top as first boot device.

Now click apply and OK to close this Window.
Installing Ubuntu Server VM
Open the Hyper-V Manager. Select the VM, and then click Connect on the right side. This will bring up the display for the VM. But at present, the VM is in shutdown mode, not running. So click Start to start the VM for Ubuntu Installation.


We have covered step by step installation of Ubuntu Server multiple times in our website for various other projects, you may follow any of those or there are many great YouTube videos and website article showing every step, you can follow that too. It is actually very simple, like installation any other software. A few clicks of Next / Next and Next to proceed forward while it does the installation in background.
Just few things to keep in mind while you are clicking next,
Server Needs Static IP -> You can setup static IP via your router DHCP with Mac Binding or you can setup a static LAN IP address inside Ubuntu while installing the Ubuntu Server. Do it as per your wish.
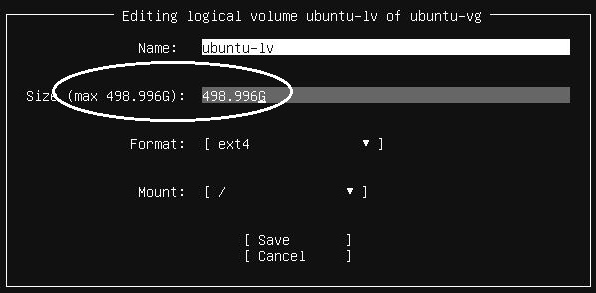
Disk Partition Size -> When on selecting hard disk partition layout, just change one option for disk size. Ubuntu installation by default leaves out some of the disk as empty, so here just input the max capacity, which is write just left of the input box. Simply write that max value as it is and save to proceed.


Remote Access -> Make sure to turn on the SSH Server Installation option and complete the installation without adding anything extra from the optional installation list.
That’s it. Keep rest of the stuff default and proceed with the installation completion till reboot.
Once the install completes and system asks you to remove the installer media and then press enter to reboot, just go back to Hyper-V Manager, select the VM and click settings in the right side menu to open the up the VM configuration. Navigate to SCSI Controller, then select the DVD drive and click remove and apply. Now come back to the VM screen and then press enter to reboot the VM.


Managing the VM

Hyper-V Manager will list all the VMs and show their operational state. In the above screenshot, you can see that we have multiple different VMs with different operating system created. One can select a VM and from right side menu, start, stop or edit the VM configuration and settings.
There is an option at top in the right side menu called “Connect”. For GUI VMs, like for example, Ubuntu Desktop or Windows VMs, you can get their display by clicking on connect.
RAM & Storage
There is no limit on how many VMs you can run or create. The limit is your computers configuration as how much RAM and Storage space you have. A GUI VM like Windows or Linux Desktop may need min of 2GB RAM each to run. Where as a server CLI VM like what we have created in this example may need min of 1Gb to run. That is for the VM OS only. This RAM requirement will increase with additional software that you may install and run within the VM.
Same is true for Storage. Modern OS needs SSD to function properly. You can put your vDisk in Hard Drive but that will make the VMs run painfully slow. Just like a physical PC.
VM Maintenace
You can freely copy your VM vDisc file for backup purpose or even move it to another Windows Computer (Server or PC) and attach it to a VM to start it there.
Device Passthrough
Microsoft Hyper-V does support device passthrough so if you need, you can forward your network, drives, USB or PCI-E devices directly to the guest OS for full physical access.
[…] VM Deployment Guide -> Microsoft Hyper-V for Home Server […]