If you search the internet about this topic, you may find a vast majority of articles and videos are showing you how to install wordpress in your local windows computer with software suites like XAMP / LAMP or etc.
They are not wrong, as those methods will get you a working local wordpress website working within your computer. However, those installation methods are neither production ready nor they are secured enough to run an actual wordpress website and allow people accessing it from the internet.
In this article, we shall share an easy but detailed, technical and in-depth, step-by-step guide on how to install, setup, run, manage & maintain a production ready, highly secured WordPress installation on a home computer. This is comparable to a VPS (Virtual Private Server) or dedicated server, which you may rent out from Cloud Hosting or VPS Hosting service providers to deploy your dedicated WordPress installation.
What is WordPress?
If you are reading this article, then surely know what is WordPress, right? But just in case if anyone is new here, who doesn’t know or needs further clarification to clean in any doubt.
WordPress is a CMS (Content Management System) software. This is installed in a webhosting server. This gives you a ready made website structure which you can easily modify with lakhs of available themes and plugins to create your own website without the need of any coding knowledge. Similar to what you can do with Microsoft Word, just write things, then drag, drop and modify according to your need and what the theme or plugin you are using may allow.
WordPress software is not like what you can download and install, it needs & depends on various other software function. These are called dependencies.
In this article, we shall share the entire process in an easy-to-understand way.
Now in order to selfhost a WordPress website, you need have a few things before you can proceed. Without these prerequisites, you won’t be able to get this working.
Hardware Prerequisites
A website is always accessible, so you need to have a computer in home which is running 24×7 along with power backup option like a home inverter along with an internet connection.
| One PC / Laptop | Internet Connection with Router | Router |
| UPS / Inverter | UPI / Credit / Debit Card | Domain Name |
You don’t need a very powerful PC, older computers or Mini PCs, old laptops or even your primary computer can also do this. Remember, if you shut down the PC, your website also shuts down.
Software Prerequisites
We are going to use all legal software here. We won’t be using any hacked or cracked software.
| Windows 10 / 11 Pro or Ent | Microsoft Hyper-V | Ubuntu Server 24 LTS |
| Docker / Docker Compose | WordPress | MySQL |
| PhpMyAdmin | FileBrowser | CloudFlare Tunnel |
Along with that, we also need a domain name. Just like our website, LazyTourer.com, you also need a domain name for your website. If you already have a domain, you can also use a subdomain of that.
Deploying VM
Most of us, PC users in India, would be running Windows.
Therefore, we are focusing our guide on Windows. We have already written a step-by-step article on how to install Microsoft Hyper-V on Windows 10 or Windows 11 Computer (desktop or laptop). So follow that guide and create a basic VM and install Ubuntu Server 24 LTS in that VM.
VM Deployment Guide -> Microsoft Hyper-V for Home Server
You may use TrueNAS / Proxmox / VMWare / VirtualBox any other Hypervisor to deploy the VM. Process is same inside the VM so it doesn’t matter in which platform this VM is running.
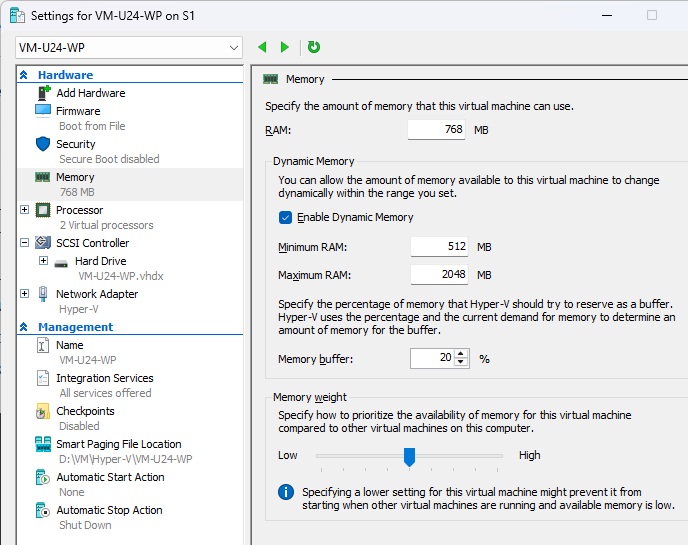
For our use, we are creating a Hyper-V VM with 2 Cores and 2GB RAM along with 16GB vDisk on our Desktop PC running AMD Ryzen 5 CPU along with Windows 11 Pro. For a lightweight and little traffic WordPress website, this is more than sufficient, in fact, our website with very low traffic can run with a single core and 1GB RAM too.
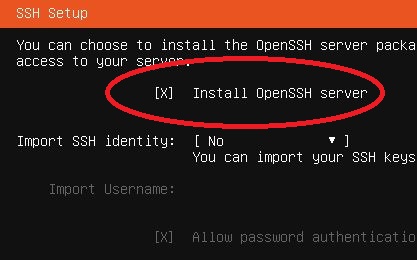
Pro Tip -> During Ubuntu Server installation within your VM, while at the installation wizard, most of the things would stay default, just ensure to turn on the check box for “Install OpenSSH Server” for remote login.
Login & Update Ubuntu Server
First step after installation of Ubuntu Server in your VM is to log in and update the Ubuntu Server. You can use your host PC or any computer within the same LAN network to remotely connect to this Virtual Machine running your Ubuntu Server. Just open up “Command Prompt” in Windows and type the following command,ssh username@local.lan.ip.address -> here, username is the user name of your Ubuntu Server user and local lan ip address is the local LAN IP of the Ubuntu Server VM. In our case, it is following,ssh hunky@192.168.1.42
The system will ask for the password, type the password (remember, for security reason, it won’t be visible) and log in to your Ubuntu Server. Once login, run these bellow commands one by one to update & then reboot the system.

sudo sutimedatectl set-timezone Asia/Kolkata -> Adjusting the Time Zone for ISTapt update && apt upgrade -y && reboot
Adjusting the Swap/Page File
After the update and reboot, log back into the VM, then copy, paste and run the following commands one by one,sudo suswapoff /swap.img && dd if=/dev/zero of=/swap.img bs=1M count=512 && chmod 600 /swap.img && mkswap /swap.img && swapon /swap.img
With the above two commands, we are adjusting and setting up the swap / page file or swap memory to 512MB.
Installing Docker / Docker Compose
After the update and reboot, log back into your Ubuntu Server and run the following commands one by one to install Docker and then Docker Compose,sudo suapt install apt-transport-https ca-certificates curl software-properties-common -ycurl -fsSL https://download.docker.com/linux/ubuntu/gpg | sudo gpg --dearmor -o /usr/share/keyrings/docker-archive-keyring.gpgecho "deb [arch=$(dpkg --print-architecture) signed-by=/usr/share/keyrings/docker-archive-keyring.gpg] https://download.docker.com/linux/ubuntu $(lsb_release -cs) stable" | sudo tee /etc/apt/sources.list.d/docker.list > /dev/nullapt update && apt install docker-ce -yreboot
WordPress Deployment
We are going to use the official Docker Container image from WordPress for this along with some other dependencies from their respective official docker images. Like, the MariaDB/MySQL for database, phpmyadmin for database management, and a web-based file editor (FileBrowser) to access the wordpress files or database for DevOps requirements.
Creating the Directory Structure & Deploying FileBrowser
We are going to put the containers within a single directory in your Ubuntu Server user home folder / directory. The default location of your home directory looks like this -> /home/username. So we are going to create a folder for WordPress in there and create further few folders for each docker containers.
Login to your Ubuntu Server and run the following commands,sudo sucd /home/username -> replace this username with your ubuntu login username
The copy paste this entire command and run it, remember to replace the username with your own ubuntu server user name before running it.
mkdir -p wp/fb && cd wp/fb && cat << 'EOF' > docker-compose.yml
services:
  filebrowser:
    image: hurlenko/filebrowser
    container_name: filebrowser
    user: "${UID}:${GID}"
    ports:
      - 8085:8080
    volumes:
      - /home/username/wp:/data
      - ./:/config
    environment:
      - FB_BASEURL=/filebrowser
    restart: always
EOF
This command will create a docker compose file for file browser along with the configuration code inside that file. Now it is time to run the command to pull the official file browser container image and run it in your local ubuntu server. To do that, run the following commands,sudo sucd /home/username/wp/fb -> Replace the username with your own ubuntu server user namedocker compose up -d
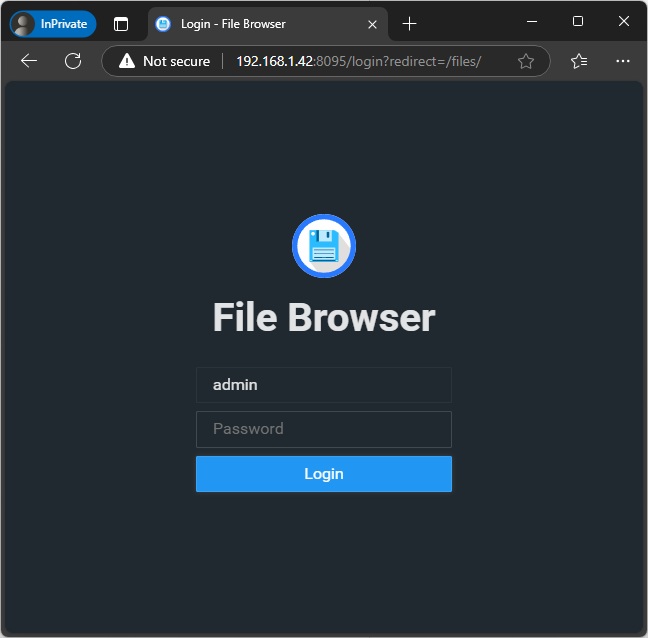
File Browser should now be installed and accessible locally (within your LAN Network) via any browser at http://Ubuntu.Server.LAN.IP:8085
Earlier the default username and password used to be admin / admin for filebrowser but now, they have changed the process and creates a random password for each deployment. To find the filebrowser login password, you need to run folloiwng command and copy the password from section “User ‘admin’ initialized with randomly generated password: xxxxxxxxxx
docker logs filebrowser
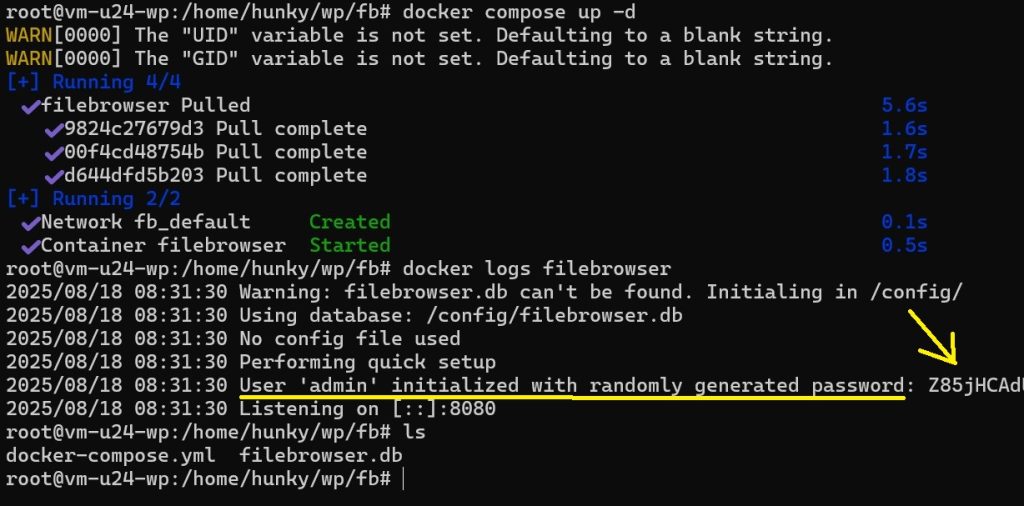
You can select that string using mouse highlighting and then press “enter” key in your keyboard to copy it. Now you have the password and user name is admin. So now we can login via http://ubuntu.vm.lan.ip:8085
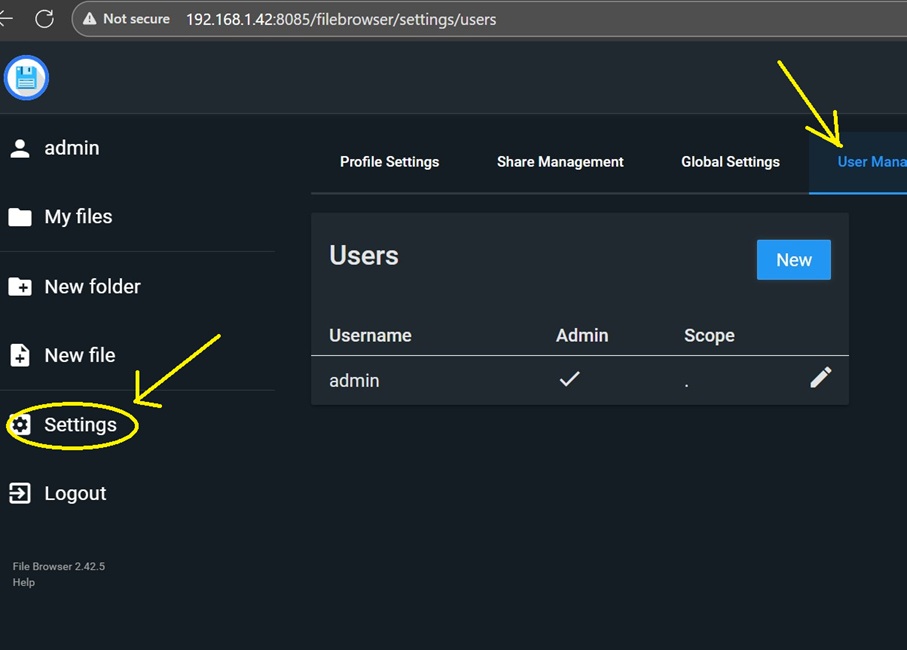
Ensure to change this password with your own to complete the file browser installation.
WordPress Docker Stack Deployment
Now we shall create the docker compose file to deploy WordPress along with all the dependencies from their official docker images. We shall be using WordPress / MariaDB (for SQL) / phpMyAdmin (DB Manager) / Redis Server (Caching)
Run the following commands to create the docker compose file along with the needed configuration code,sudo sucd /home/username/wp -> Replace the username with your own ubuntu server user name
Now copy & this entire command to create the docker compose file for WordPress stack. Remember to replace the passwords, which are written as “Change@Me” with your own.
cat << 'EOF' > docker-compose.yml
services:
  # MariaDB Database
  db:
    image: mariadb:latest
    container_name: wordpress_db
    restart: always
    environment:
      MYSQL_ROOT_PASSWORD: Change@Me
      MYSQL_DATABASE: wordpress
      MYSQL_USER: wordpress
      MYSQL_PASSWORD: Change@Me
    volumes:
      - ./db_data:/var/lib/mysql
    networks:
      - wordpress_network

  # Redis Cache
  redis:
    image: redis:latest
    container_name: wordpress_redis
    restart: always
    networks:
      - wordpress_network

  # WordPress Application
  wordpress:
    image: wordpress:latest
    container_name: wordpress_app
    restart: always
    environment:
      WORDPRESS_DB_HOST: db
      WORDPRESS_DB_USER: wordpress
      WORDPRESS_DB_PASSWORD: Change@Me
      WORDPRESS_DB_NAME: wordpress
      WORDPRESS_CONFIG_EXTRA: |
        define('WP_REDIS_HOST', 'redis');
        define('WP_REDIS_PORT', 6379);
        define('WP_CACHE', true);
        define('WP_MEMORY_LIMIT', '256M');
        define('WP_MAX_UPLOAD_SIZE', '250M');
    volumes:
      - ./wordpress_data:/var/www/html
    ports:
      - "8000:80"
    depends_on:
      - db
      - redis
    networks:
      - wordpress_network

  # phpMyAdmin for Database Management
  phpmyadmin:
    image: phpmyadmin:latest
    container_name: wordpress_phpmyadmin
    restart: always
    environment:
      PMA_HOST: db
      PMA_ARBITRARY: 1
      UPLOAD_LIMIT: 250M
    ports:
      - "8080:80"
    depends_on:
      - db
    networks:
      - wordpress_network

# Define the network
networks:
  wordpress_network:
    driver: bridge

# Volumes for persistent data
volumes:
  db_data:
    driver: local
    driver_opts:
      type: none
      device: ./db_data
      o: bind
  wordpress_data:
    driver: local
    driver_opts:
      type: none
      device: ./wordpress_data
      o: bind
EOF
Now run the following command for deployment and installation,docker compose up -d
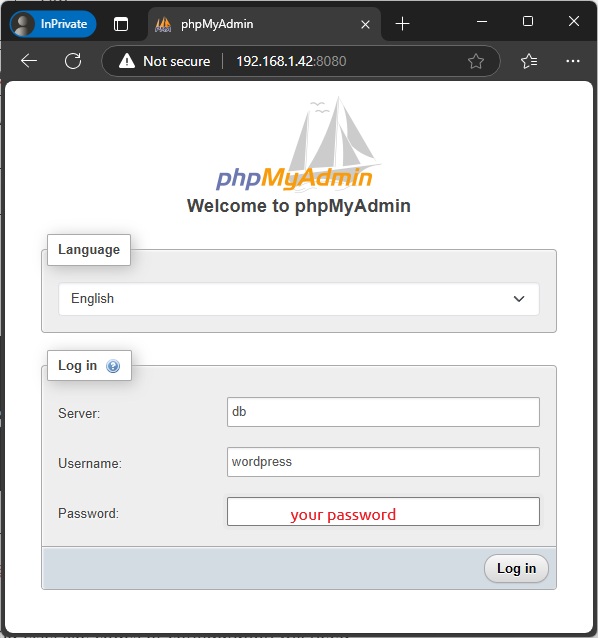
WordPress and phpmyadmin is how available at these following URL,
| File Browser | phpmyadmin | WordPress |
| http://Ubuntu.Server.LAN.IP:8095 | http://Ubuntu.Server.LAN.IP:8080 | http://Ubuntu.Server.LAN.IP:8000 |
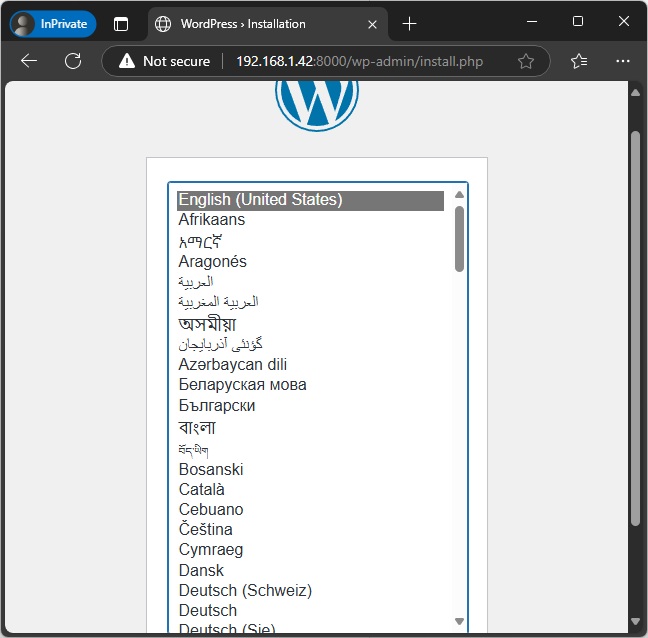
Do not proceed with the installation of WordPress yet. Before we proceed, we need to configure our domain name and cloudflare tunnel.
Domain Name
First step in this project is to register a domain name. In our case, although we have a domain name, but for this project, we are buying another domain name. It is LazyTourer.PW
So go ahead and register your domain name since everything else, like codes or configuration will need this domain name of yours.
Yes, if you are wondering, you can also use a subdomain on your existing domain to continue with this project.
CloudFlare Setup
You will need to create a free cloudflare account from cloudflare.com
The process is really simple like creating a new email account or such. Just feeling up the form and your account will be ready. Remember, they will offer many trials or this and that, do not activate any trial. Stay on the FREE cloudflare account only.
We are going to use three features of CloudFlare,
1. CloudFlare DNS Management
2. CloudFlare Tunnel
3. CloudFlare Given Fully Signed and verified SSL Certificate
Adding domain to CloudFlare Dashboard
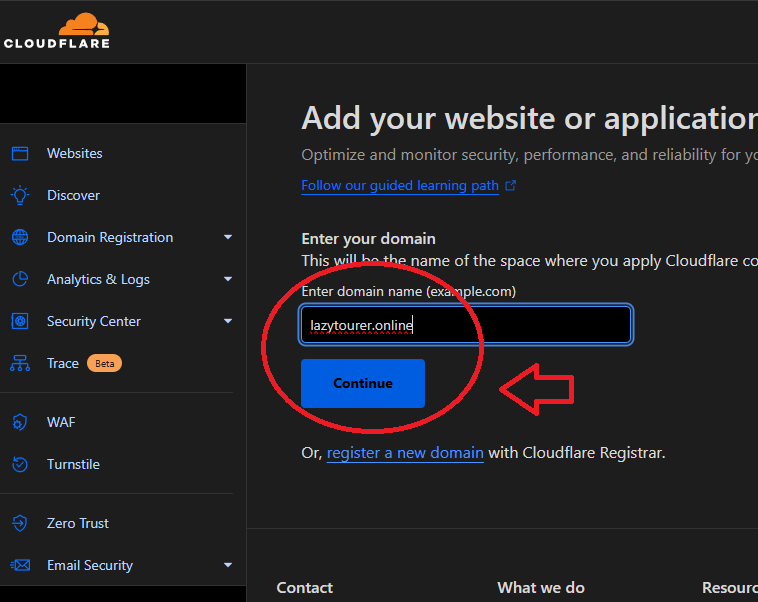
Open the CloudFlare.com website and click login to enter your user name and password to sign into your Free CloudFlare account. In the main dashboard, at your right hand side, you can find an option to add a new site, click that.

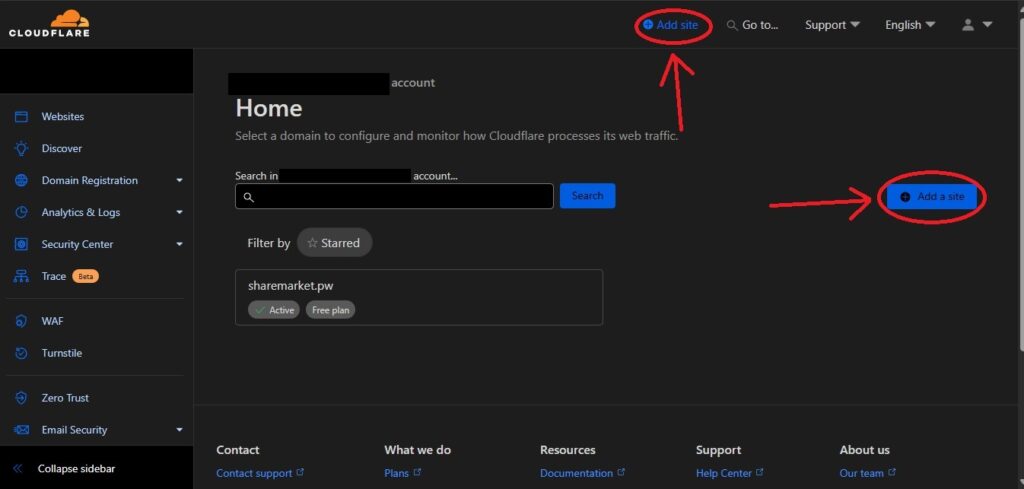
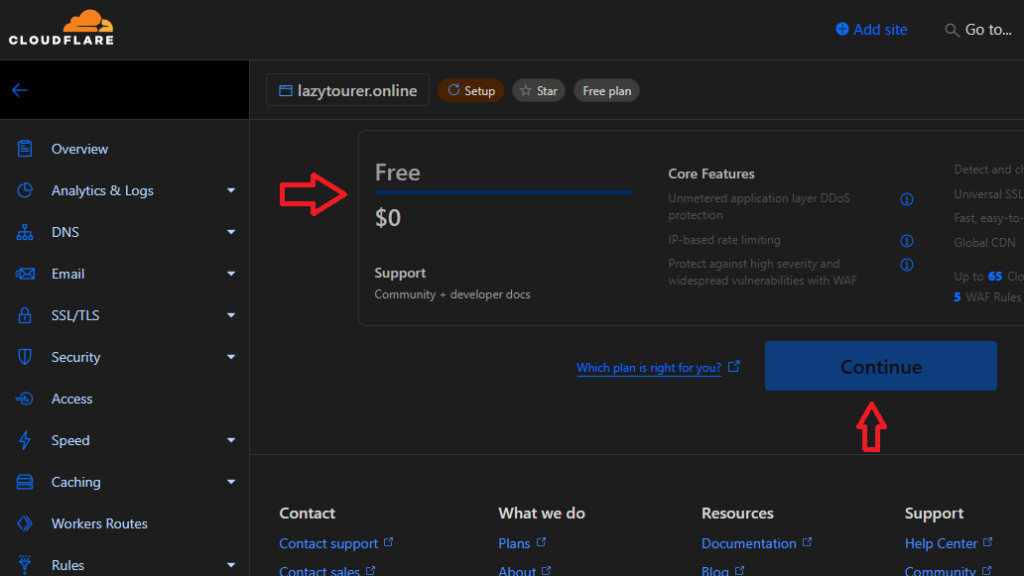
Enter your domain name and ensure to select the FREE plan and click continue. Remember, we only need the free plan, do not avail any trial or such options. Just select the free plan, that is sufficient for the project and our need.
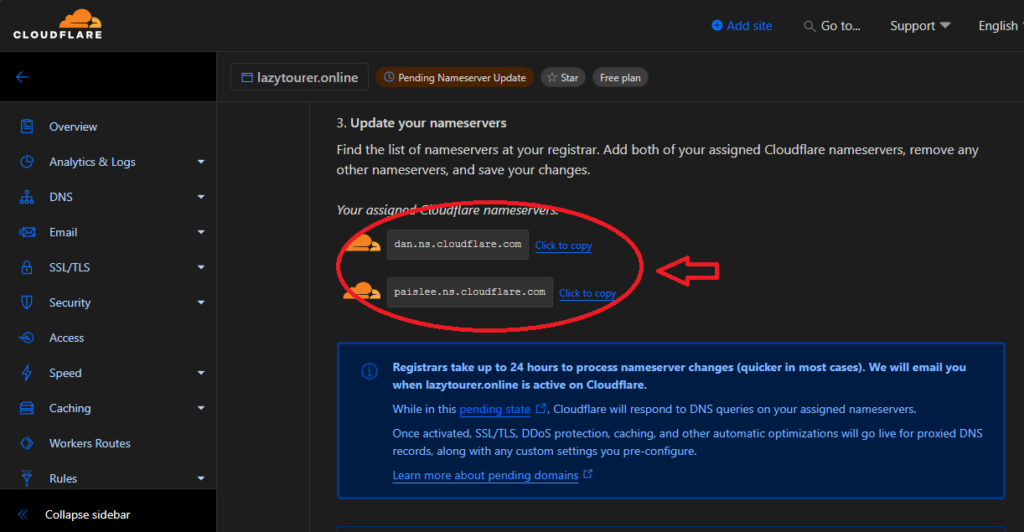
On the next page, delete if any previous / existing DNS record is found. Ensure that there are no DNS records by deleting any such entries and continue to next step. In the next step, cloudflare will generate two NS record entry for your domain. Copy those two records into a notepad file. Then click continue in the bottom to complete the domain addition process.

Adding CloudFlare NS Records to your New Domain
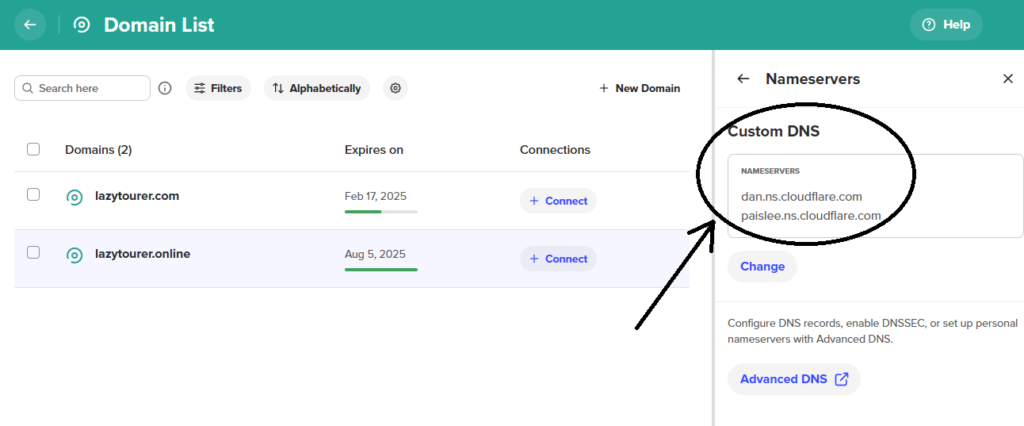
Process is very similar in every domain selling company or domain registrar but their website navigation would be little different. You can refer to their help section or simply search on how to change NS (Name Server) record for the domain registration company you have used. You need to delete the default NS entry for this new domain of yours and add the cloudflare given values. For our case, we have done so for this new LazyTourer.Online domain.
Usually it takes around 10/15 mins for the records to get updated, but for some rare cases, it may take upto 48 hours for the records to update and the domain is shown active in your cloudflare account. You have to wait till the domain is shown active in your cloudflare account.
Once changes are applied, you can see your domain as active status in cloudflare account page.
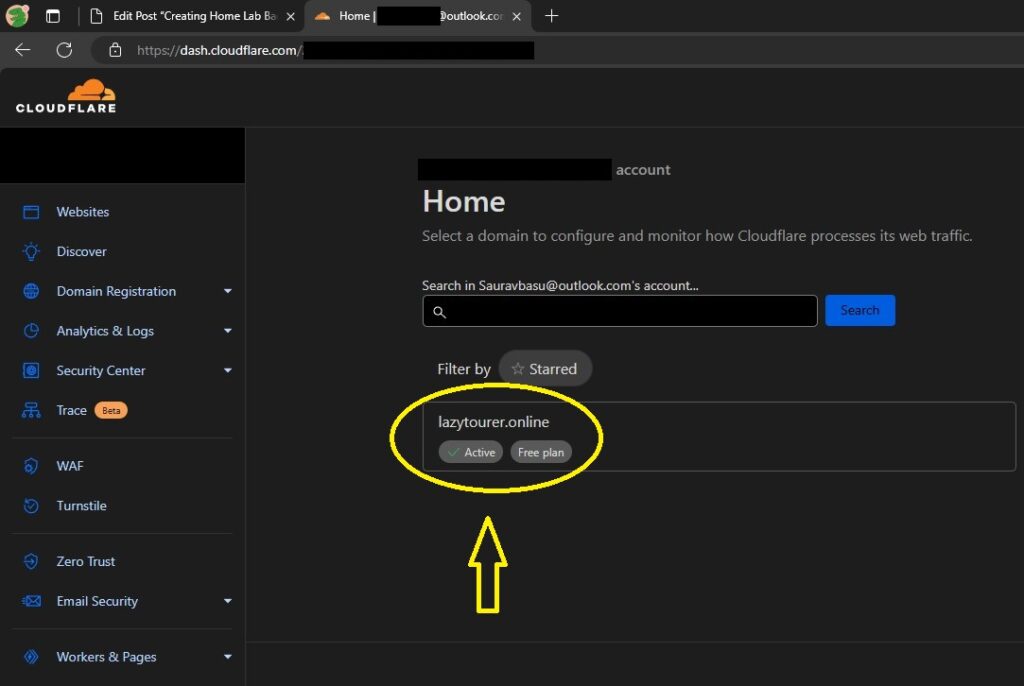
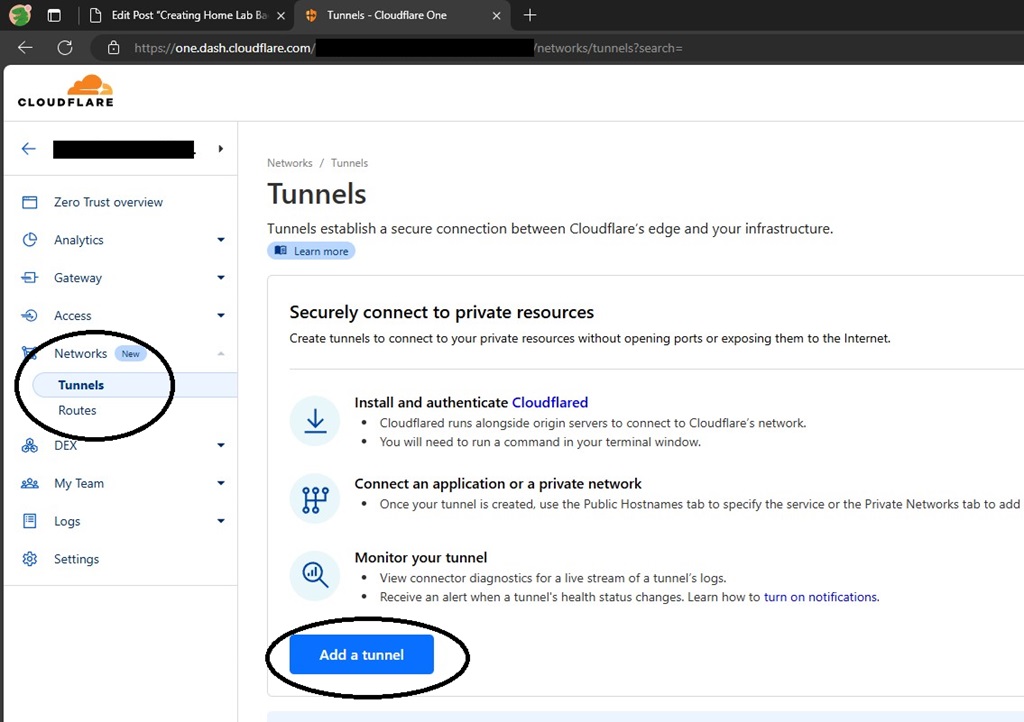
Creating CloudFlare Tunnel
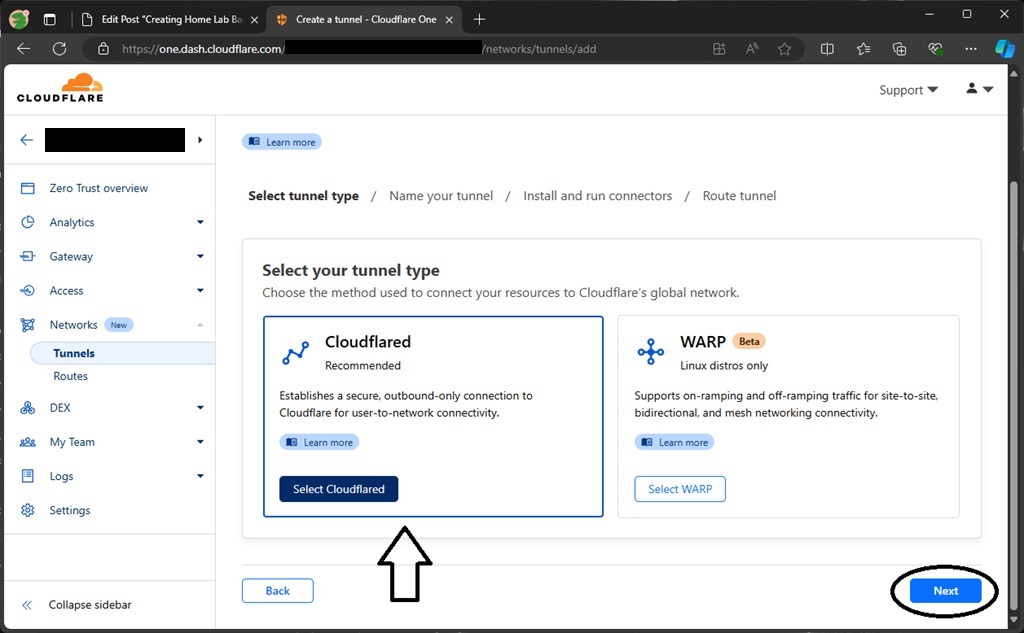
Click “Zero Trust” on the left side menu of CloudFlare page. It will launch a new window, there on left side menu click “Network -> Tunnel”. Click Add tunnel and select “Cloudflared” tunnel option and click next.
Now enter a name of the tunnel as per your liking and click next / save tunnel. This will bring you to the tunnel installation page. We are running Ubuntu Server in our VM, so we need the “debian” installation code.
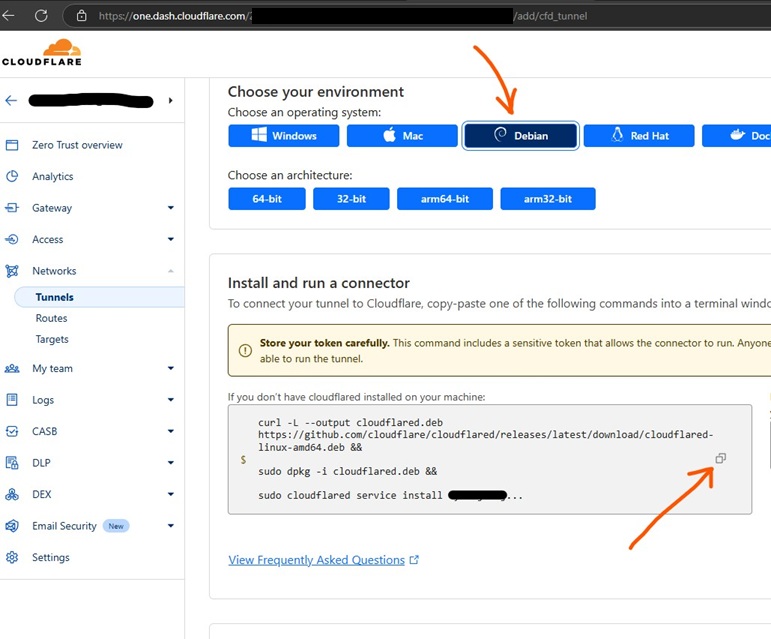
Now click that little copy button in that, follow the on screen instructions if needed to copy the entire code. Remember the entire code is super long and hidden, so copy using that little button given in the web page and run it in your Ubuntu Server.
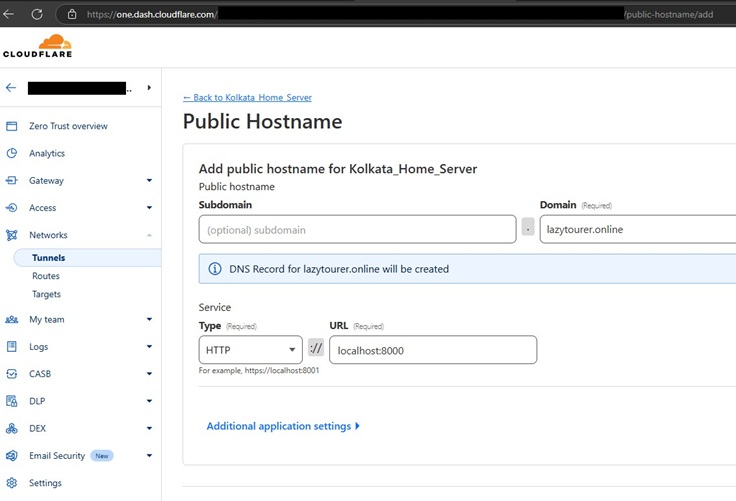
Creating Domain / Sub Domains / Public Host Names
As of now, the tunnel setup is done but we need to create the domain / sub domains for our services (Main WordPress website, File Browser and phpmyadmin) for traffic routing and external web access. So at the bottom of the tunnel installation page of CloudFlare website, click next to proceed for public host name creating.
We need to Create following 3 public host names for our operations. In our case, with our domain LazyTourer.Online it looks like this,
| URL | Service | Local Connection |
| lazytourer.pw | WordPress Main Website | localhost:8000 |
| files.lazytourer.pw | File Browser | localhost:8095 |
| db.lazytourer.pw | phpmyadmin | localhost:8080 |
Add 3 public host names under this tunnel with following details,
| Sub Domain | Domain | Path | Type | URL |
| blank/empty | your.domain | blank/empty | HTTP | localhost:8000 |
| files | your.domain | blank/empty | HTTP | localhost:8085 |
| db | your.domain | blank/empty | HTTP | localhost:8080 |
Access Via Web
Once you have created all three public host names, now your wordpress along with File Browser and phpmyadmin is available for outside web access. You can now access & proceed with the installation for WordPress via URL https://your.domain
Dont forget to change the default password of your File Browser. The default user name & password is admin/admin. So login via URL files.your.domain and change the password.
Maintenance and Updates
There are 3 main things to update in this deployment. Operating System and Software / Docker Containers / WordPress Internal (Plugins / Themes).
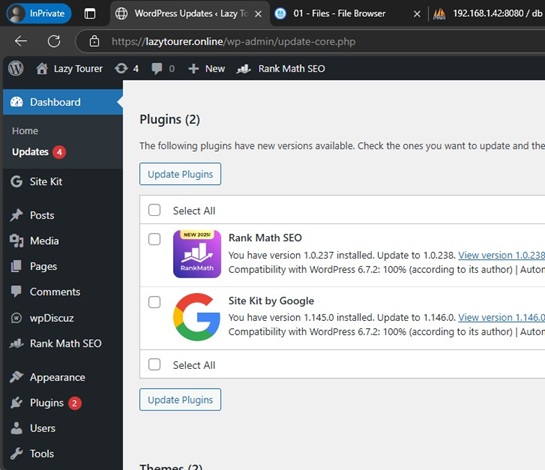
WordPress Internal
WordPress internal stuff, like themes and plugins can be updated from WordPress Internal admin dashboard. You can keep this in auto update mode and WordPress itself will update the stuff in background or you may manually update the installed stuff from wordpress admin panel.
Docker Container Updates
We have two docker compose configuration file where two different container stacks are running with multiple container images from each compose file. For updating, one needs to update both. For this, you need to login to your Ubuntu Server via CLI again and run these following commands for each container
File Browser
Run these commands one by one,sudo sucd /home/username/WordPress/FB -> Replace this user name with your owndocker compose stop && docker compose pull && docker compose up -d
WordPress Stack
Run these commands one by one,sudo sucd /home/username/WordPress -> Replace this user name with your owndocker compose stop && docker compose pull && docker compose up -d
Ubuntu Server (OS) Update
To update the Ubuntu Server, run these following commands one by one,sudo suapt update && apt upgrade -y && reboot
Backups
There are two ways of backing up.
First you can backup the Hyper-V VM vDisk and restore it anywhere or any computer or server running Hyper-V. Secondly, you can manually download the MySQL database dump via phpmyadmin and WordPress files via File Browser.
Conclusion
We have shown you a detailed, step by step, easy to understand technical guide and tutorial on how to self host a highly secured and production ready wordpress in your home computer (PC or Laptop) with any Indian home internet connection. Now the question is should you really consider hosting your own website in your PC?
Electricity Cost
The PC running the VM and website software needs to run 24×7, always on. As otherwise, turning off the PC running the VM means turning off your website. A typical Home Desktop PC may consume around Rs. 250/300 of electricity per month. If you are already running a home server, then it makes sense to just deploy another VM but as otherwsie, you are looking at around Rs. 300/- of electricity bill per month for running your PC non stop 24×7
Domestic Internet Speed
Your websites performance depends on internet speed, mainly the upload speeds. AirFiber or low speed home plan connections may perform poorly due to slow upload speed. You would need a good fiber to home broadband connection with good upload speeds.
Comment / Question?
If you have any comments, question or suggestion on this, feel free to drop in below.