Normally when we search about this topic in Web or now days, in YouTube, maximum content is from western sources. Like, Europe or North Ameria. There is absolutely no problem in learning from them, or matter of fact, their articles or tutorials are indeed awesome. But the problem is, they normally show us high end hardware and a lot of commands (CLI) for settings things up.
In our previous server related tutorials, where we have shown our fellow Indians, that we can create an always online home lab backup server using really old rejected PC or laptop in India for free. But there too, we have received many comments on difficulties about commands and code. Along with many people requesting us to show where or how to buy second hand PC for home server project at really cheap cost and simpler, no commands or coding based setup, where people can setup this server with easy GUI and mouse clicks.
So, in our previous article, we have shown you, how we have purchased a second hand used PC from Amazon along with few upgrade parts for under Rs. 12,500/-. Here is the link -> Buying used PC to make Home Cloud Backup Streaming Server in India. And in this article, we are going to show you a step by step guide on how to setup an always online, self hosted, home cloud backup server in India, without running any code or commands.
What is a Server?
When we think about the word server, usually we associate this term with some enterprise rack mounted large scale hardware. But technically speaking, those are just case / cabinet to hold your computer components. Fundamentally, there is no difference between Laptop / Desktop or a server. Its just the software. So we can install the server related software and convert any Laptop or PC into a server.
What is the Purpose?
Everything that you do has a purpose. Either for entertainment or for work and study. So why are we building this self hosted home server?
The main purpose of this server is to act as an alternative to cloud storage. Like, for example, Google Drive / Google Photos, Microsoft OneDrive, Apple iCloud or like Dropbox and so on. We want this server to automatically backup our phone or computer data, like photo and video automatically like how it happens with Google Photos or iCloud and we want to free up the phone storage and view this from anywhere on the internet using our device or any browser.
No large companies will now have any access to our data, and we are self-hosting our data with full privacy security.
Further, we wish to create a streaming server. Like Netflix or Amazon Prime type service alternative, from where we can stream any movie or web series what we have in our server disk on any device.
Hardware Prerequisites
You will need following hardware in your home / office or at the place where you plan to deploy / run this server.
| 1. Internet Connection | 2. Router / Switch with a free LAN port (1gbps is preferred) | 3. A spare Computer (Desktop / Laptop) which we will convert |
| 4. Monitor Keyboard Mouse (For installation purpose) | 5. 1 USB Ped Drive (4GB or Higher) for installer ISO | 6. Your primary PC/Laptop |
For our project use, we have purchased a 2nd hand used desktop PC from Amazon India. The HP Z230 SFF (Small Form Factor). This base PC comes with following configuration,
| Intel Core i7 4790 (4c/8t) | 8GB (4×2) DDR3 1333 RAM | 1 SATA 500GB 3.5inch HDD |
We have added following upgrades into it. All of these are purchased from Amazon India,
| 2 SATA 3.5inch 500GB HDD (used but under warranty) | 1 SATA 256GB 2.5inch SSD (New with warranty) | 8GB (4×2) DDR3 1333 RAM (new with warranty) |
Total cost of this build, including the upgrades are Rs. 12,500/- with free home delivery.
Software Prerequisites
For this project of building your own home cloud backup and streaming server, we shall be using all legal and mostly open-source software. Most of them are free to use, expect one or two. Which are optional and depending on your use case, you may need to spend money on that. However, under nothing in this setup will use hacked / cracked or duplicate software.
| TrueNAS Scale | Ubuntu Server LTS | NextCloud |
| PhotoPrism | Jellyfin | File Browser |
| Docker / Compose | CloudFlare Tunnel | Nginx (Optional) |
| Static Public IP (optional) | One Credit / Debit Card | One TLD Domain Name |
TrueNAS USB Installation Disk Creation
Visit TrueNAS website and download the TrueNAS Scale Installation ISO (Here -> Download TrueNAS SCALE – Data Storage Software) in your primary PC. You can use a free tool called BalenaEtcher (Website -> https://etcher.balena.io/) to create installation USB from this downloaded ISO into a USB Disk. Ensure to use 4GB or higher size USB Disk. You can search the internet for guide on how to use BalenaEtcher. It is really simple, just few clicks and installation USB will be ready.
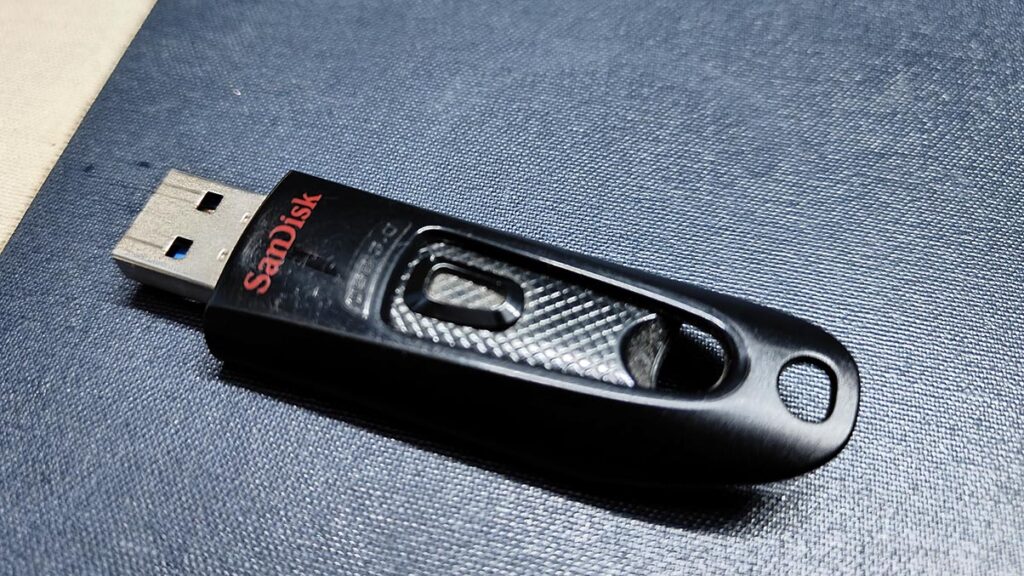
We have used one of our high speed USB 3.0 SanDisk pen drive for the purpose.
Installing TrueNAS Scale
Changing the BOOT Order
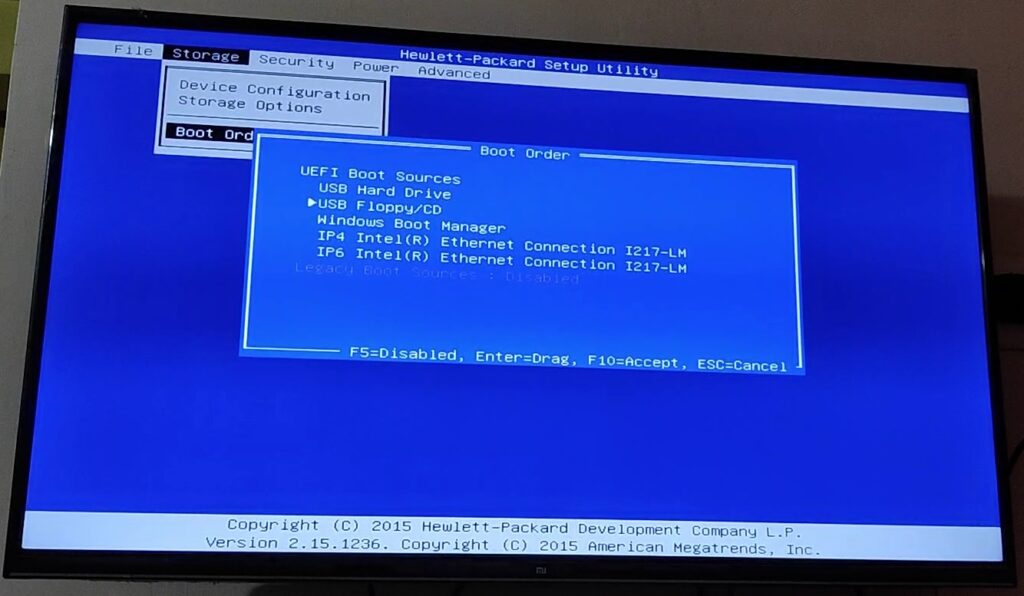
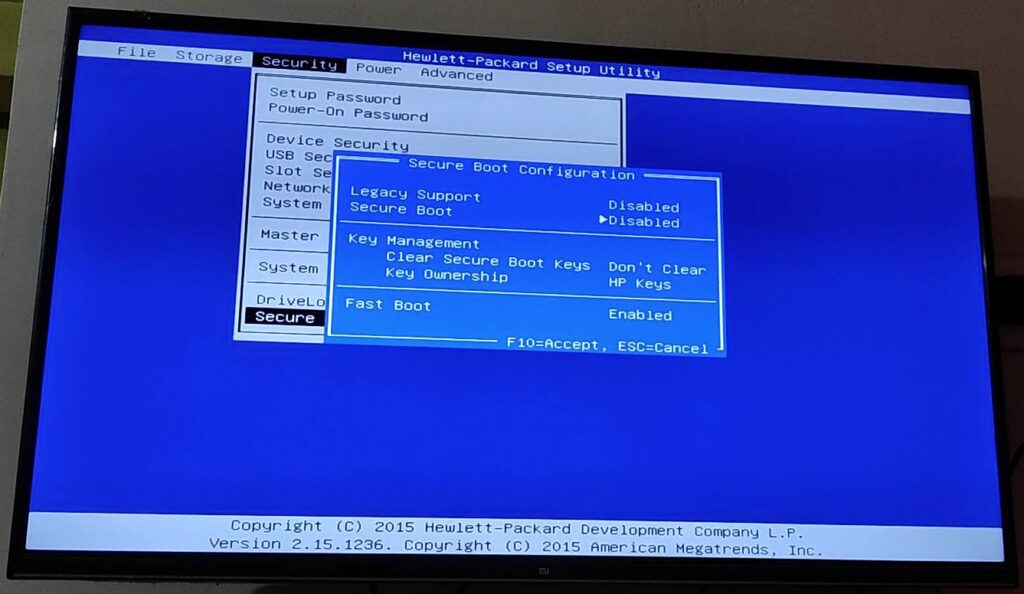
You need to connect a Monitor (Display) / Keyboard / Mouse and that TrueNAS installation USB Key to your system which you plan to convert into a server and get into the BIOS. Different Laptops or PCs have a different button to press (like Delete, F2, F8, F10 or such) during boot to get into BIOS. You can search the internet with your PC / Laptop Motherboard model number to find out which key you need to press during booting to get into the BIOS.

In our case, for our HP Z230 SFF, we have to press F10 during booting process to get into BIOS. Here you need to do two things, first change the boot order to make installation USB the first boot device. Secondly you need to turn off secure boot. Save the exit, this will reboot the system into TrueNAS installation process from that USB Pen Drive
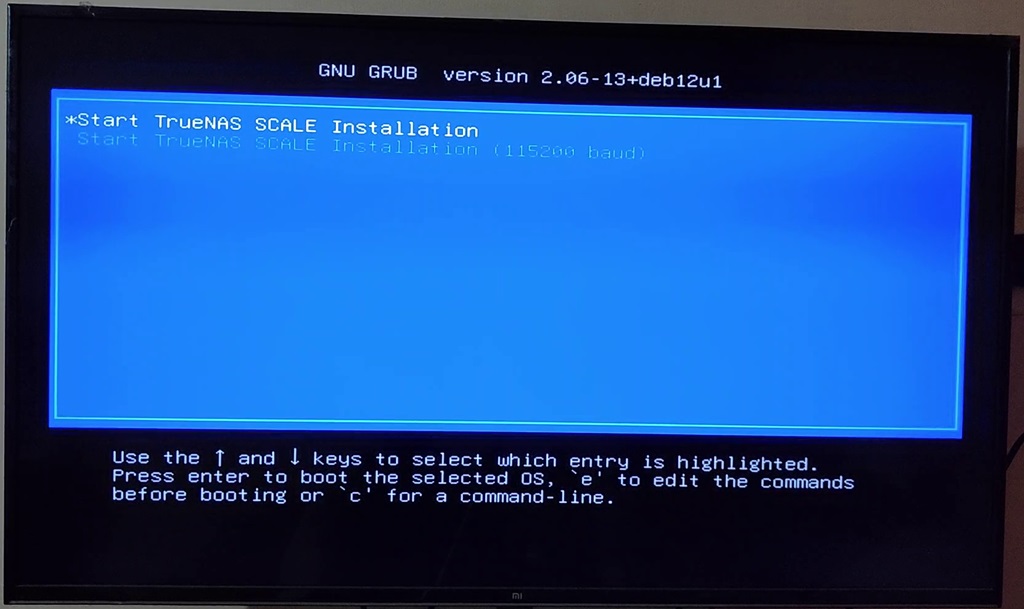
Installation of TrueNAS Scale
You would find just two options once the system boots into TrueNAS scale installation scree. Select the first option which says Start TrueNAS Scale installation. On the screen you would be asked to select the disk on which you wish to install the TrueNAS scale. Select the disk you wish your installation to happen on, and keep other disk unselected and press OK to start the installation
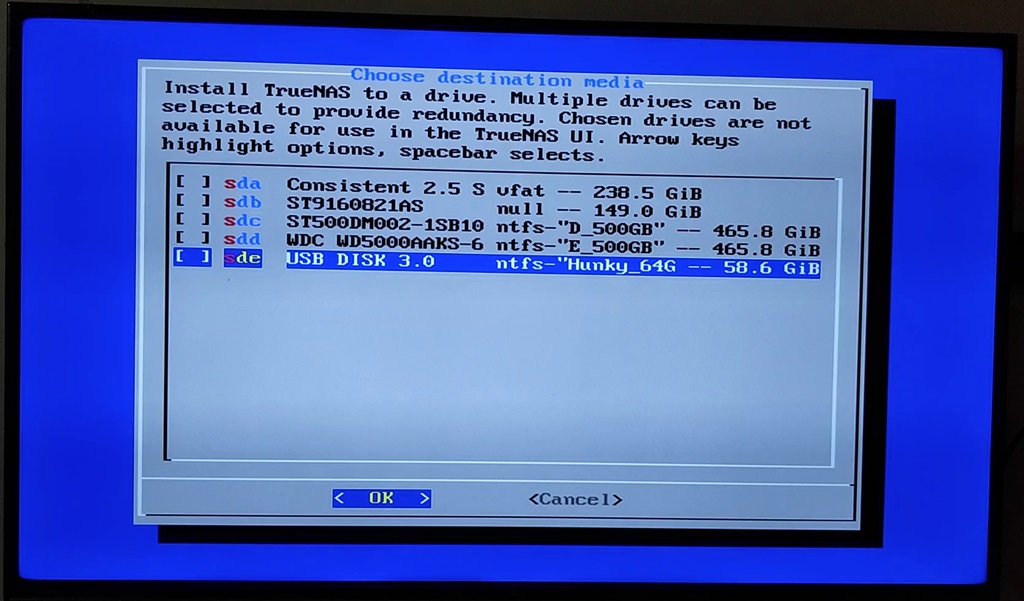
In our case, as you can see from the screenshot above, we have also added a High Speed USB 3.2 EVM 64GB pen drive and we are installing the OS on that. It has costed Rs. 450/- from Amazon.

Check out the deals
High Speed USB 3 Pen Drives
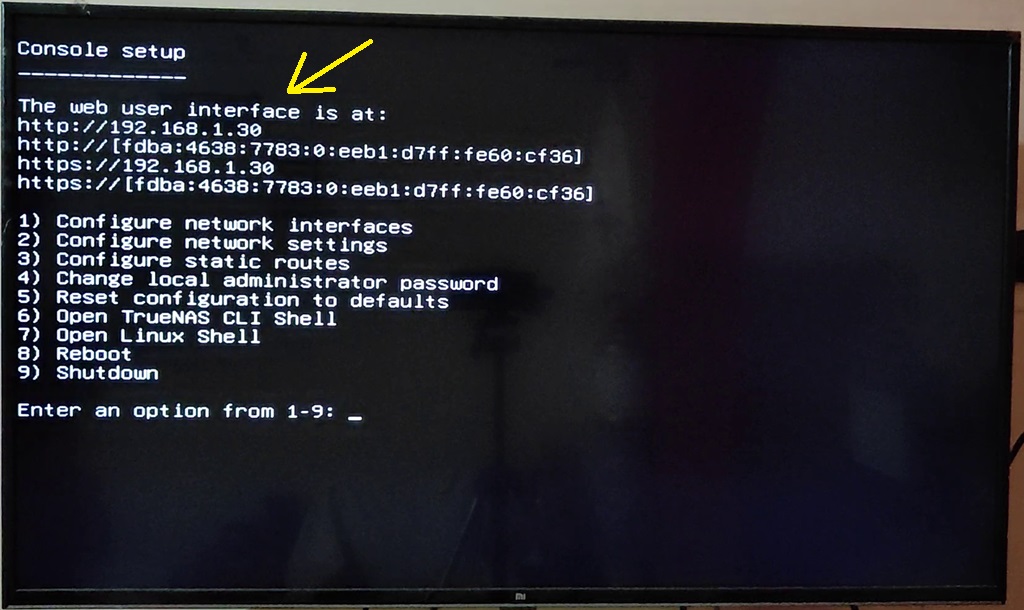
Depending on your system configuration, installation may take sometime. After installation, system will return start menu, select reboot and remove the installation USB. First boot may take some time, and once boot up, system will show your login details on screen.. Note that IP address down, you will need for login.
Remember, if your router is in DHCP Mode, it may change the server LAN IP address on every reboot or after the DHCP lease runs out. It is recommended to set a Static LAN IP address of this server via your Router DHCP / MAC binding settings. You can search the internet about your router model as how to do that.
TrueNAS Scale Server Web GUI
In our case, as you can see, the TrueNAS Scale server GUI is available at local LAN IP address of 192.168.1.30, so we can access it via any web browser and type that in address bar to open the login page.
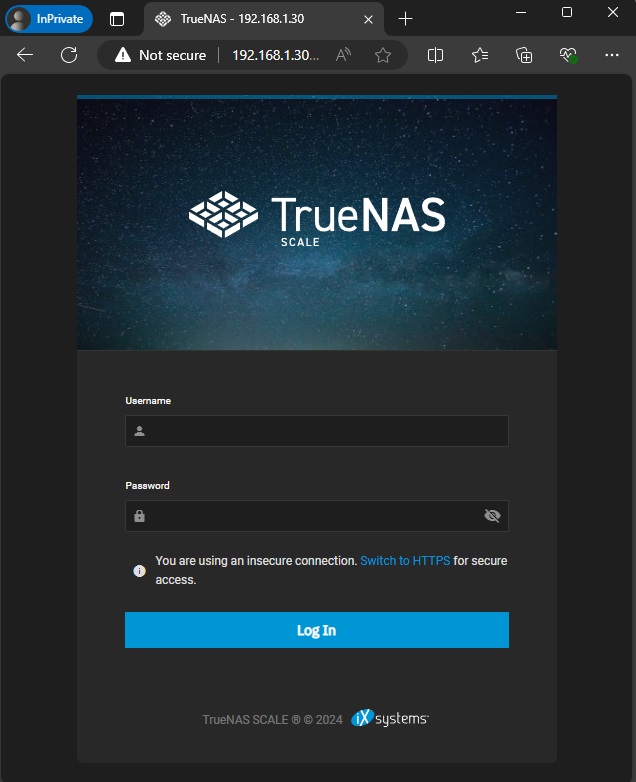
Login page will ask for the username password. The username is admin but the password is what you have set during the installation process.
Enter your username password to login into your TrueNAS Scale Home Cloud Backup Server for further setup.
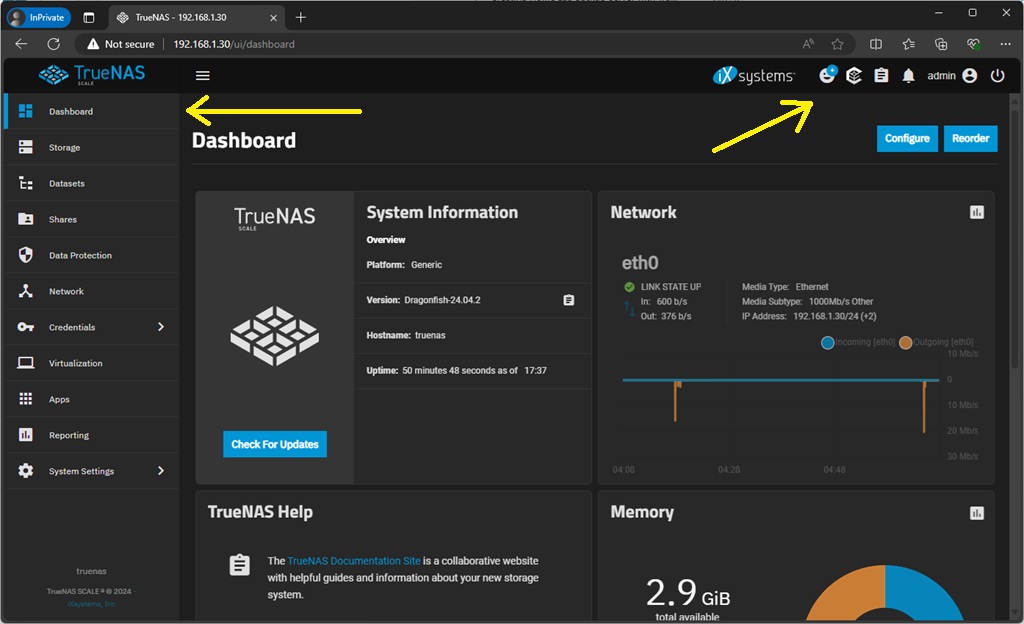
The main page has 3 elements, the left side bar, middle work pane and top right side action buttons.
TrueNAS Scale Configuration
As you can see from the main page, its really simple layout but for any newcomer, it may feel confusing. So lets compare this TrueNAS scale setup and working process with Microsoft Windows. Just like in Windows, you have a start menu to open things and work in that, here too, the left side navigation pane is your menu. From here you will configure the server as per your need.
Storage Pools Configuratoin
In a Windows Computer, when you go to My Computer (File Explorer), you see your storage disks. Like C / D or E drive and so on. Here in TrueNAS Scale, storage devices are called Storage Pools. Secondly, if you connect a new drive in Windows Computer, that wont directly show up in your My Computer (File Explorer). You would need to open device manager, format that new drive and assign a drive letter, like D / E or such to configure the drive and use it. It is same with TrueNAS Scale also, you need to format and name your drive to show up in Storage Pools.
So to do that, click on Storage in left hand side menu option. In storage page, you can see the buttons on your right hand side of the page. You can click the Disk button to check and verify that how many storage disks (including HDD and SSD) are present there.
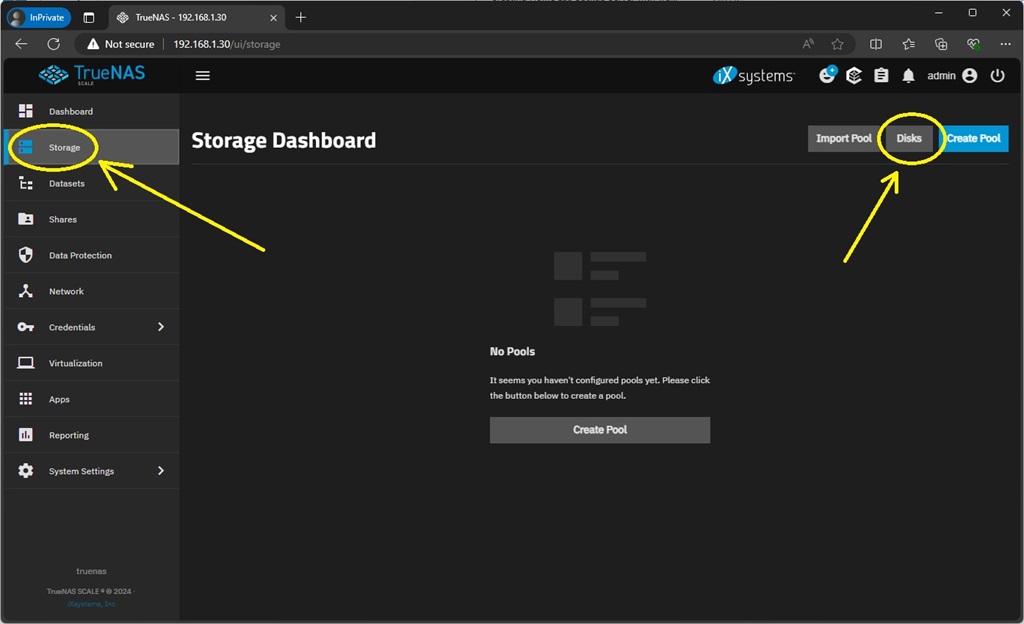
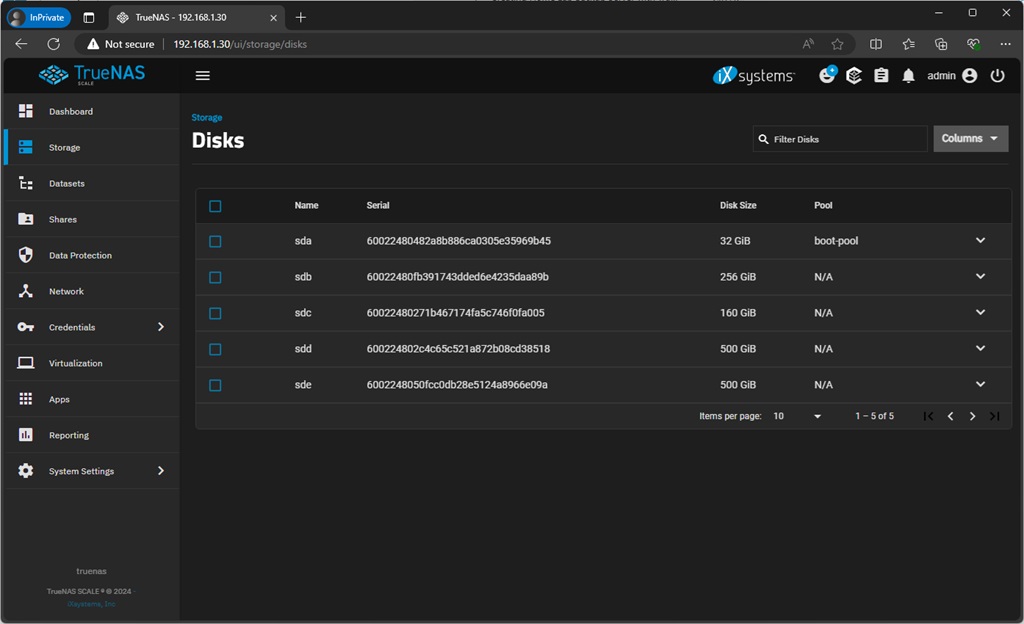
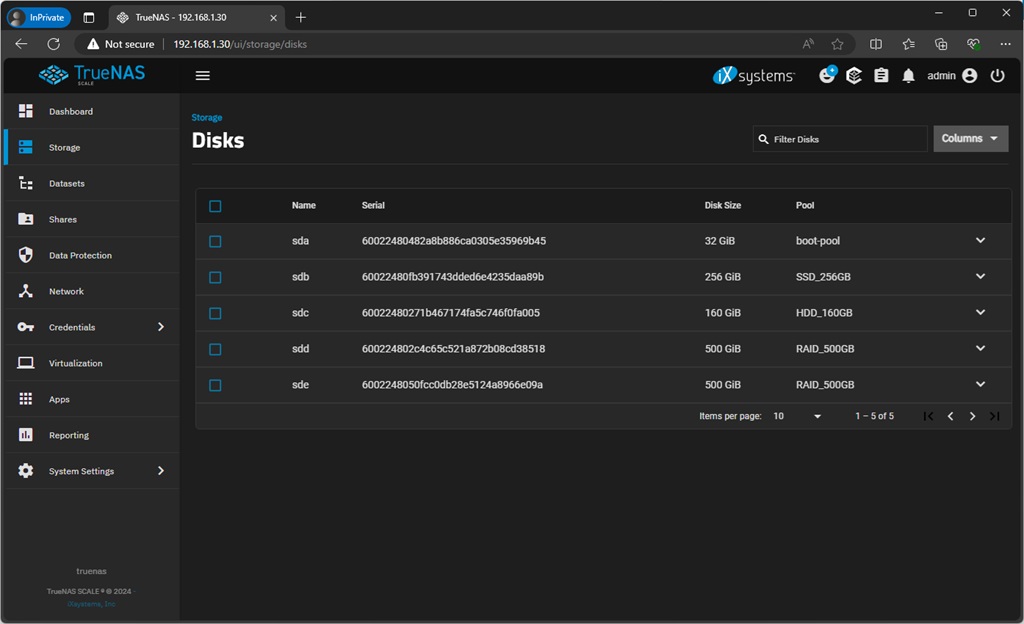
As you can see in our case, we have total 6 disks. Out of which, 2x 500GB HDD, 1x 256GB SSD, 1x 64GB USB. There is already a pool present here, the system created boot pool. Do not touch this ever, this is our OS system drive.
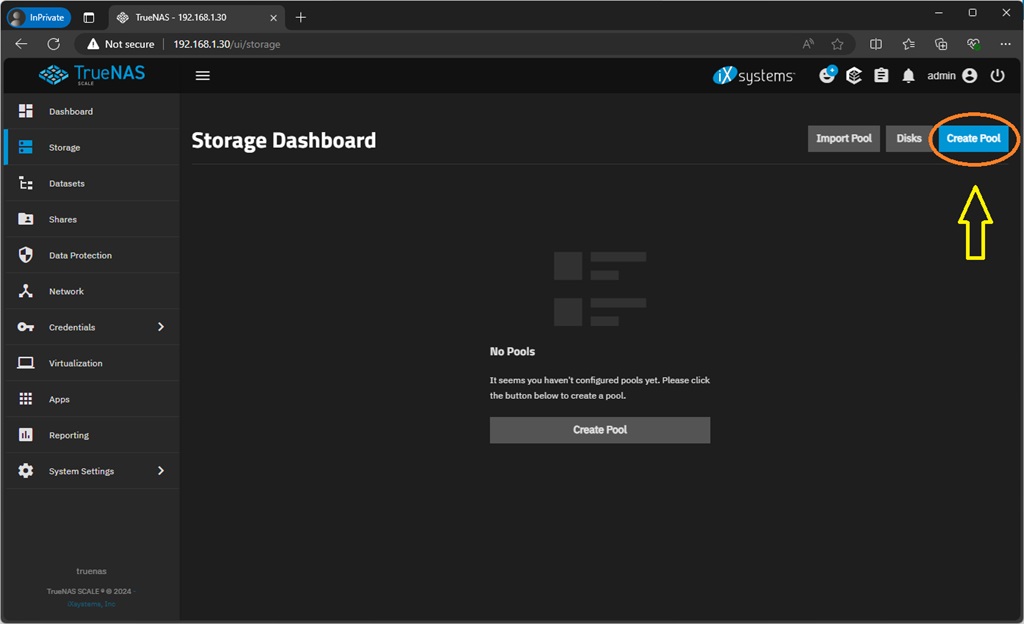
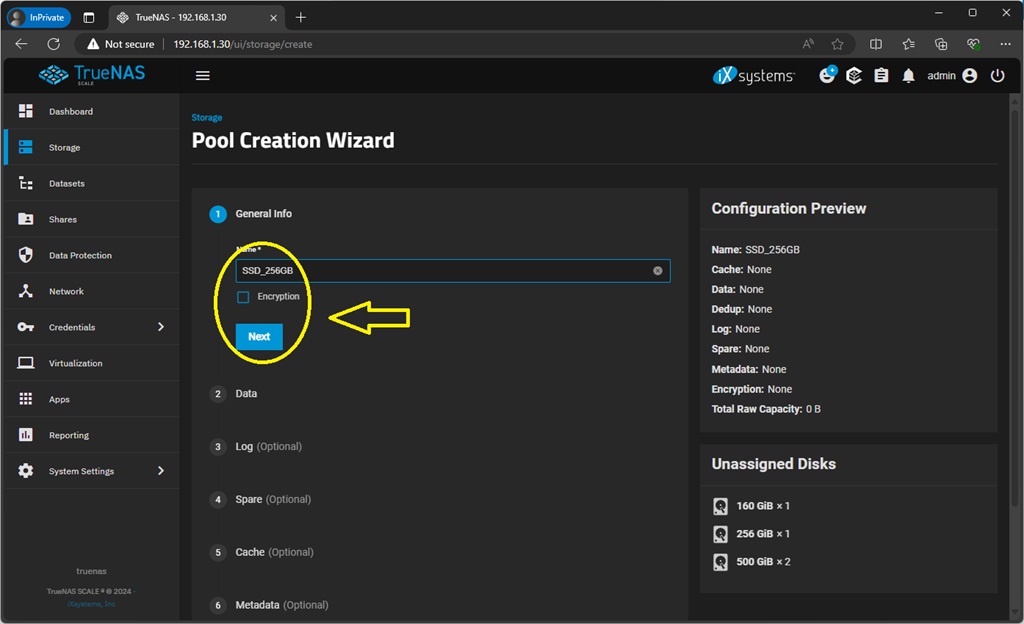
We will now create pools using the available HDDs and SSDs. To do so, click on Create Pool option. There will be a lot of options, but we shall only touch the options needed for a home server type setup & rest shall stay untouched default. So first under General Info, name the pool. In our case, we are going to create the first pool using single SSD disk, so we are naming it SSD_256GB for easy identification. You can name your pool anything you wish. Then Click Next.
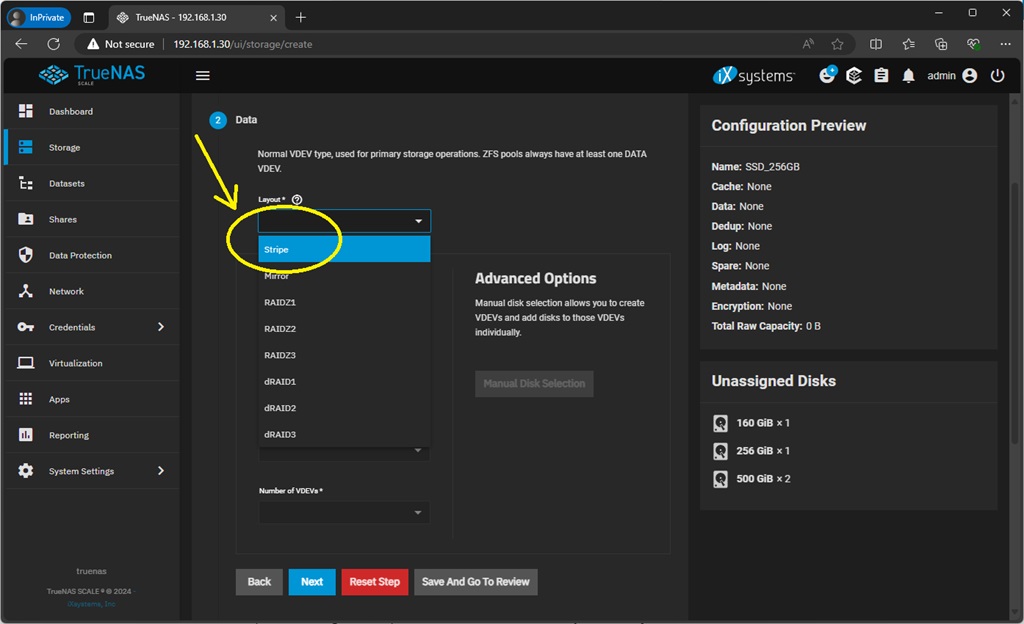
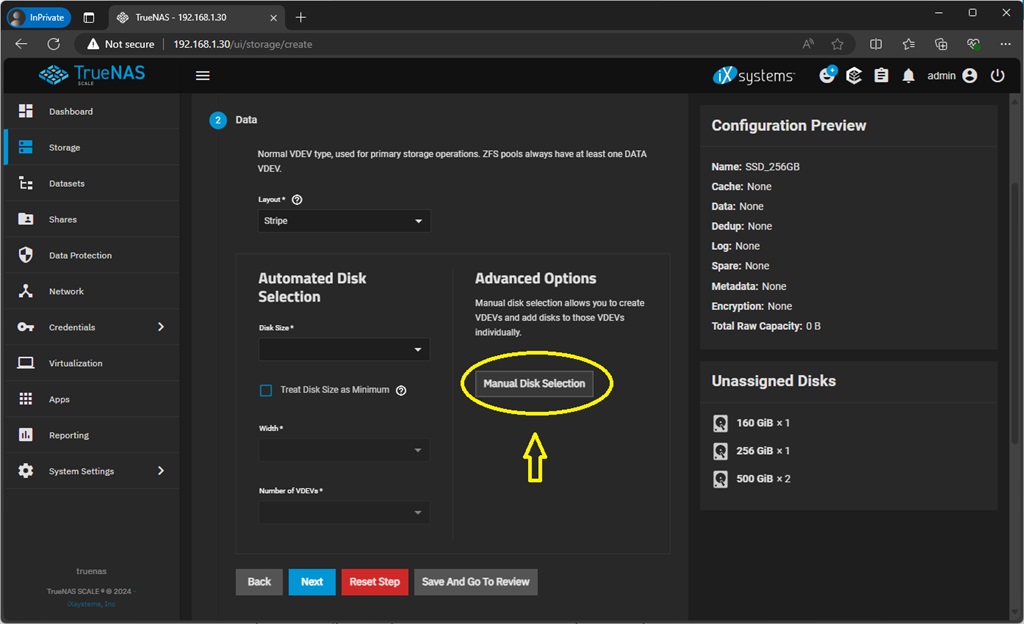
Now under the Data Option, we shall be selecting Stripe. Remember, if you have multiple same size disk, you can create mirror or use those disk individually by creating stripe. In this case, since we only have a single SSD, and we plan to use it as single disk, we are selecting Stripe and then click Manual Disk Selection.
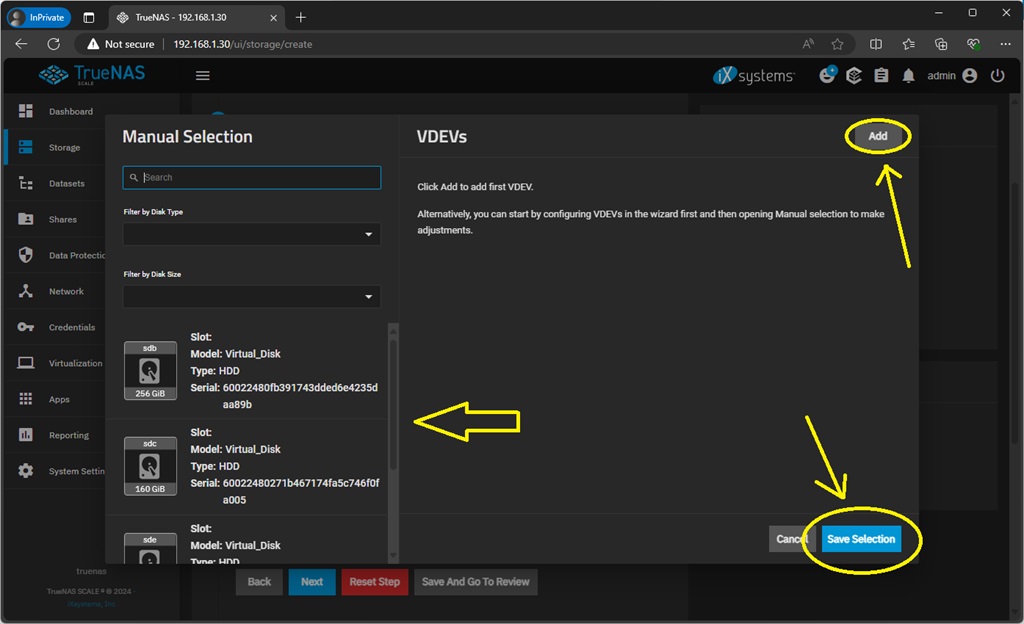
Here add a VDEV and drag your disk into the VDEV and click save selection.
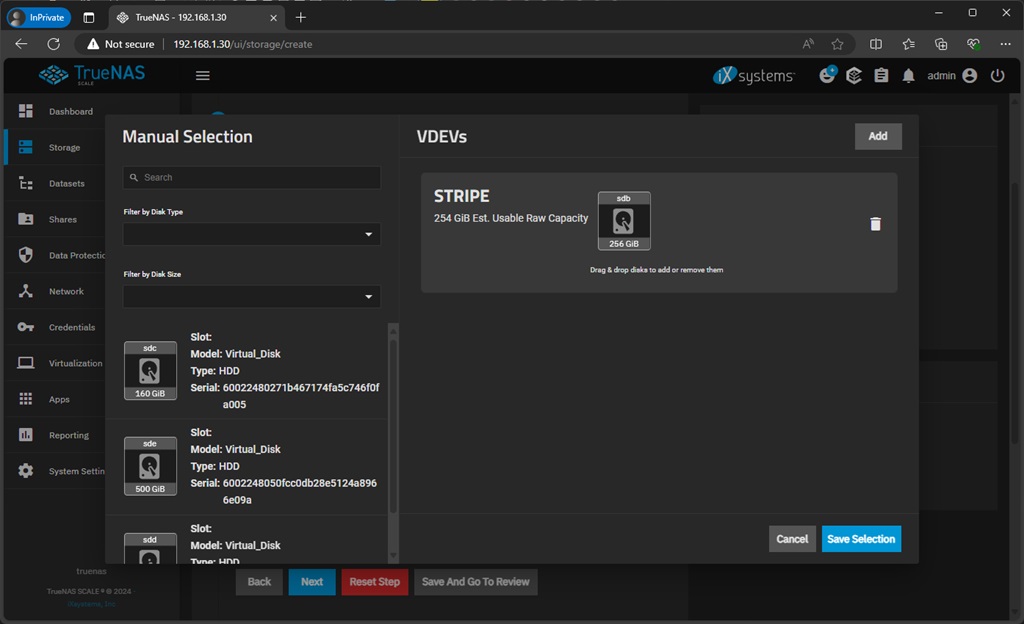
We will not be doing anything else for this Pool and will keep rest of the options black and default as they are to click all next and create the pool in final step.
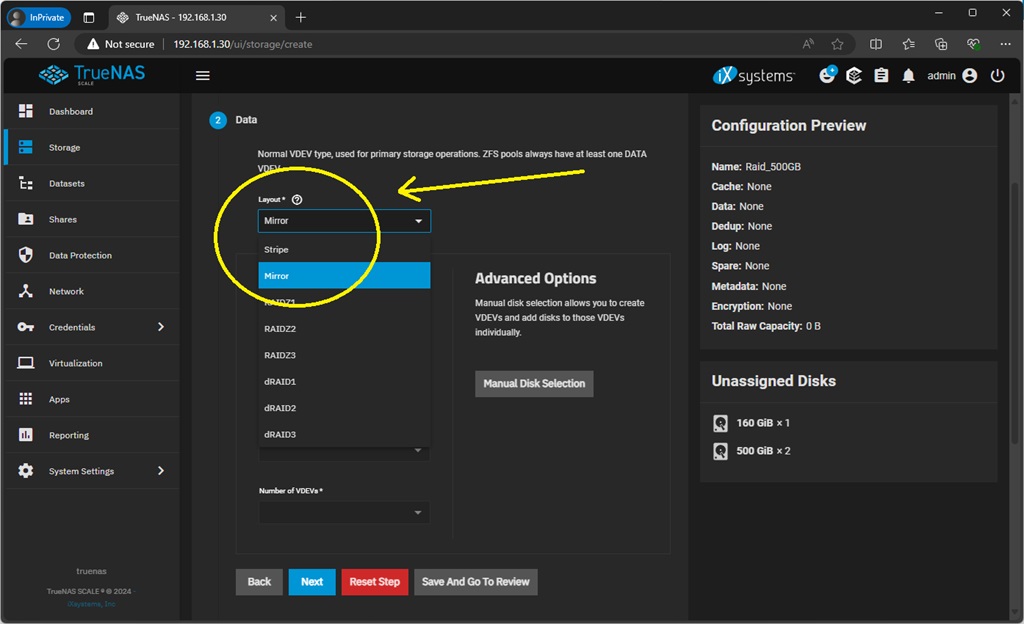
Mirror / Raid Disk Storage Pool
Now for the pair of 500 GB HDD we have, we shall be creating a mirror pool. Remember, the system can work with one disk as shown in the first stripe creation. So these extra pools that we are creating, are option. You may or may not need them depending on your system configuration and number of disk you have.
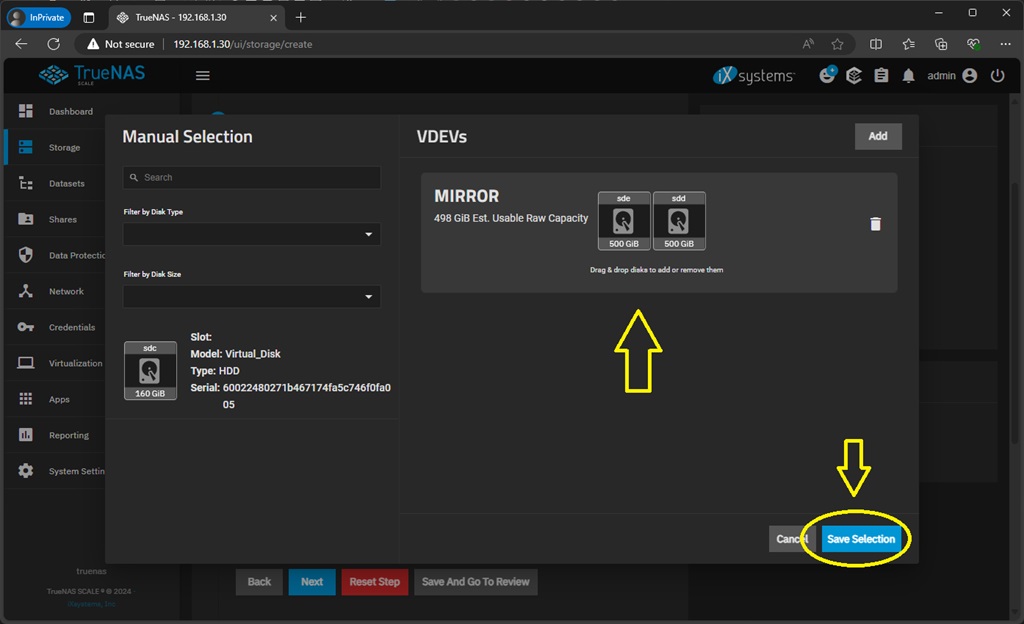
The process of pool creation is same as above shown, just in this case, we shall be selecting Mirror instead of Stripe and will drag two disks in to the VDEV while naming this pool, Raid_500GB.
We also have created a 3rd pool (stripe) with the remaining 160GB HDD by naming it HDD_160GB.
So in our case, we have total 3 pools. 2 of them are stripe with single disk and one is mirror raid with 2 disks. They are as follows,
| Pool Name | Pool Type | Pool Details |
| SSD_256GB | Striple (Single Disk) | 1x 256GB SSD |
| HDD_160GB | Stripe (Single Disk) | 1x 160GB HDD |
| Raid_500GB | Mirror (Dual Disk) | 2x 500GB HDD |
TrueNAS Scale System Config
Next thing is to do few system configuration changes. First is to edit the swap file size and location then default system pool location change into SSD (Optional) and thirdly, system clock, date and time settings.
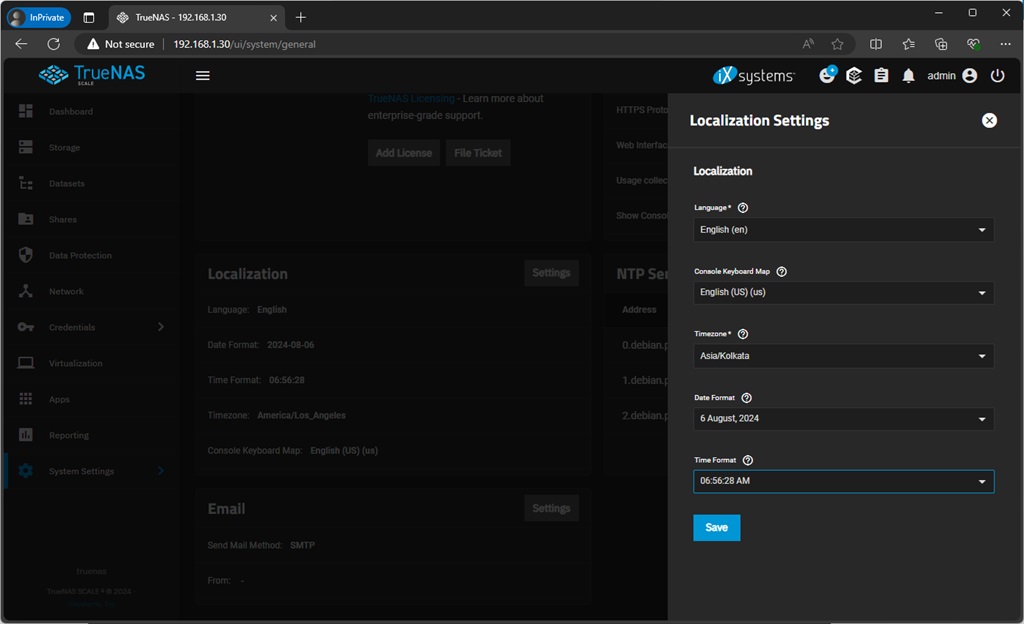
Navigate to System Settings -> General -> Localization and then edit and change the details as per your region. In my case, it is Indian (Kolkata) time zone and respected data and time format.
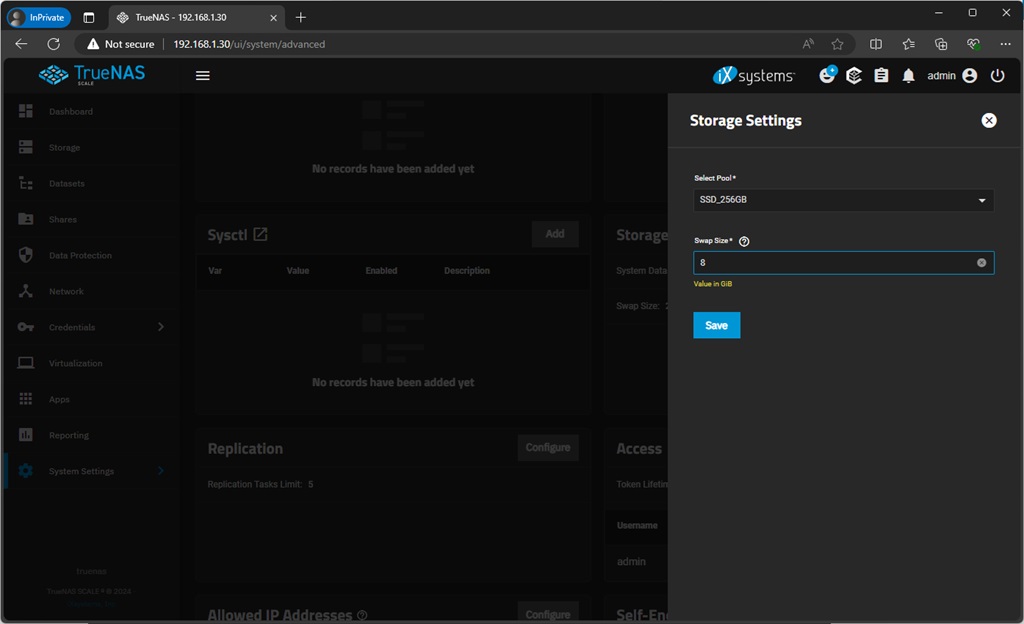
Navigate to System Settings -> Advanced -> Storage. Here, change the configure the storage pool as the fastest drive, in our case, it is the SSD and edit the swap size to at-least half of the total RAM size. This step is optional, you can do this in case you have multiple disk like we have or you can skip the pool change.
Application Storage Pool Selection
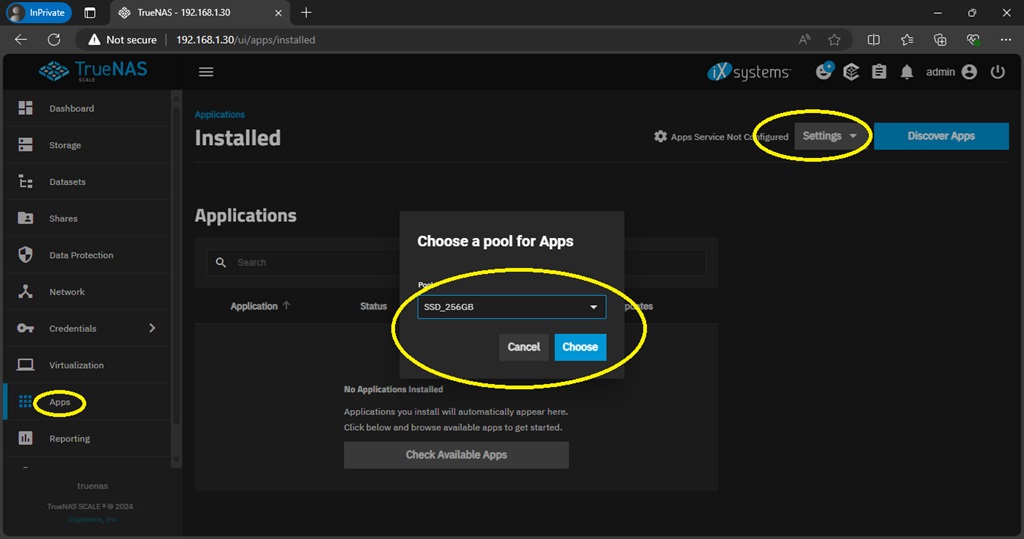
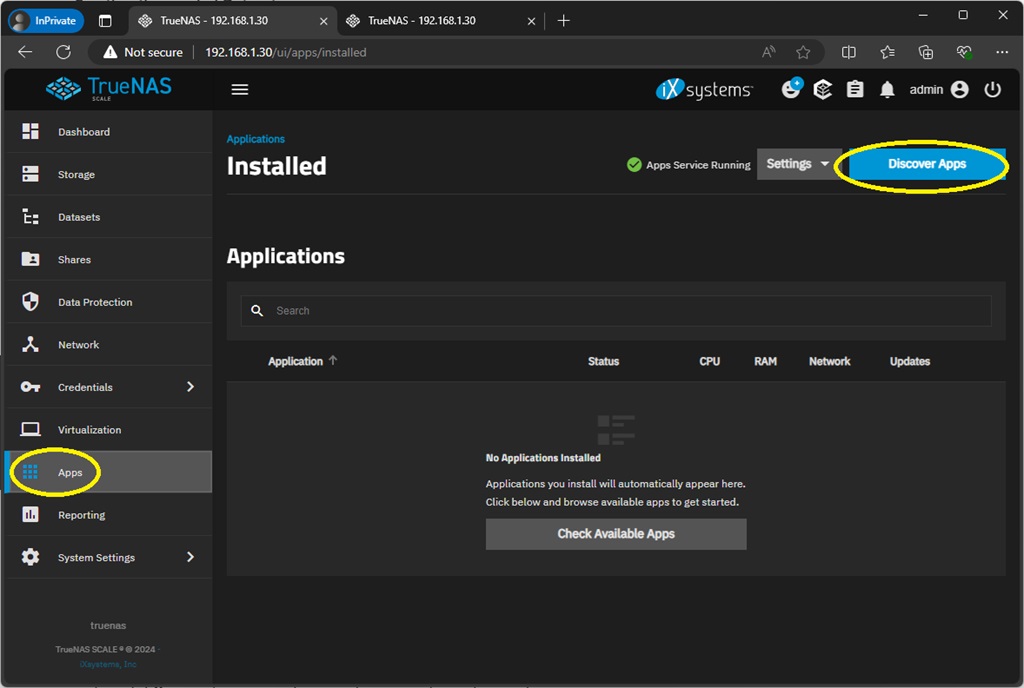
Go to Apps in your left side menu and click settings on right side of the page to choose a pool. Since we have a SSD in our server, we are selecting that as default pool for apps.
TrueNAS Scale Apps – Nextcloud
Just like we can install an app in our phone from apps store, TrueNAS scale brings this same feature for servers via their Application Catalogue. This is pretty amazing since you dont need to write any commands or code to deploy various servers and services via this feature. Our first application is Nextcloud. Which is an open source alternative to Google Drive / Apple iCloud or Microsoft OneDrive type backup solutions. With this, we can automatically backup our android or ios phone and its media (like camera photos and videos) or backup our computers also.
Creating the needed Datasets (Optional)
To deploy Nextcloud, first we need to create few datasets. Compared to a Windows operation, Datasets are basically folders. Which are called Datasets in TrueNAS App. By default, all apps are installed inside the apps default storage pool but since we want to shift out important data to mirror disk, that is why we are manually creating datasets for that. We can keep the rest of the application related files in default storage pool but application database and user data needs to be stay safe and in RAID.
First let’s check in Nextcloud app, how many datasets we need to create. So for that, click on Apps menu in your left hand side navigation menu. Then click discover apps, and search for Nextcloud. Click the first install button and scroll down see how many storage section / option it is showing.
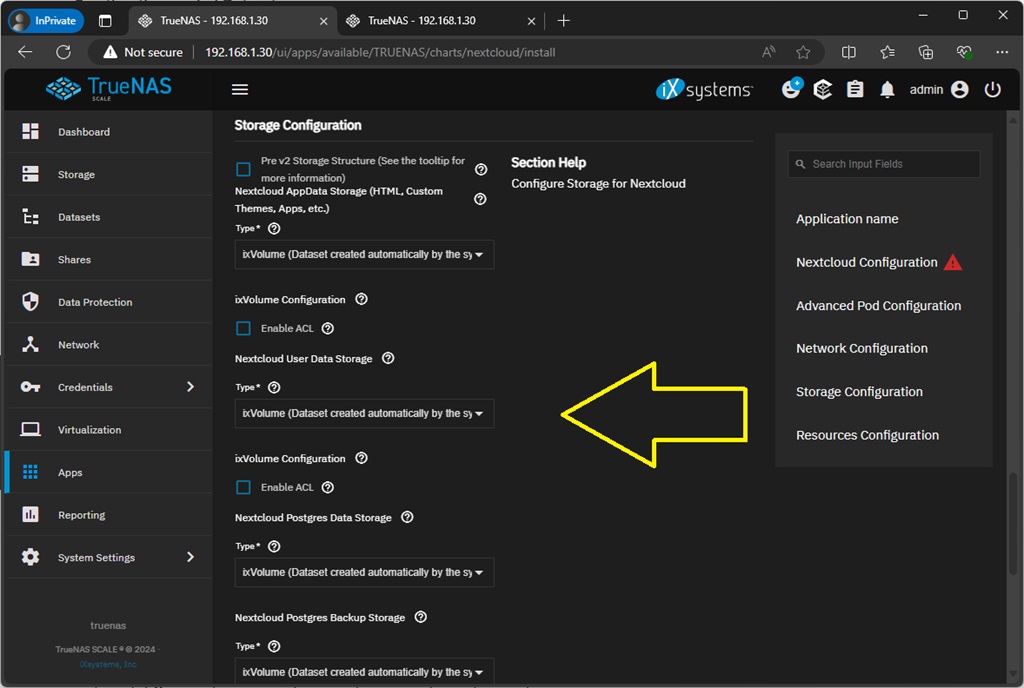
Here under the Install options, we can see, there are 4 configuration storage locations. Which are as follows,
| Nextcloud AppData Storage | Nextcloud User Data Storage |
| Nextcloud Postgres Data Storage | Nextcloud Postgres Backup Storage |
We need to create two datasets under mirror drive of ours for “User Data” and “Postgres Data”. This way, in case of disaster recovery, we can reinstall nextcloud using existing database and user data. Remember, this is an optional step. Those who are on a single drive, you may skip this option and keep all settings default for your single disk.
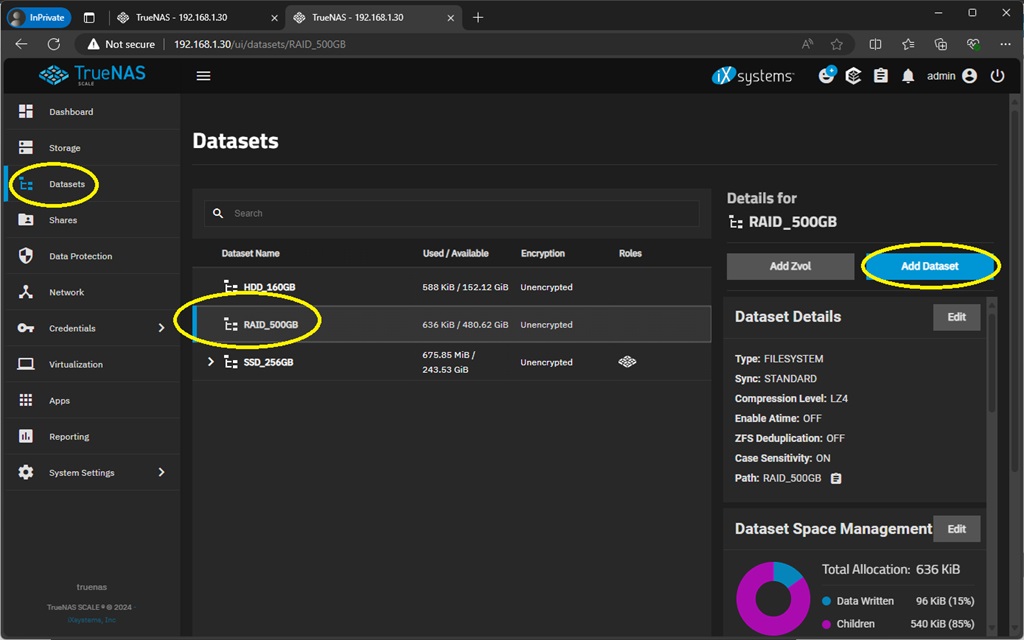
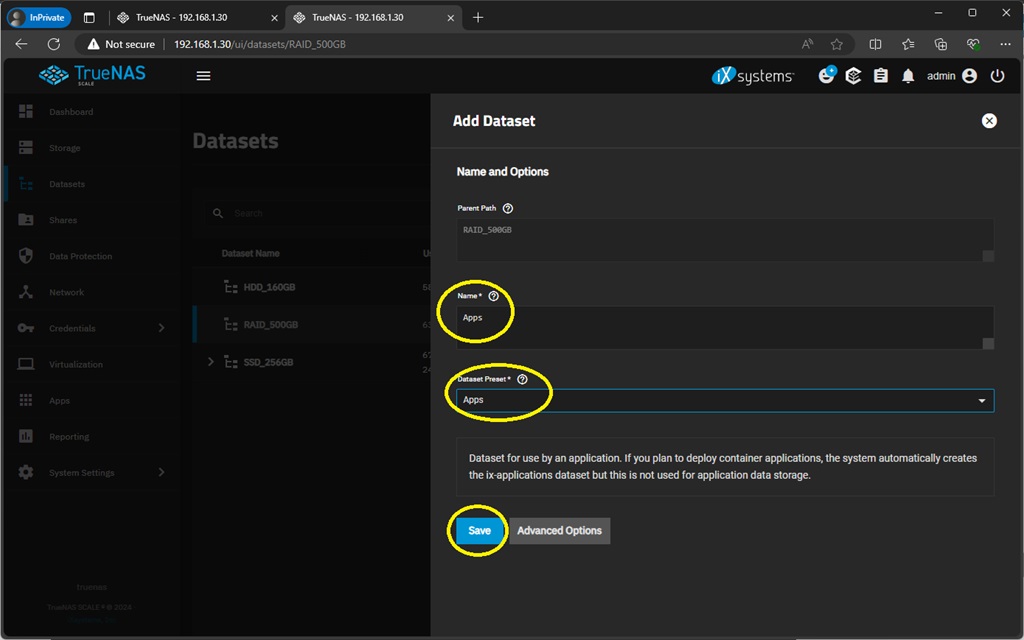
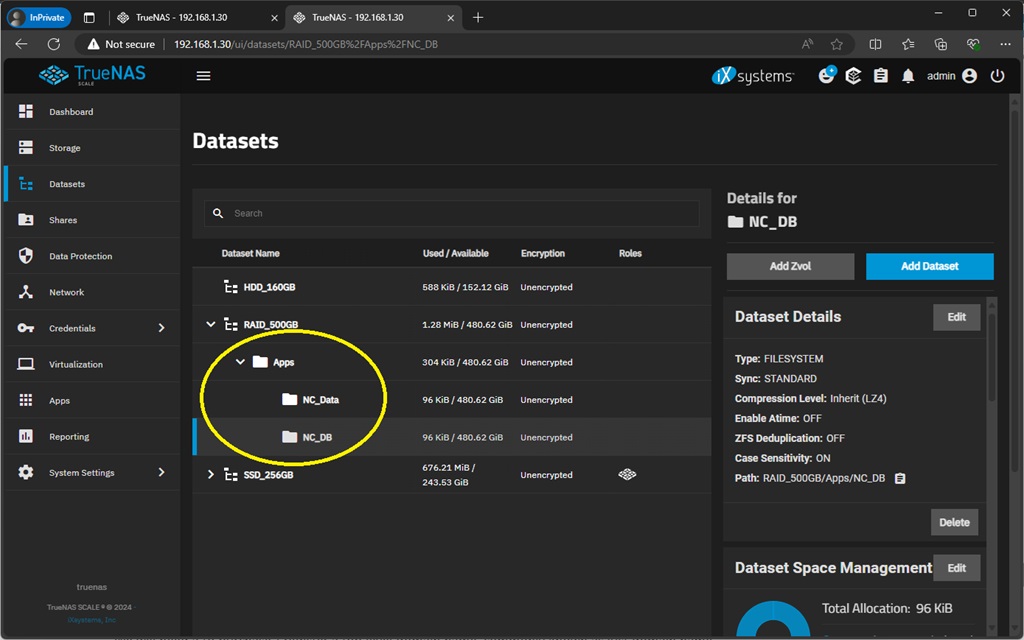
So for dataset creation, go back to the navigation menu and click datasets. There, select the pool in which you wish to create the dataset, in our case it is Raid_500GB, and click add dataset from the right-hand side menu option. There, name your dataset. We are naming it apps, you can name it anything you wish and ensure the permission is set to Apps and click save.
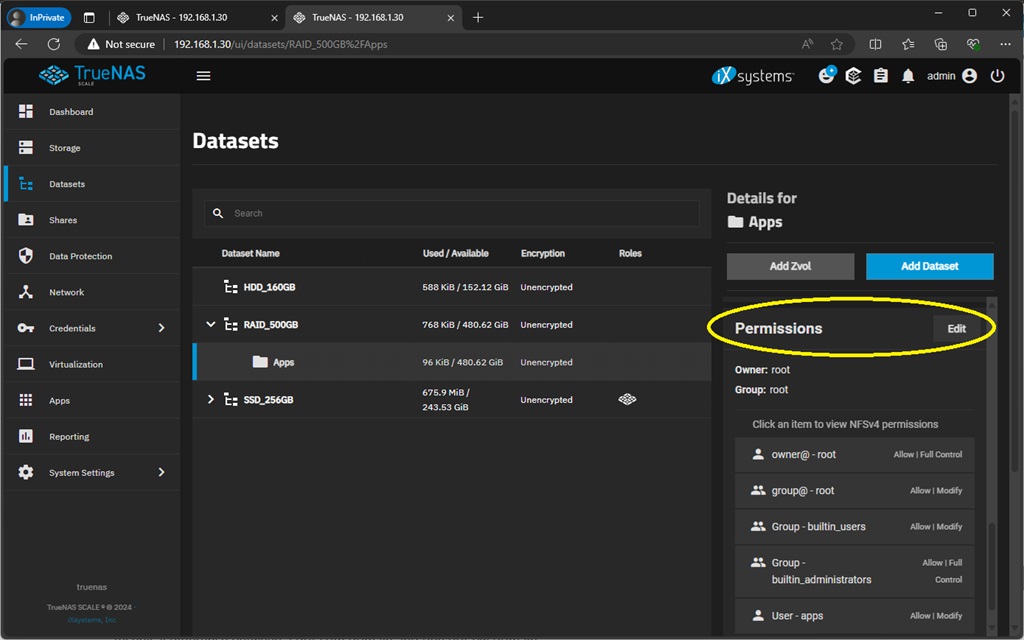
We need to allow full permission for this apps user so scroll down the left hand side menu to find Permissions and click edit. Select app user and allow full control to save the ACL.
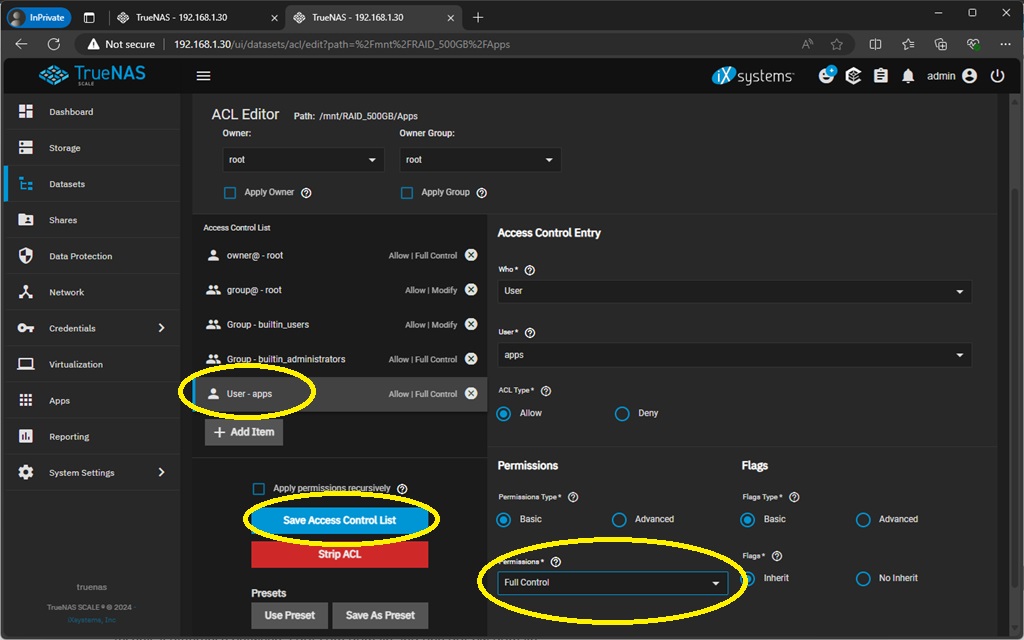
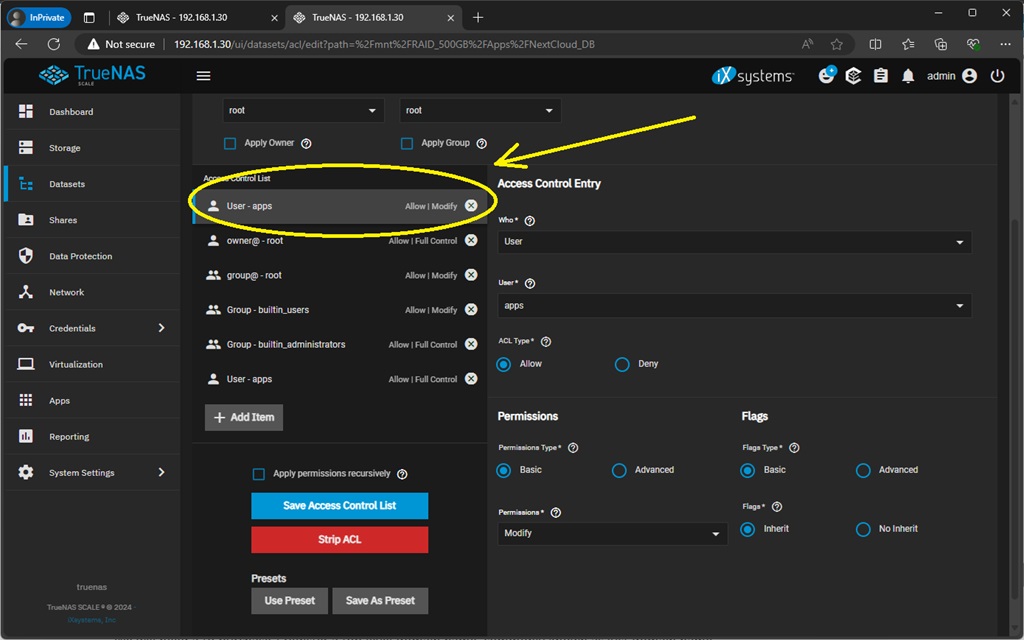
We would create two more datasets inside this “Apps” dataset. Just for easy navigation and easy to understand folder structure. Following would be the final result. Just remember, every time you create a new dataset with same apps user permission inside another dataset, it would add an extra apps user. You would need to delete that extra user from ACL Editor. Dont forget to delete that extra “apps” user with only “modify” permission in ACL.
Installing Nextcloud App
Now we can go back to Apps menu and search for Nextcloud to click install to open up the installation options configuration page. You can keep all options as default they are, just set you own “Admin User” and “Admin Password” and click install. But in our case with extra mirror disk and custom datasets, additionally we need to change two storage location also. For that, just scroll down to storage section, and for “Nextcloud User Data Storage”, change the type to “Host Path” and select the dataset. In our case, it is NC_Data under Raid_500GB disk and “Apps” dataset.
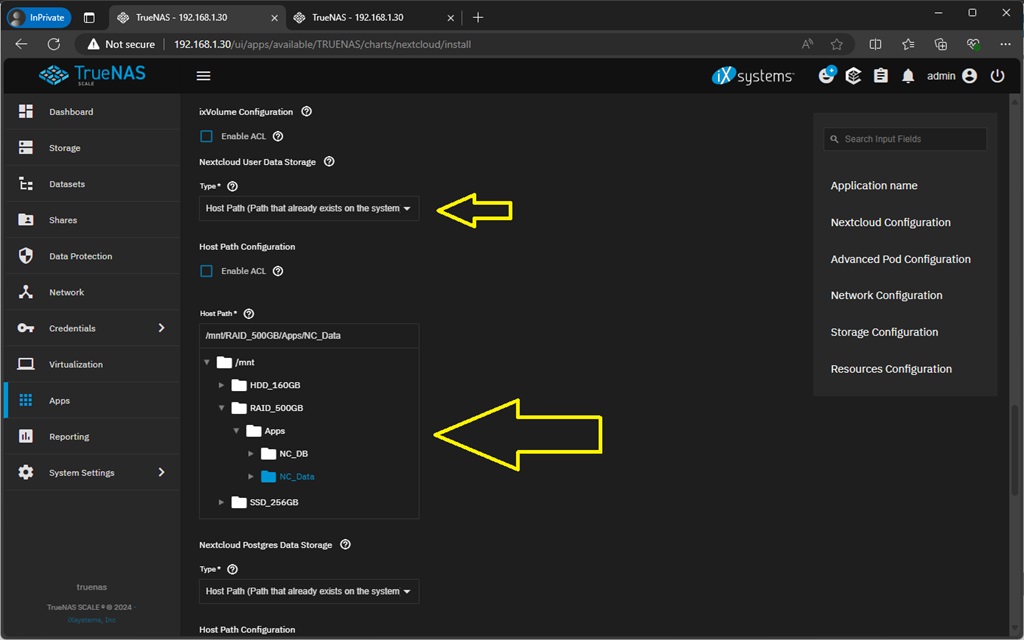
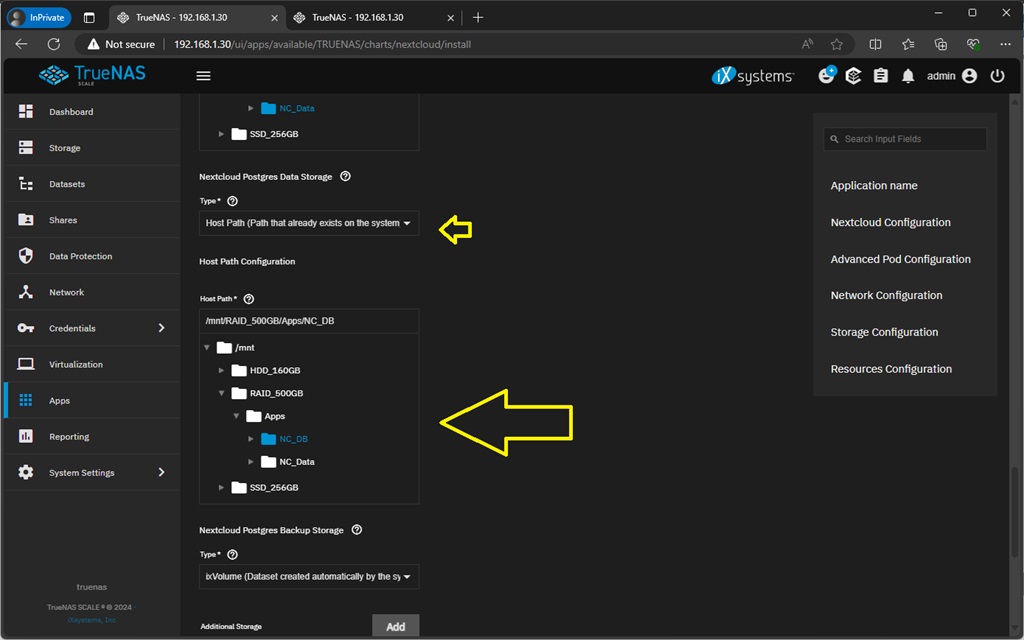
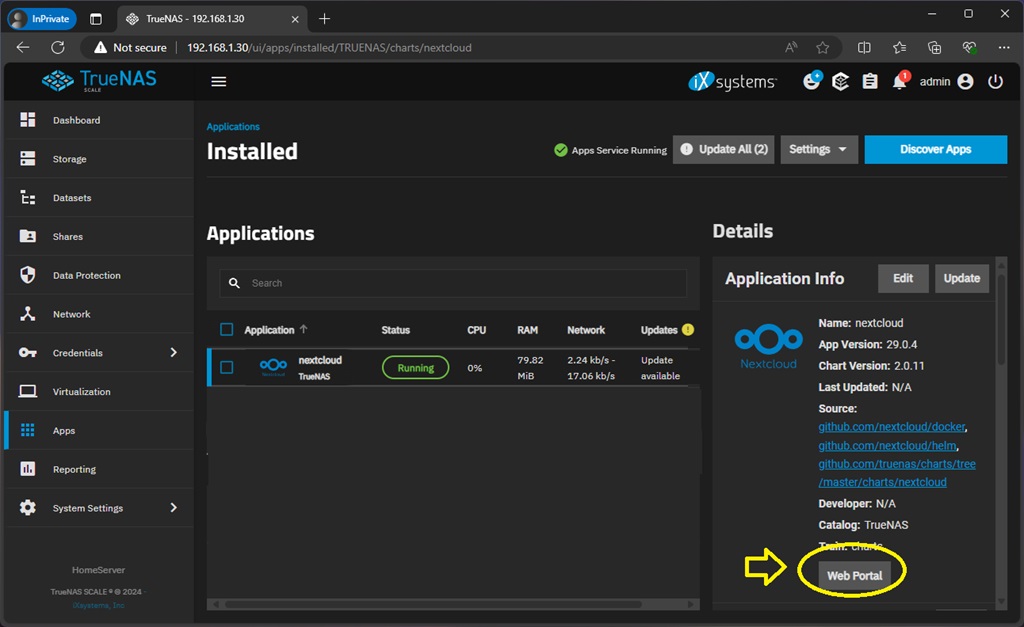
The same thing needs to be done with “Nextcloud Postgres Data Storage”, here we are selecting the dataset NC_DB. Now we can scroll down and click install to start the app installation. Depending on your internet speed and server performance, it may take few min to complete the installation. Once the apps page shows nextcloud running in green, you can select nextcloud and in right hand side menu, click the option web portal for launch a new window for nextcloud login.
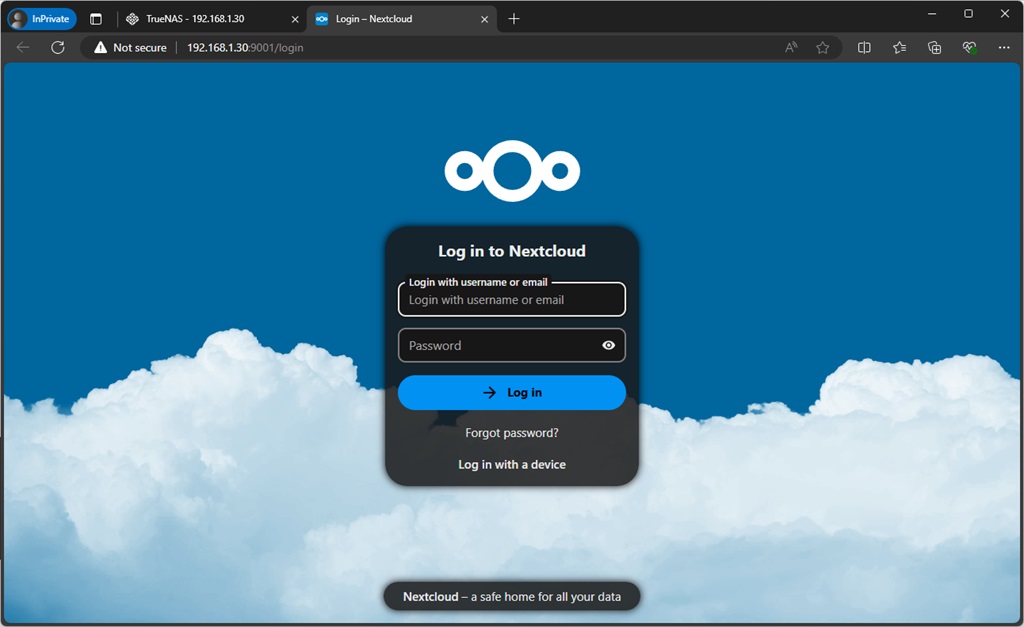
You can use the admin user name and password which you created at the time of installation to login to Nextcloud.
Now the question is How can you use Nextcloud to automatically backup your phone / computers? Like Google Photo or Drive or Apple iCloud does? We have already covered that in one our previous articles on nextcloud, you can read more and learn about the usage process there.
Read the Nextcloud using process part on this article -> https://lazytourer.com/in/how-to-install-setup-use-nextcloud-as-google-photo-alternative-for-local-backup/
TrueNAS Scale Apps – File Browser
By default, TrueNAS scale doesn’t have any file explorer or file browser. Think of it like Windows My Computer or Explorer from where you can browser your entire disk and folders. Normally for using TrueNAS, we shall be accessing everything via the NextCloud Application but for maintenances or troubleshooting and specially adding media to JellyFin Server, you would need something to few the raw files or folder inside TrueNAS and Storage Pools or Datasets. For that we shall be using an application called File Browser.
Installing File Browser
Just like what we have done in while installing nextcloud, go apps and search for File Browser. Click install to open up the installation configuration option. Here, everything will be default except for our 3 storage pools, we need to add 3 “additional storage locations”. Check the image below, 3 additional storage locations, all are selected as “Host Path” and for each, we are selecting the host path as the storage pool and for mount path we are writing the name of the pool like this /SSD_256GB or /HDD_160GB respectively. Dont for that “/” at the start while writing all the mount paths.
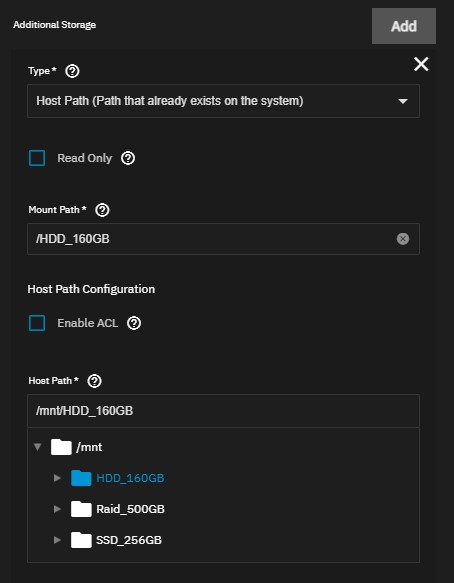
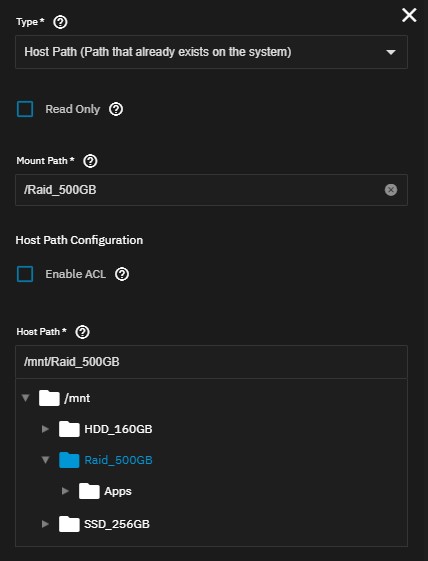
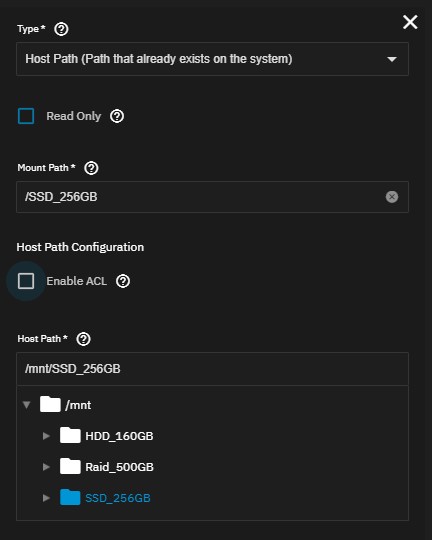
Since we had 3 storage pools, we have created 3 additional storages with above mentioned configuration. For your setup, it would be different depending on how many storage pools you have. For each pool, setup an additional storage like shown above.
Now click install to install the application. Just like what we have done in nextcloud, wait for the app page to show file browser application as green running. Then select it to click Web Portal in right side menu to open file browser.
admin // admin is your default username and password for login and you can change the password later inside the filebrowser.
TrueNAS Scale Apps – JellyFin
Jellyfin server is a software which allows you to run your own personal streaming server like Amazon Prime video or NetFlix. Whatever movie or web series you have in your local storage can now be streamed by any device in your network and via internet with proper user credential. Remember, the app and back software is open-source code, so it is absolutely legal and free but the content you want to stream via this service is upto you to obtain license off.
Installation process is very similar to nextcloud. The application database is important so it needs to stay within raid mirror disk but user data, like movies and web series are not critically important so they can stay in some other disk. In our case, the application configuration and database will be in Raid_500GB pool and we plan to put the media library in our 160GB HDD full. The other, application related stuff can stay in its default location. In our case, that’s the 256GB SSD. This process is optional, in case you have single disk, you may put everything in that pool only.
Creating the datasets
Following the same process as described in Nextcloud installation, we are creating a dataset “JellyFin_Data” in HDD_160GB pool and “JellyFin_Config” under Apps dataset of Mirror_500GB pool.
Installing JellyFin App
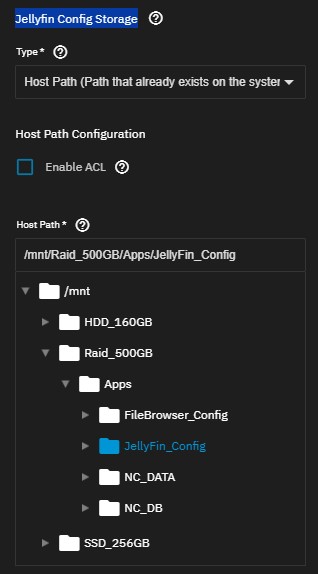
Just like how we have shown in Nextcloud, you can click Apps in left navigation menu and search for Jellyfin. Click install to bring up the installation configuration. Here, you may change the “Jellyfin Config Storage” settings, “type” to “Host Path” and here we are selecting Jellyfin_Config located under Mirror_500GB and Apps dataset. Secondly, we will add one additional storage. In that, for our case, Host Path would be JellyFin_Data dataset located under HDD_106GB storage pool and mount path would be /media

You can now click the install button to install JellyFin service app in your TrueNAS Scale server and wait for the deployment to complete. Once the service is shown as running in green you can select it to click Web Portal on right menu to launch the JellyFin page to proceed with account creation and media library adding.
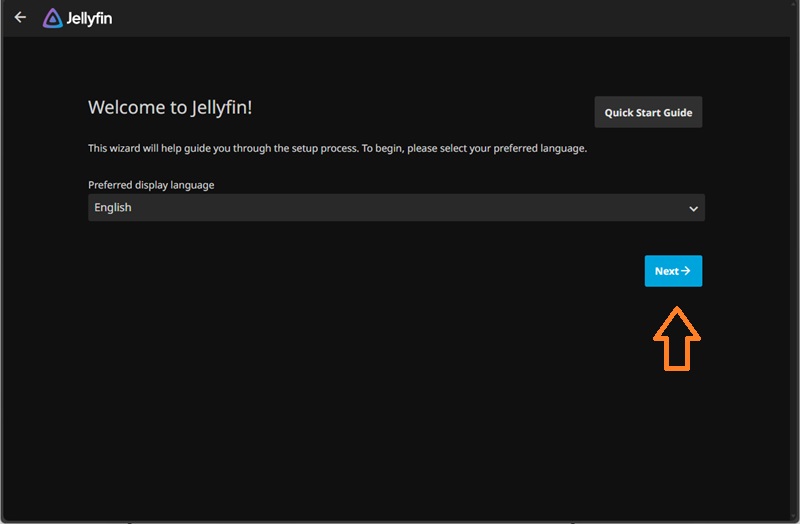
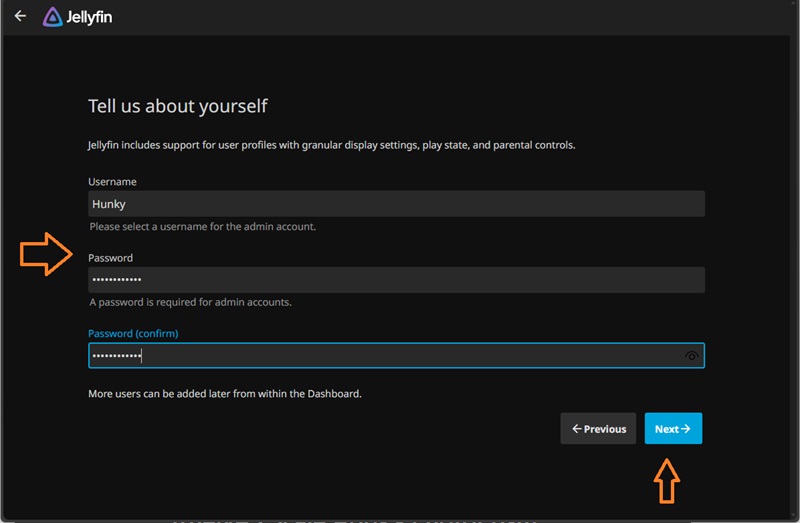
Select your language and click Next. Then Create your own user account with your own desired user name and password. This will be the main admin user of the JellyFin Server.
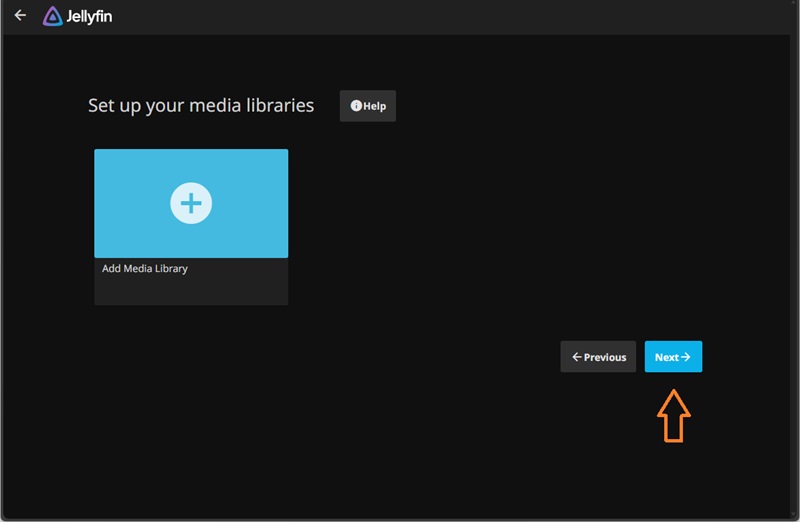
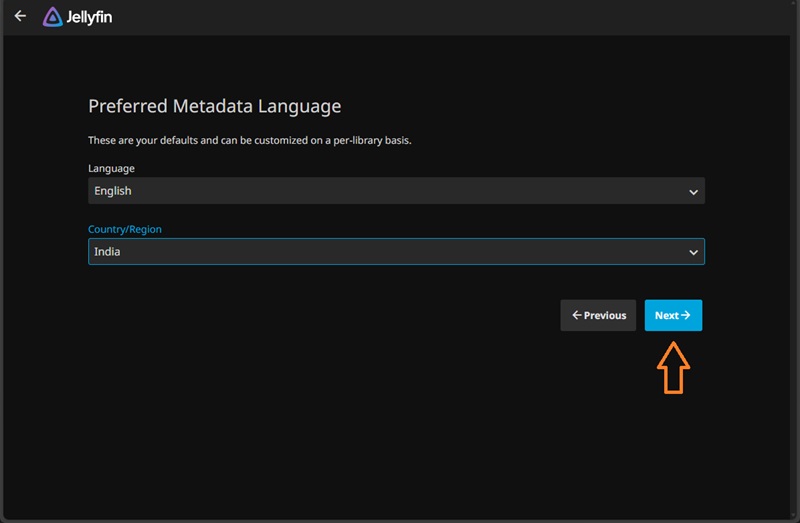
It will now ask you to create or add library, skip that by clicking Next. Now select your preferred language and country. In our case, obviously its English and India. Now click next. Now turn on remote access and automatic port mapping and click Next. The successful Installation message will come now to finish the setup.

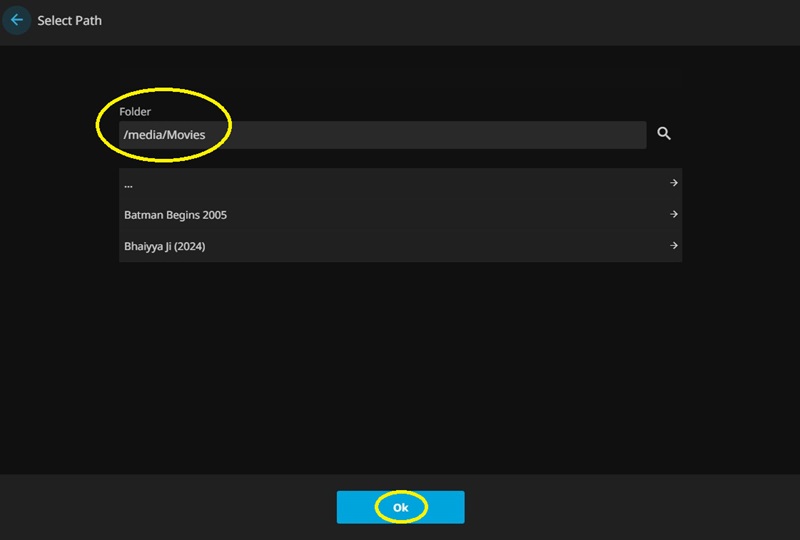
Now its time to add media libraries. Before that, we need to add some content. So open up your Flie Browser and create two folders (Movie & Show) inside that JellyFin_Data dataset we have created. You can now upload your movies in that Movie Folder and Web Series files into that Show folder. Remember, each movie should be in its own folder inside that movie folder and same for web series too. Remember to write that folder and movie name as exactly as they are. Double check the spelling from Internet. JellyFin will read these file name to find the movie info from Internet.
We have done that and now time to come back to JellyFin for creating the Library. For that, log into your jellyfin account (you can launch by click that “Web Portal” button in apps in TrueNAS for JellyFin). Enter your user name password to log into JellyFin. On the left menu of the page, you can click dashboard under administration and then click library to add a new library.
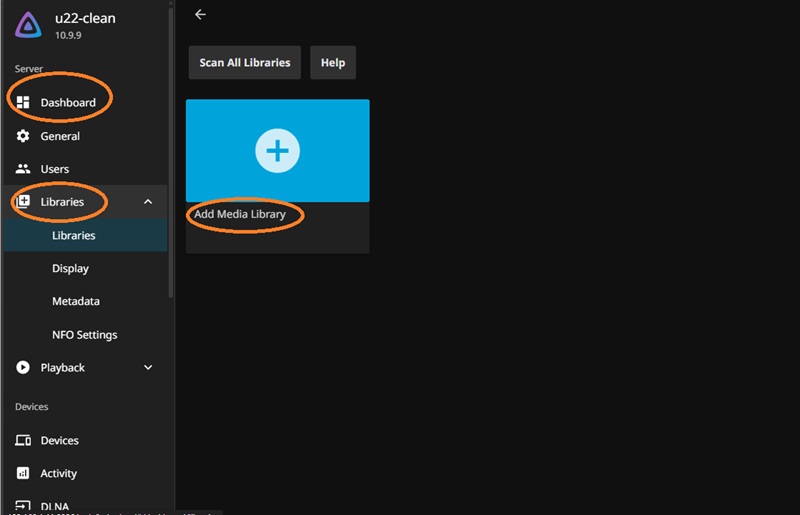
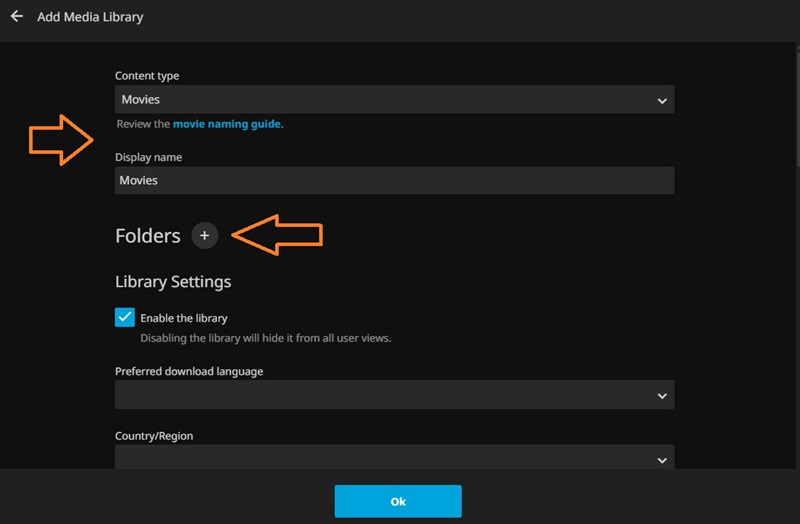
Now here, “Content Type” will be “Movies”, Display Name would be anything, but to ease, we are naming it Movies. Now click that folder + button to select the location. It would be under Media -> Movie.
Now select your preferred download language and country and check on following option, Automatically add to collection // Automatically refresh metadata -> 30Days // Save artwork into media folders // Trickplay & Chapter Images. Keep rest as default, don’t change or alter those settings. Now click ok to complete the first library adding. Server will now refresh the media library to build it’s cache.
Do the same thing for Shows too. Same process as above to complete that second media library adding too.
Now you can access your JellyFin server via Android / iOS or any TV based JellyFin application. Check the respective app store and download the app. One can also access this via browser too. You can also create multiple users for different people and they too can access this server. Server address / URL within local LAN -> is your ServerIP:Port
TrueNAS Scale Apps – PhotoPrism
Nextcloud is automatically backing up our photos from our computers or phone. To view them, we can use Nextclouds own photo gallery, but it is really simple compared to the featured offered by something like iCloud Photos or Google Photos. PhotoPrism offers far better and feature rich photo gallery experience. That is why we are going to use PhotoPrism as our photo gallery, via which we can view all our photos as like any other online photo gallery.
Installing PhotoPrism
Since photoprism would only access data from nextcloud, so this is basically same data. Therefore, there is no need for mirror storage to store this data. However, since scrolling through a photo gallery needs a faster storage with higher speed, we are going to use our SSD for this. And our SSD is already the default storage of any apps so we dont need to make any storage related configuration change here.
Just search for PhotoPrism in your apps section of TrueNAS Scale dashboard, click install to open up the installation page and enter your desired password. Now click install to finish the installation. Once the app is deployed and showing running in green you can click the web portal option in right side to launch the web page.
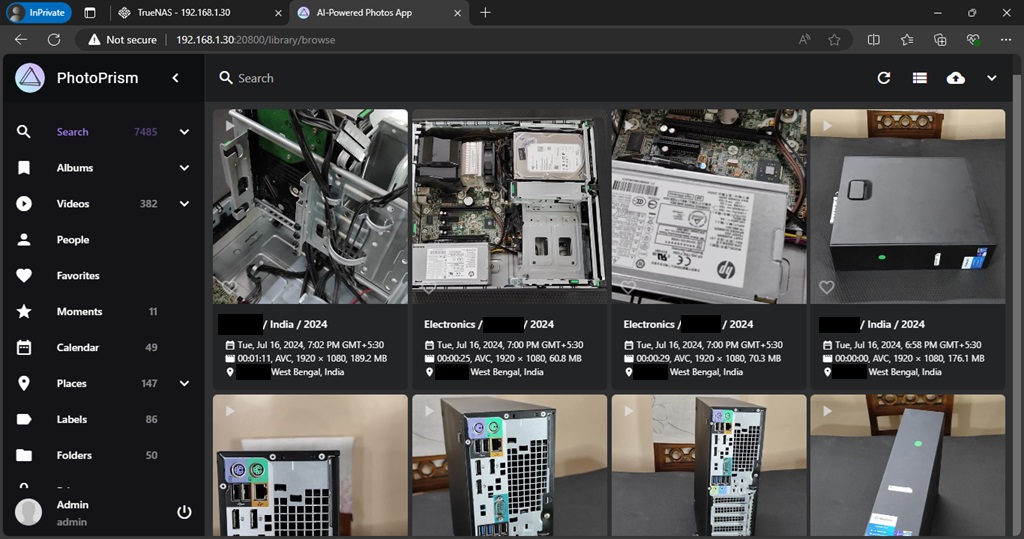
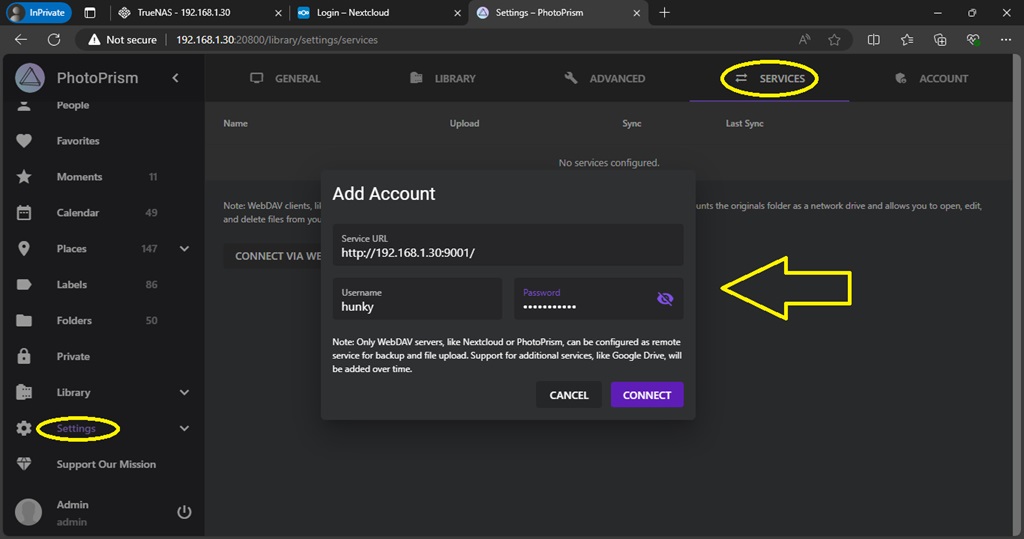
Now click the settings option in left side menu of PhotoPrism and click Services up top. There click add account to add your nextcloud account into PhotoPrism so that it can start importing the images and videos from there.
Making the Home Cloud TrueNAS Server Online
As of now, our server is fully ready and accessible via our local LAN with IP address and port of respective applications like, Nextcloud // PhotoPrism // JellyFin. However the server can’t yet be accessed from outside our home LAN network. For that we have three options. Either to use any of them,
| CloudFlare Tunnel (Free to use) | Static Public IP (Paid) | Cloud VPS – VPN Tunnel (Paid) |
The fastest (performance) & most easy to use solution is off course asking your internet service provider to give you a public static ip (IPv4). Usually in India, it costs around Rs 2500/- per year on top of your existing internet plan. Prices may vary depending on your location, city, ISP etc. However, some Internet services providers are really stubborn on giving out Public Static IPv4 on domestic plans, like for example, Jio Fiber. They will simply not give you the option to rest a public static IP.
In that case, the next best option is to use a Cloud VPS (Virtual Service Provider) to rent a lowest spec VPS. There, running Ubuntu LTS along with OpenVPN to create a VPN tunnel between our home server and that VPS to forwards (pass through) all traffic (respective ports) from that Public Static IP of VPS to our Home Server. Usually a low specs, cheap Cloud VPS may cost your around USD 15 per year, meaning around Rs. 1500 per year.
Last of all, there is this option of CloudFlare tunnel. This is free to use but comes with risk of account ban in case you abuse their data policy with really high amount of data transfer. But in case of Home Server use, usually this is fine and most of us wont fall in that heavy use category. So, we are going to use this option.
For all of these options, having a TLD (domain name) is mandatory. So first, lets purchase a domain name.
Domain Name Purchase
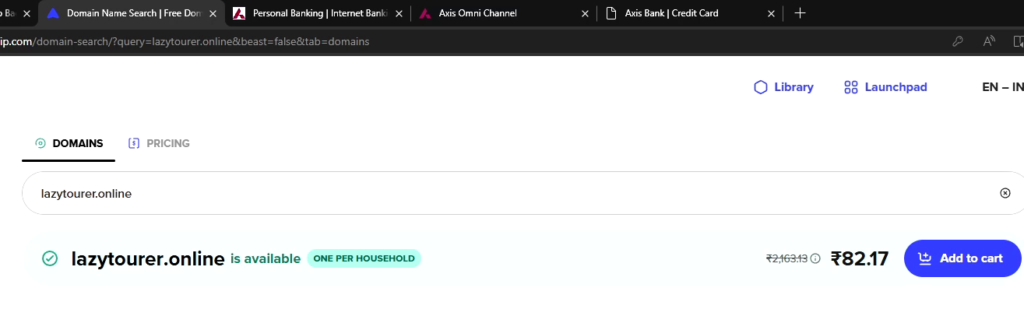
We will need a to purchase / register a top level domain name, commonly known as just domain name. Normally, when talking about domain names, we think of an address like something.com or something.org or something.in like our website, LazyTourer.com. Here, the first part is the name and second party, like that dot com or dot org is called an extension. If you like you can certainly buy such but we can save some money by choosing an obscure extension like, dot online or dot pw. Those extensions are really cheap compared to dot com and dot in or net. Functionally they are all same. There is no technical difference between a dot com domain and one dot pw domain.
You can search on the internet for the cheapest possible .online or .pw type domain selling websites. Like, Godaddy, BigRock or NameCheap and so on. Offers run all the time, and they cost around USD 2 (Rs. 150/-) for one year validity. As on writing this article, I am getting LazyTourer.online at really cheap rate so I am booking that. You may need an international OTP less payment enabled credit card or debit card for this purchase.
Usually, new domains are activated within minutes for official maximum time frame is upto 72 hours. So in some rare cases, you may need to wait for some time to see the new domain active in your account.
CloudFlare Setup
You will need to create a free cloudflare account from cloudflare.com
The process is really simple like creating a new email account or such. Just feeling up the form and your account will be ready. Remember, they will offer many trials or this and that, do not activate any trial. Stay on the FREE cloudflare account only.
We are going to use two features of CloudFlare, 1. CloudFlare DNS Management & 2. CloudFlare Tunnel
Adding the new domain to CloudFlare Dashboard
Open the CloudFlare.com website and click login to enter your user name and password to sign into your Free CloudFlare account. In the main dashboard, at your right hand side, you can find an option to add a new site, click that.

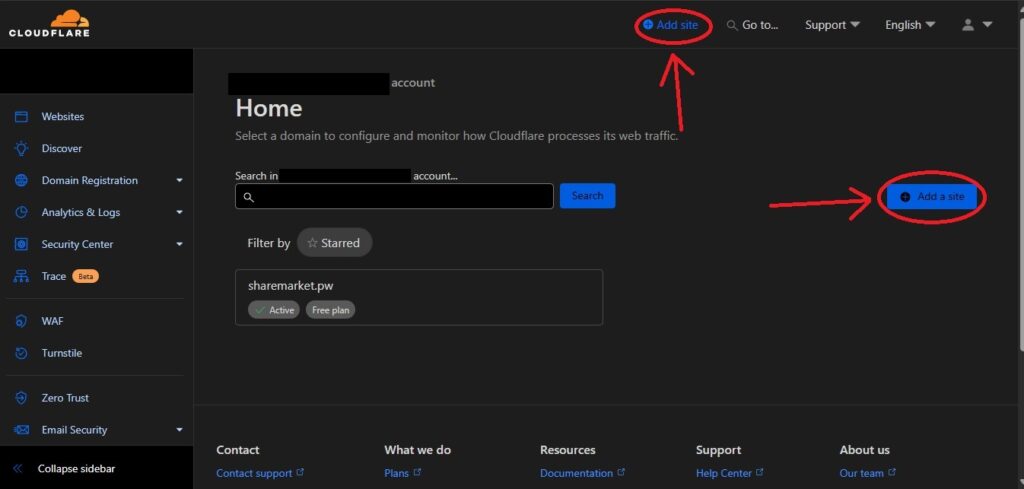
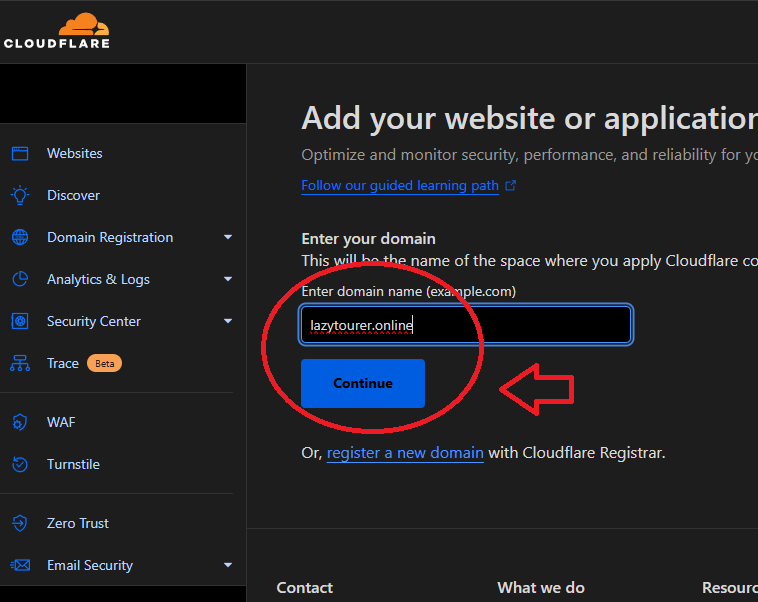
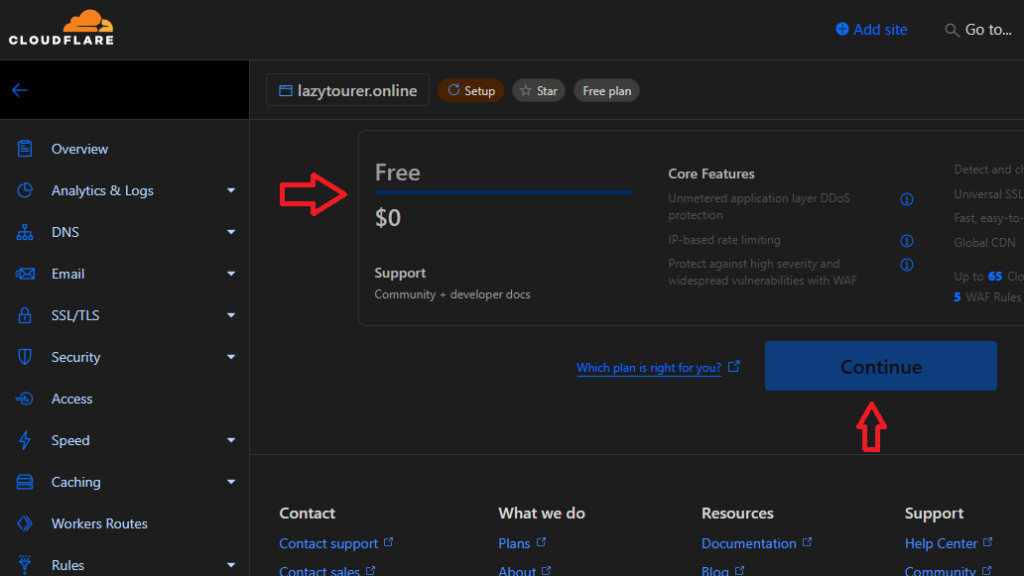
Enter your newly booked / registered domain name and ensure to select the FREE plan and click continue.
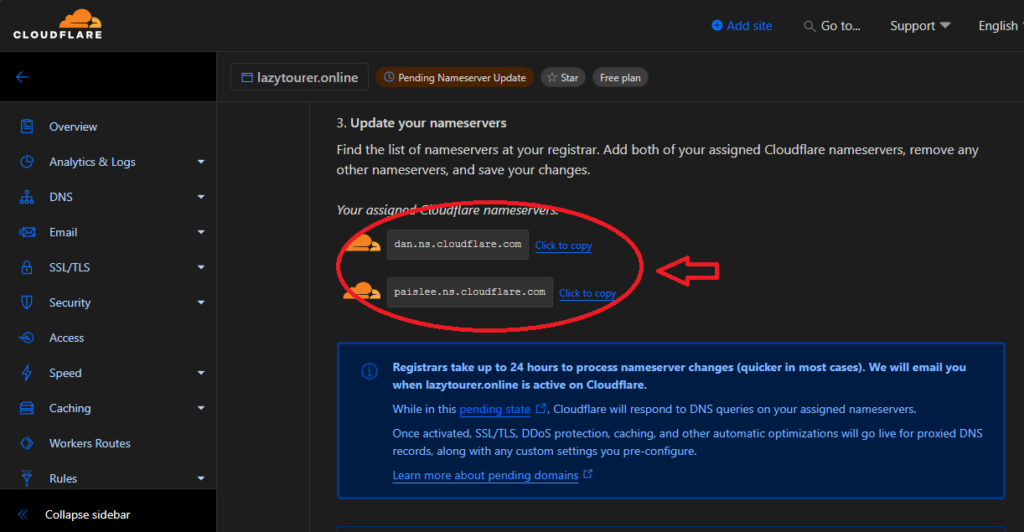
On the next page, delete if any previous / existing DNS record is found. Ensure that there are no DNS records by deleting any such entries and continue to next step. In the next step, cloudflare will generate two NS record entry for your domain. Copy those two records into a notepad file. Then click continue in the bottom to complete the domain addition process.

Adding CloudFlare NS Records to your New Domain
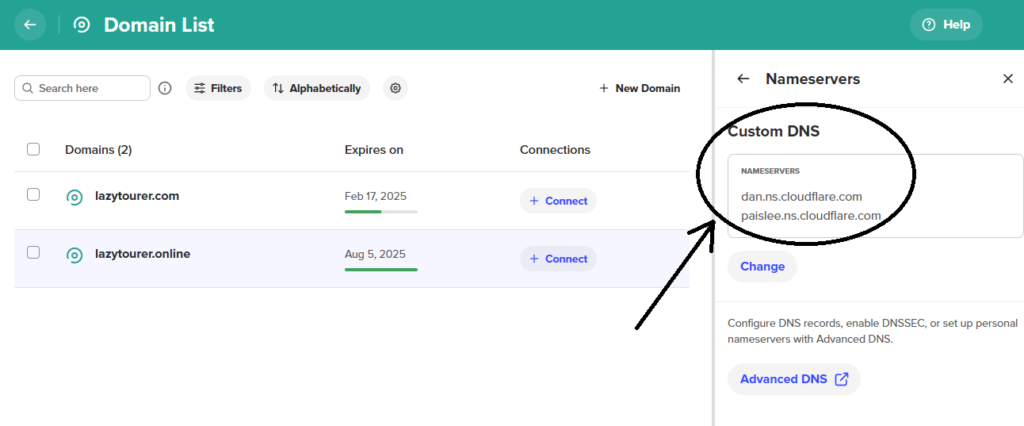
Process is very similar in every domain selling company or domain registrar but their website navigation would be little different. You can refer to their help section or simply search on how to change NS (Name Server) record for the domain registration company you have used. You need to delete the default NS entry for this new domain of yours and add the cloudflare given values. For our case, we have done so for this new LazyTourer.Online domain.
Usually it takes around 10/15 mins for the records to get updated, but for some rare cases, it may take upto 48 hours for the records to update and the domain is shown active in your cloudflare account. You have to wait till the domain is shown active in your cloudflare account.
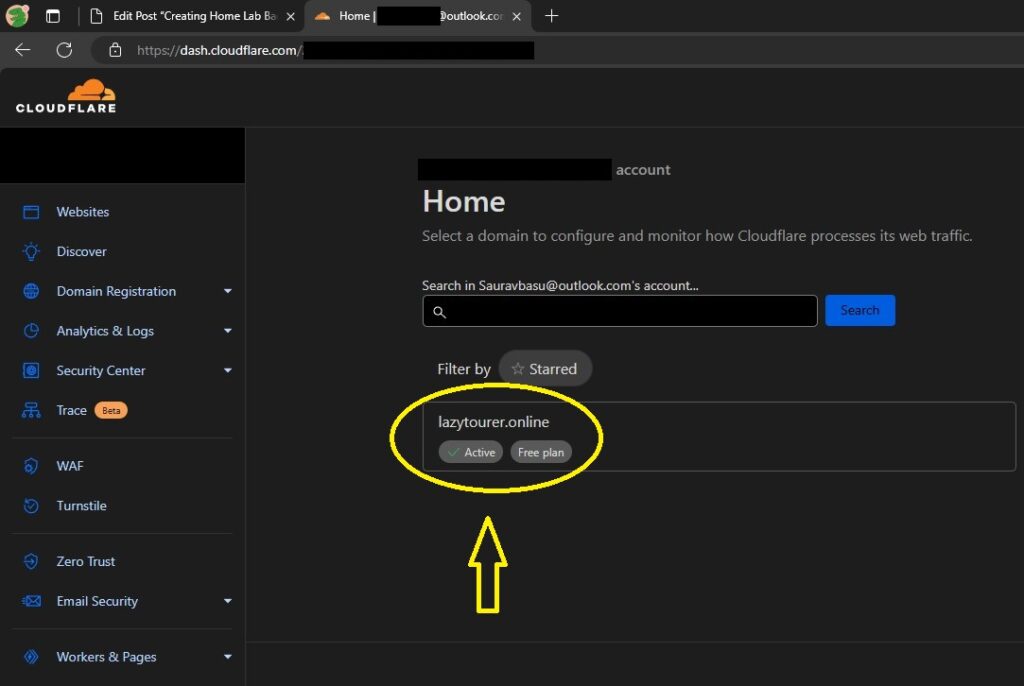
Once changes are applied, you can see your domain as active status in cloudflare account page.
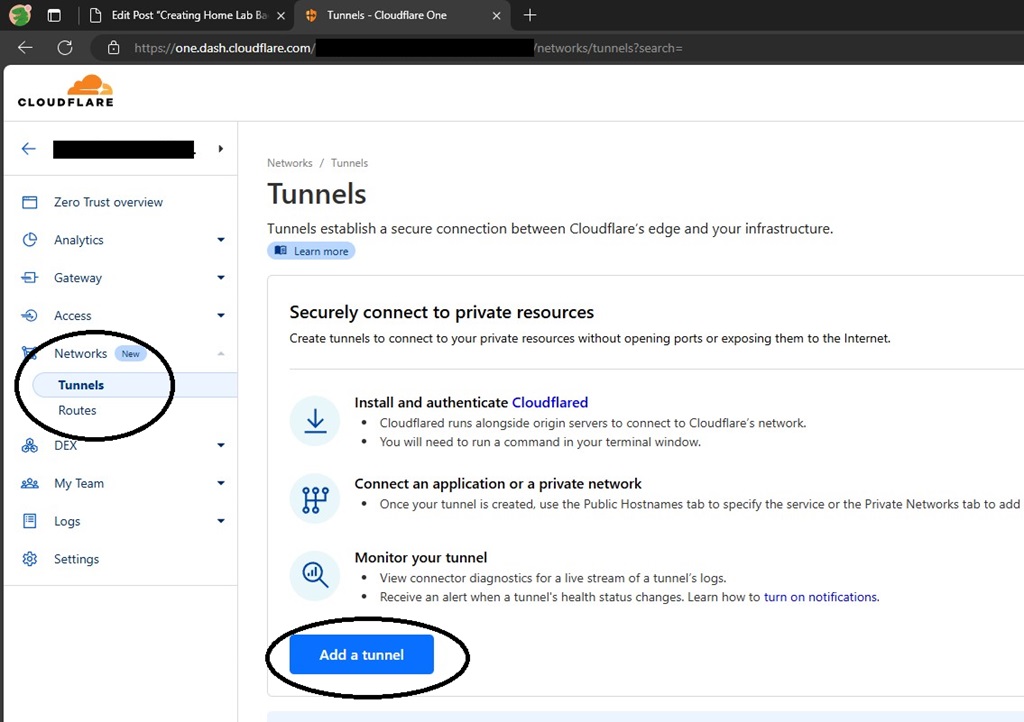
Creating CloudFlare Tunnel
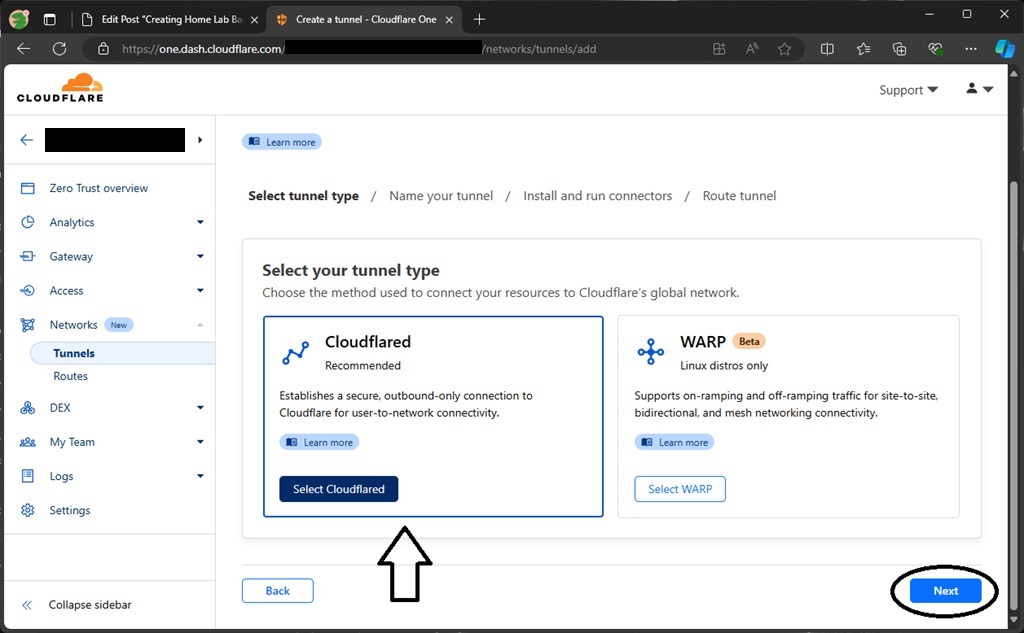
Click “Zero Trust” on the left side menu of CloudFlare page. It will launch a new window, there on left side menu click “Network -> Tunnel”. Click Add tunnel and select “Cloudflared” tunnel option and click next.
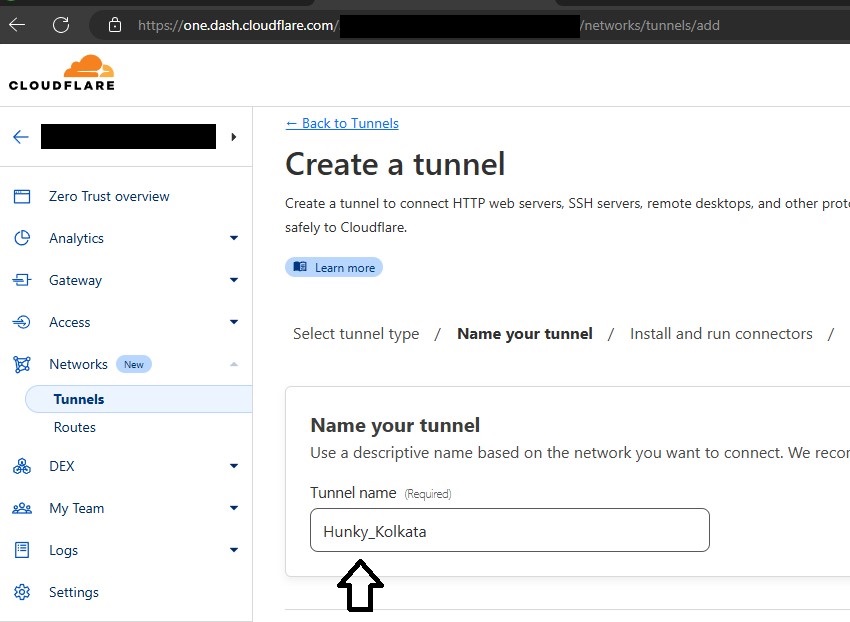
Now enter a name of the tunnel as per your liking and click next / save tunnel. This will bring you to the tunnel installation page. For our TrueNAS Scale Server, we only need the secrete token as shown in the below screenshot, copy that for installation in your server.
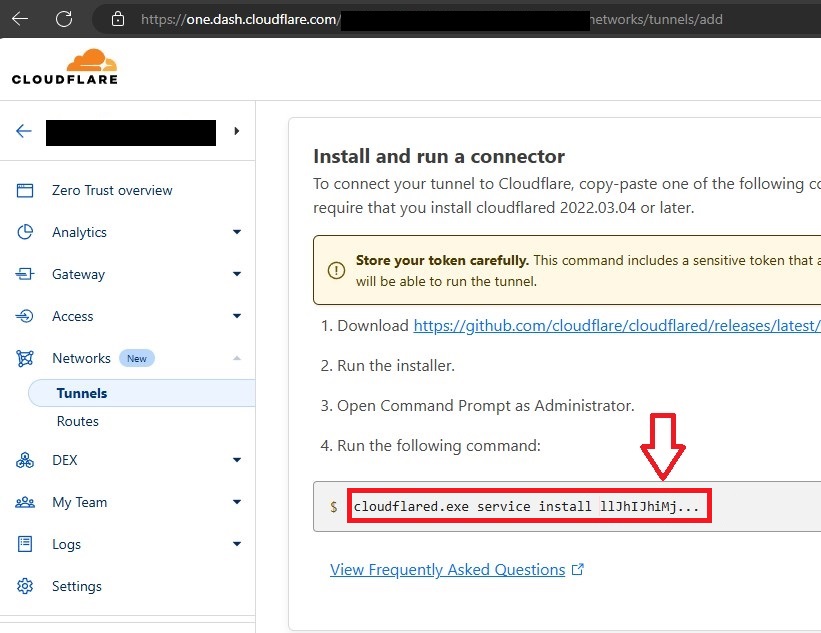
Remember, paste that code into notepad first, since the actual token is long and hidden. We need the token only, not the entire command code.
Installing CLoudFlare Tunnel in TrueNAS Scale Server
Login to your TrueNAS Scale Home Server and go to apps in the left side navigation menu. Just like we have done with Nextcloud or other apps, similarly, search for CloudFlare Tunnel and click install. The only change you need to do here is to enter the “token” you have copied from cloudflare tunnel page in the given place and click install to deploy the tunnel.

Creating the Subdomains for outside access
Every App running in our TrueNAS server is on different ports. In this case, there are 3 of them which requires outside access. Namely, NextCloud // JellyFin // PhotoPrism. As you open them in browser by clicking the web portal button, you can see the port behind the IP address of the server. For our case, following the address,
| NextCloud | JellyFin | PhotoPrism |
| http://192.168.1.30:9001/ | http://192.168.1.30:30013/ | http://192.168.1.30:20800/ |
| Port -> 9001 | Port -> 30013 | Port -> 20080 |
Now under your cloudflare tunnel page, on the next step, it would be asking you to “Route Traffic // Add Public Host Name for Your Tunnel”. We need to add three public hostnames for each of the above-mentioned apps.
So for nextcloud, following are the details to enter,
| Subdomain | Nextcloud (you can write anything you wish) |
| Domain | Click to select your domain (our is lazytourer.online) |
| Path | Leave it blank |
| Type | Select HTTP |
| URL | 192.168.1.30:9001 (our server LAN IP & nextcloud port number) |
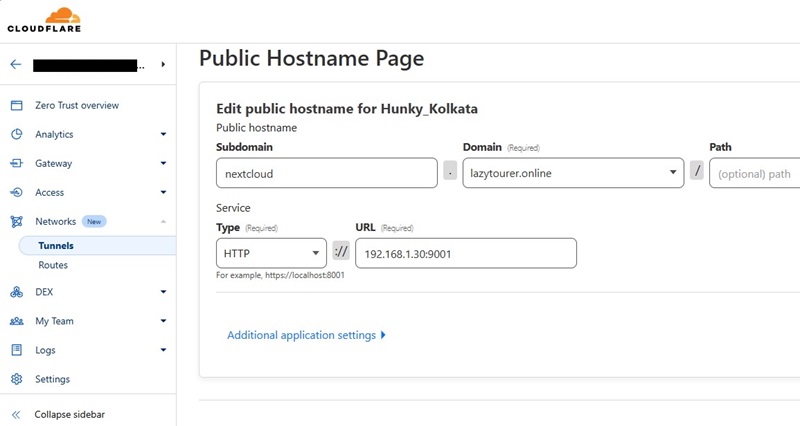
Save the tunnel and then click edit / configure to repeat this Public Host Name creating step for rest of the two apps with their respective port numbers in similar manner. So at the end of this process, we have 3 public url address to access our nextcloud, jellyfin and photo prism via internet from our home cloud back server. In our case, they are, #1 Nextcloud -> nextcloud.lazytourer.online // #2 JellyFin -> jellyfin.lazytourer.online // #3 photoprism -> gallery.lazytourer.online
Configuration Edit for Nextcloud Access
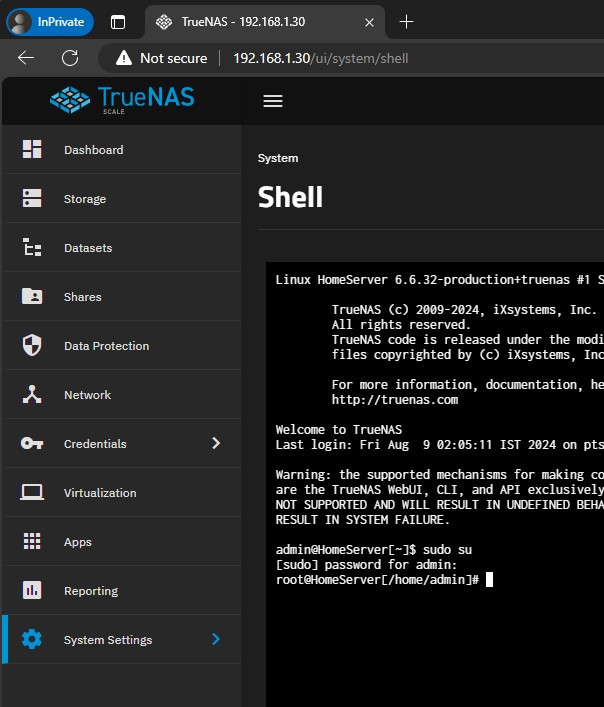
Jellyfin and PhotoPrism will work out of the box via your subdomains from outside access but nextcloud wont due to its extremely strict security settings. We need to manually edit it’s configuration file to allow our subdomain to work. This is the only part where you need to touch the code & commands. So by far, in this guide and setup process, this is the toughest part. Click System “Settings -> Shell” and run first command,
sudo su
It will ask for your TrueNAS password. Enter that to Authenticate yourself
We need to edit the Nextcloud configuration file to add an extra entry for our subdomain name. In our case, it is nextcloud.lazytourer.online Yours would be different according to your domain name and subdomain. The location of the configuration file is at,
/mnt/SSD_256GB/ix-applications/releases/nextcloud/volumes/ix_volumes/html/config/
Be careful here, as you can see, in every different setup, this red color highlighted part above would be different. Rest will be the same. That part, is our storage pool name where application files are stored. If you read above in the article, you can review, that we have selected our SSD as our default application installation location and for nextcloud, we didnt change the location of it’s core files. So our location looks like that. So now we would run command to open up the config file in a text editor inside the shell.
Run this below command,
nano /mnt/SSD_256GB/ix-applications/releases/nextcloud/volumes/ix_volumes/html/config/config.php
This will bring open the config file in a text editor. Be careful, dont not change anything. Just using your keyboard arrow keys, down arrow to scroll down to find the part which says ‘trusted_domains’ => as shown in the screenshot below.
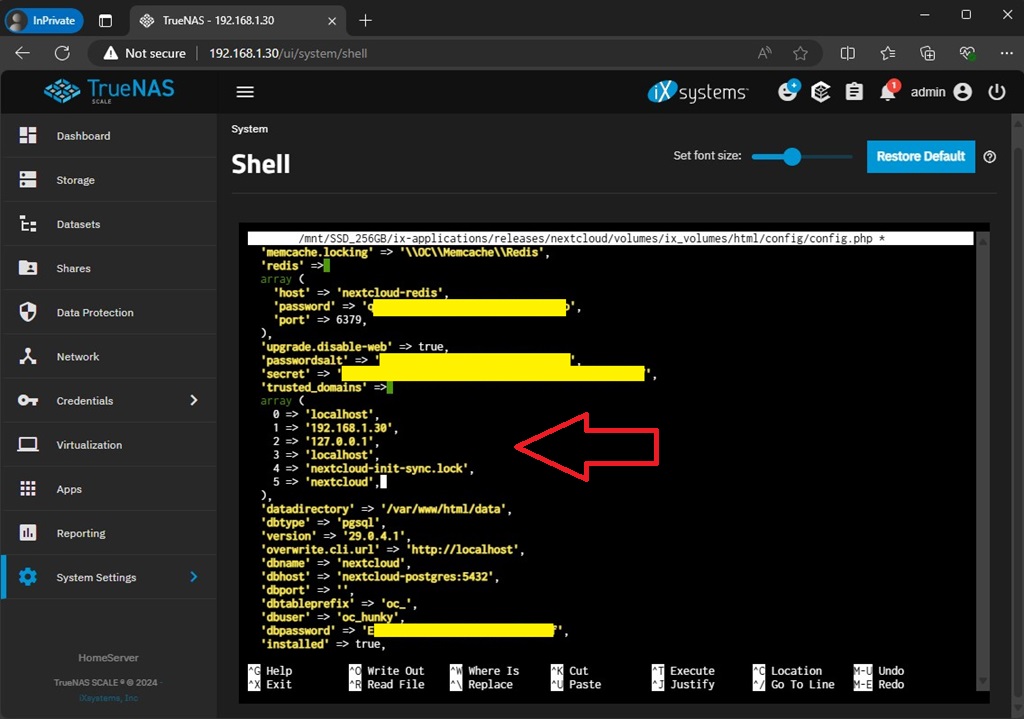
You need to write an extra line after that 5 => 'nextcloud',
Be careful and write exactly as in the format of the file, with the needed “space” as required. For us, we are writing 6 => 'nextcloud.lazytourer.online', as for you, write your own subdomain name of the nextcloud that you have created in cloudflare. Just like as shown in this next screenshot.

Nothing else, nothing more. Once done carefully without any mistake, now it is time to save this edit. For that hit following keys in your keyboard, press CTRL + X, then type Y and “enter” to save and exit the file.
Now reboot the server and check accessing the nextcloud with your external access subdomain via a different internet connection.
Conclusion
If you have done all the steps correctly, by now, your own selfhosted always online personal home cloud backup server should be up and running. You don’t have to login to TrueNAS anymore for anything, you can access those different apps via their respective URLs and just keep using them. You can access and use it via internet from anywhere in the world.
For our setup, starting from zero, we have spent Rs. 8,500/- on the system with Rs. 4,000/- on upgrades and Rs. 450/- for the USB Pen Drive. Total of around Rs. 13,000/- is cost for the hardware & one year of domain name. Whereas, on average, we have measured the electricity bill of around Rs. 250 / Rs. 300 per month in Kolkata with 24x7x365 nonstop running.
Depending on your budget, your system configuration may differ and based on your processing load and system configuration, your monthly electricity bill.
So go ahead and give it a shot, try for yourself and if any question, suggestion or comment, you can use the comment section below.
Thank you, sir. I have already successfully installed and am running my self-hosted home cloud storage. This one is very interesting; I’ll try this project too. Bro, I have a request for you. Please make a video and post article about Immich app installation as the Nextcloud Gallery app. And Is it possible to create multiple users in Immich app. I have 6-7 family members as my server users. Waiting for your reply. Thank in advance.
Hey Ramesh,
Check out the Hyper-V video. You can use virtualization to test setups before deploying them on production servers. And regarding immitch, as spoken in twitter, feedback taken, will do !!
Thanks.