
Back in 2015 Google announced free and unlimited backup for all our photos and videos with their Google Photos app. The app and service is cross platform compatible, meaning works with Apple iOS (iPhone / iPad), Android phones and any browser in Computers !!
The service is amazing and just like me and you, entire world is hooked into it. No more headache of phone memory space running out as once the pictures and videos are backed up, you can delete it from device storage but still access all of them via Google Photos app via your internet connection.
However, once we all got used to and somewhat depended on Google Photos, all of sudden they pulled the ground out of our feet and announced closing of unlimited free back up storage from June 01, 2021. At least they were kind enough to let us keep all previously uploaded pictures and videos but anything new will eat into the 15GB default storage of your google account shared between Gmail / Drive and all other Google Services.
What are your options with Paid Google Photos?
1. Pay for storage in Google Account and keep using Google Photos.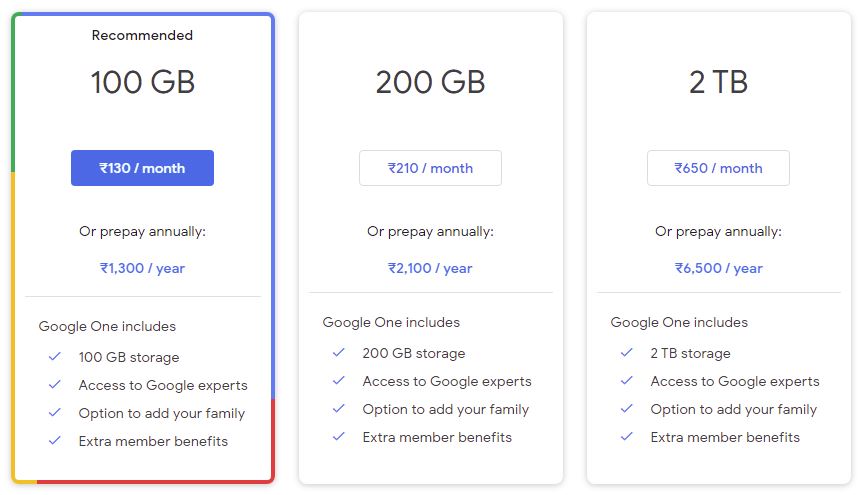
This is the easiest way out, Rs. 1300/- per year isn’t bad at all, specially when you get Google’s solid internet infrastructure & servers. This 100GB of space can be used for Google Drive or Gmail also. Best part is the ability to add Family or friends account to share this 100 GB space between each other. Helps to keep the cost down and your entire family or mates can take advantage of the storage.
2. Pay other cloud backup service providers.
Frankly speaking, Google’s pricing is really good and this space can be shared between other Google account holders and services makes it the best value for money, but in case you don’t want to pay Google for any reason, there are many Cloud Service providers to choose from.
3. You need Free options
What if you are like me and need something absolutely free to replace Google Photos to backup your and family devices? In this case, you have to consider local storage (in your PC or MAC) backup and below is a long but very useful tutorial about using Nextcloud as the best Google Photos alternative to backup photos and videos from android phones tablets and iPhones / iPads. It supports multiple users, so your entire family, friends or room mates too can use it along with you.
Setting up NextCloud as Google Photos alternative
NextCloud is a free to use (personal use) software which runs on Linux / Docker containers but doesn’t support Windows directly. Don’t worry, its not that tough & will not cause any issue with your computer.
Prerequisites of using NextCloud
You need to have following stuff to run & use NextCloud,
- One Laptop or Desktop Computer
- Wireless Router with Internet Connection
- Virtual Box (Virtualization) – Free Software
- Ubuntu OS – Server Operating System
- NextCloud – Free Software
Interestingly, if you are like me, having an old low powered laptop gathering dust, you can skip VirtualBox / VMWare type virtual pc software and install Ubuntu + NextCloud directly on that.

How to Setup NextCloud for Google Photos Alternative?
Step One
This process starts in your Computer, first download two software, VirtualBox and Ubuntu 20.04 LTS Server. Both are free to use software, so no license or money needed to purchase these. You can do it in any computer running Windows 10 latest or MAC OS latest.
VirtualBox -> Oracle VM VirtualBox
Ubuntu Server -> Get Ubuntu Server | Download | Ubuntu
Install the VirtualBox software. Installation is extremely simple, few clicks. There are tons of web tutorials and YouTube how to hands on videos available, you can watch them if you need or wish.
Step Two
Creating a new Virtual Machine and Installing Ubuntu Server.
Launch the Virtual Box software / application, and in main Window, click New to create a new machine.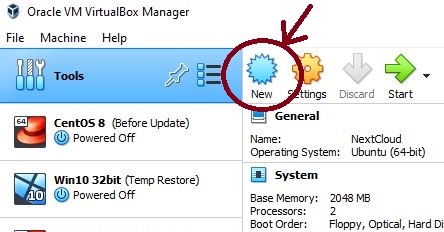
Now in the Machine details Window, enter your details just like the screenshot below,
Name :- Ubuntu or NextCloud or what ever you wish.
Machine Folder :- Change the location as per your need, if you have SSD/NVMe, try to keep it in there.
Type :- Select Linux
Version :- Select Ubuntu x64
Memory Size :- If you have 6Gb or more RAM, enter 2048 MB (2GB), if 4GB or less RAM then (1024) 1GB.
Hard Disk :- Create a virtual hard disk now
Now click Next to proceed to the next step to create Hard Disk,
Location :- Don’t need to touch it as you have already given it a location in the above step. Just make sure its the same location.
File Size :- 30GB
Hard Disk File Type :- VDI with Dynamically Allocated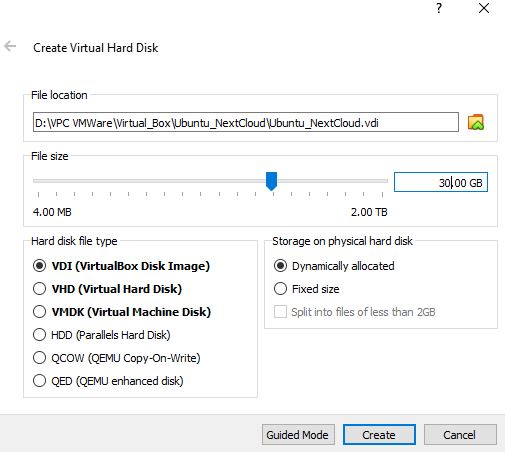
Clicking create will now create the Virtual Machine for you.
Step Three
Configuring the Virtual Machine and Installing Ubuntu.
Once the machine is created, now select the machine and click settings. As you may see, I have multiple VMs listed so I needed to select the machine I wish to modify the settings,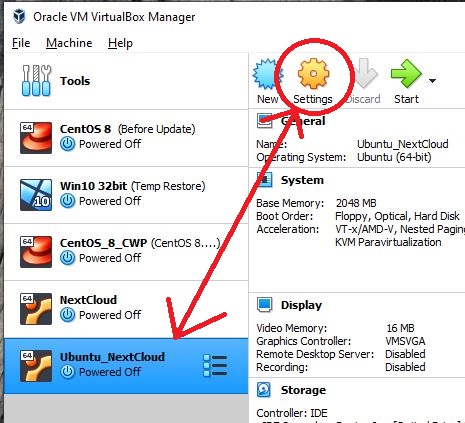
You need to change following settings, so refer to the each image and continue,
Under System, go to processor TAB and select 2 CPU and enable the extended features as shown below,
Under Acceleration TAB, enable the nested paging hardware virtualization as shown below,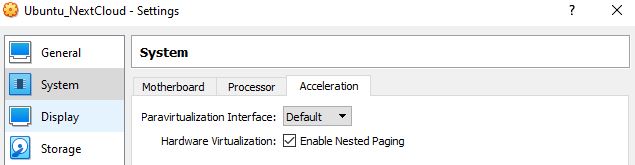
Now go to Display and enable acceleration and assign max video memory as show below,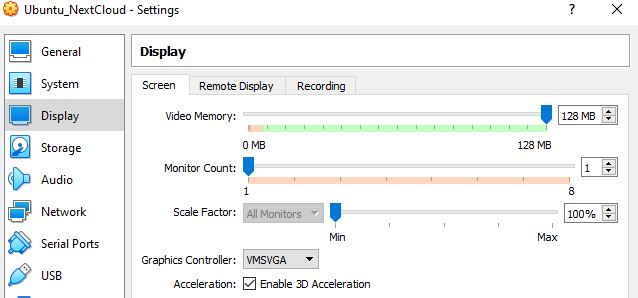
Under the storage option, click Controller IDE and then select the Ubuntu Server downloaded installation ISO file as shown below,
Finally, under network settings, select Bridge Networking as shown below,
Now you can start the installation of Ubuntu by starting the virtual machine.
Step Four
IP Address selection under installation.
There are tons of Ubuntu Server Installation videos and website tutorials, search and follow or refer to them on installation. Its really simple, just proceed without changing any default options (off course select your own country and time zone).
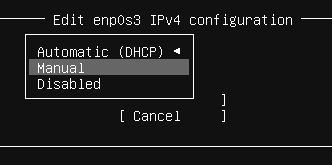
Just one thing you need to modify, thats setting up a static IP for this Virtual Server. Select your Network, edit the IPv4, Set it to manual and input the IP Addresses as shown below,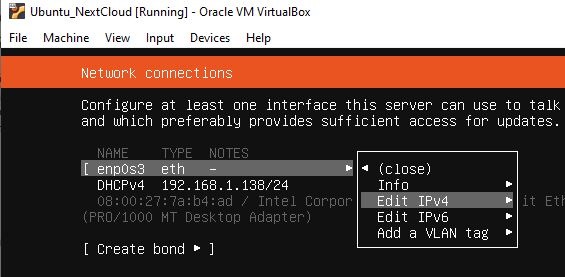

Remember, your IP Address range can be different depending on your router settings, so check. Most of the Routers either use 192.168.1.1 or 192.168.0.1 type range. So input the details accordingly !!
Continue and complete the installation.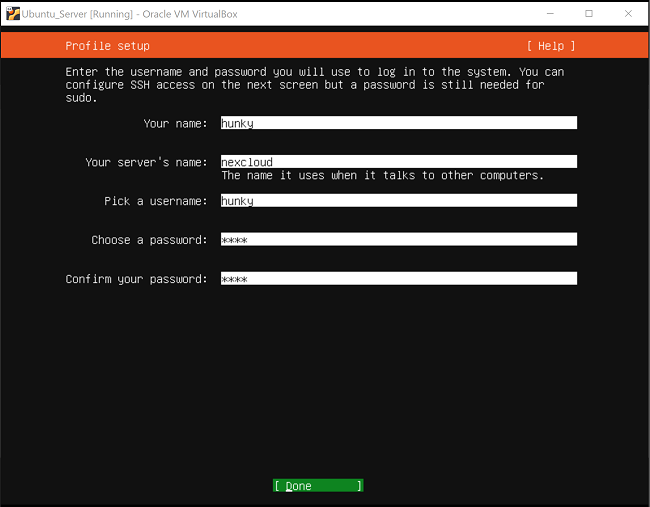
Remember to write down your User ID and Password. Make sure not to use any space or upper case letter while creating these. Helps in later stages.
Step Five
Creating 2nd virtual disk & attaching with Ubuntu Server
Before you go for the NextCloud installation, its a good idea to create a second virtual disk drive for all the backup that Nextcloud would do. It helps to move and later restore stuff if things go wrong in future.
Shutdown the Ubuntu Virtual Machine, then click file in Virtual Box main window and click the virtual media manager option.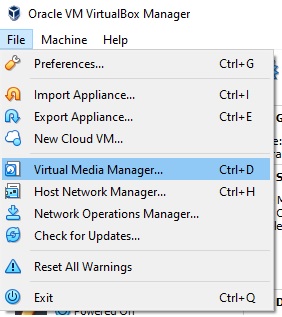
Now click create to create a new virtual disc, name it ncdata.vdi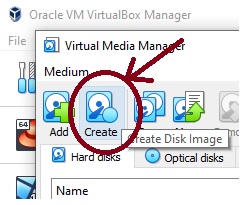
Input 500 GB as size and make sure to select VDI / Dynamically Allocated Disk Space option. You can select a different location for this VDI file, since its your data drive, you can place it in mechanical hard drive of yours while the virtual machine disk stays in your fast NVMe or SSD storage.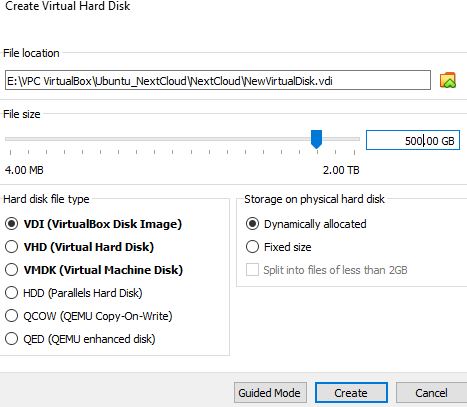
Now go to the settings of your Ubuntu Virtual Machine,
Under storage settings, add this new virtual disc.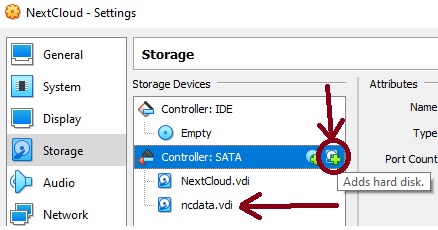
Now start the Ubuntu virtual machine. Yes, it is slow to boot up, since all servers are like this, wait till you are till log in consol. Input your user name and password to log in.
Ubuntu Server is all command line operation so you need to run following commands to mount this new hard disc. You can simply copy paste.
Pro Tip, try using putty (search google and download from putty.org) tool. Just input the static in IP in putty (off course, that Ubuntu Virtual Machine needs to be turn on) to login to your virtual machine as it is easy in putty to copy paste compare to doing it directly in Virtual Box Window.
* Run command sudo lsblk to check second HDD showing. It should now be visible sdb - 500 GB.
* Now format that virtual disk by running command sudo mkfs.ext4 -j -L ncdata /dev/sdb
Every time a disc is formatted, a new UUID (disk identification label) string will be created, so you need to find that and copy it in a note pad for further use.
* Run Command sudo blkid /dev/sdb
It will show such above output in Putty, use your mouse to select that UUID string and press enter to copy it from putty. Then go to note pad and paste it there.
Now you need to Ubuntu system file fstab to mount the new drive under /media directory. You can edit it from Putty by using Ubuntu Built-in text editor called VIM.
* Run command sudo vim /etc/fstab. By default its read only so just press i button to start editing. Use your keyboard arrow key to come down to last and add a new line with following, /dev/disk/by-uuid/4006fe68-879a-41ed-b4da-cc0e6bc6b4bb /media/ncdata auto nosuid,nodev,nofail,x-gvfs-show,x-gvfs-name=NewHDD 0 0
Remember to replace the red colour UUID with your own, that you just copied and pasted in note pad. Press ESC button of keyboard and type :wq! then press ENTER to save this edit.
* Create a mount point under /media directory with following command sudo mkdir /media/ncdata
* Set right permissions and user group access level for the new mount directory by running following two commands, sudo chown -R root:root /media/ncdata & then sudo chmod 0770 /media/ncdata
All done, now just reboot the virtual machine by running command, sudo reboot and restart putty to log back in again.
Step Six
Installing Nextcloud and configuring it. Its simple, just you need to run few commands by copy pasting from here,
* Run following command to install nextcloud via snap sudo snap install nextcloud
* Granting access to /media directory by running command sudo snap connect nextcloud:removable-media
* Creating snap Admin A/C & Password by running command sudo nextcloud.manual-install username password (Make sure to replace this username & password with your desired username & what ever password you wish to set)
* Adding the server static IP by running following command sudo nextcloud.occ config:system:set trusted_domains 1 --value=192.168.1.45 (remember that ubuntu installation step where had set a static IP, replace this IP value with your own server’s IP Address)
* Enable self signed SSL by running sudo nextcloud.enable-https self-signed
* Reboot the OS by running sudo reboot (You would need to close putty and restart and re login)
* Restart the Service by running sudo snap restart nextcloud.php-fpm
NextCloud is installed but now you need to move all data next cloud will save to that additional hard disk by changing the nextcloud data directory.
* First to stop nextcloud service sudo snap stop nextcloud
* Edit the configuration file sudo vim /var/snap/nextcloud/current/nextcloud/config/config.php (press i to start editing and use allow keys to navigate the line which says DataDirectory, now carefully just edit & change that location to new location /media/ncdata/data Press ESC button of keyboard and type :wq! then press ENTER to save this edit.
* Restart the Service by running sudo snap restart nextcloud.php-fpm
* Move NextCloud Data Directory to New Location by running following command sudo mv /var/snap/nextcloud/common/nextcloud/data /media/ncdata/
* Reset the Permission by running following commands, sudo chown -R root:root /media/ncdata & then sudo chmod 0770 /media/ncdata
* Restart NextCloud sudo snap start nextcloud & finally reboot the server by running sudo reboot
* Set right permissions and user group access level by running following two commands, sudo chown -R root:root /media/ncdata & then sudo chmod 0770 /media/ncdata
Thats it, you have successfully created a virtual machine running Ubuntu Server and NextCloud. You can now access this by visiting https://YourIP in any browser, in my case its https://192.168.1.45/ and you can now log into next cloud with that User ID and Password you created while installing the nextcloud.
Configuring the NextCloud
To access or use NextCloud, your Ubuntu Virtual machine must be running along with your router. To open next cloud, you may visit your ubuntu / nextcloud static IP address via any browser and use your User ID & Password to log in. You may need to click Continue as unsafe since this SSL certificate is your own, created in your own Ubuntu, by you. This will not be recognised by browsers and your computer.
In my case, I am visiting my ubuntu static IP https://192.168.1.45 , which I have set while installing the Ubuntu .

Once you have logged into the NextCloud using your nextcloud User ID and password, now you can visit the settings pane and there you may find option to create further user accounts.
Remember, you may create multiple user name for your family members or house / room partners. However NextCloud works just like Google Photos so every user can use their multiple devices, Android / iPhones / laptop / iPad or tablet using that same user name and password and access all of their individual photos backed up and available at one place. Good thing is that one user account can’t view pictures of another user account. So privacy data security is maintained at highest level.
How to Setup your Phone (Android / iOS / iPhone / iPad or Tablets) to use NextCloud
First you would need to download and install the NextCloud App from the respective App stores. NextCloud app is a free to use app and its available in both Android Play Store and Apple App Store. Once you have installed, you need to sign in using your user name and password via local IP (in my case, the log in IP is 192.168.1.45).
Once you are inside the app, simple go to NextCloud Settings from the main windows left hand side menu option to open up the configuration tab.
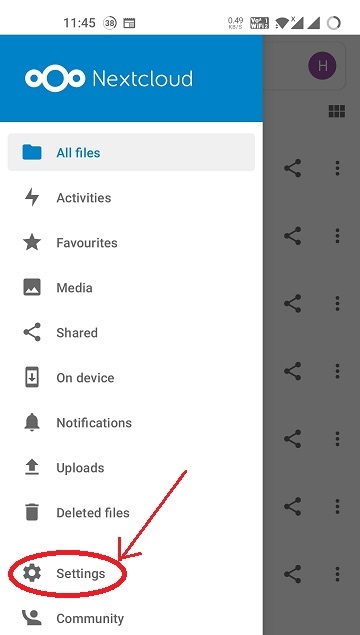
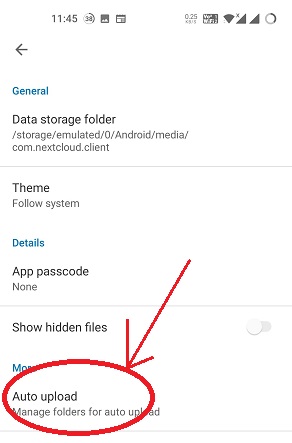
In side the settings page, you need to scroll down to find the option Auto Upload. Click that to bring up the Auto Upload Configuration page and menus.
Under the configuration page, you will find all your folders containing picture and videos are listed. NextCloud will show separate entry of a folder / directory if it has both videos and pictures. You can click the settings icon beside every directory name to manually configure the auto upload options. For my case, I am here only selecting my Phone’s camera directory for pictures and videos for upto backup / upload.
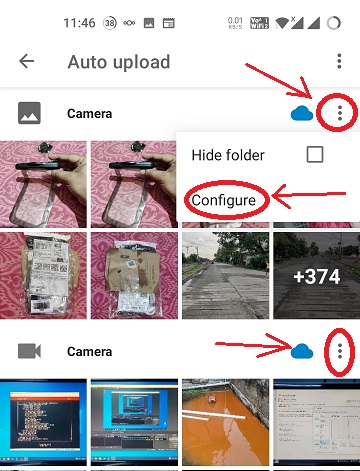
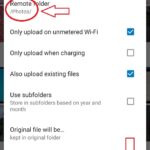
Under the configuration menu, you would need to set few options,
1. Turn on the Auto upload toggle switch
2. Select the Remote Folder as /Photos/
3. Save the new configuration
As soon as you complete these steps, nextcloud will automatically start backing up the pictures and videos that is selected under above steps. You may view the uploading proceedings by click the left hand side menu and selecting uploads.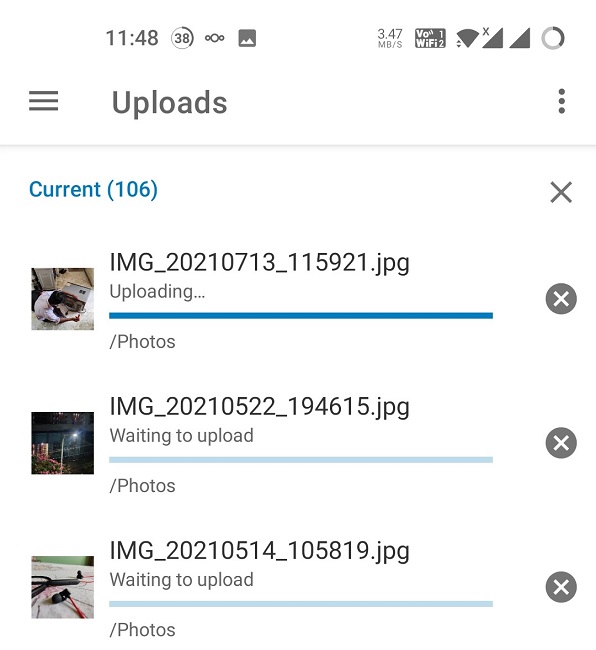
Now every time you start the virual machine, its completely automatic, no commands needed or no action is needed, NextCloud will automatically detected when you start the virtual machine and will start the backup in background. Depending on your home WiFi Network LAN speed, it may take few hours for all users in your home to complete their backup.
Few Points to Note
- You need to run NextCloud (Ubuntu) Virtual Machine to use NextCloud. If the Computer containing the virtual box isn’t running then it won’t work.
- NextCloud in your phone will use the home networking to backup the data, it will use zero internet connection / bandwidth.
- Its not necessary to keep on running your computer with nextcloud virtual machine always. Just once a weak at night, start the PC and launch the Virtual machine. That is it, everything is automatic, it will backup in background.
If you have any question, you may drop us a comment, we shall try and reply to short you out.
[…] they happened in a critical time for us.For example, we released a video about NextCloud, we had our article written with various command and viewers opting to follow the tutorial will definitely need to […]
[…] Google Drive and Google Photos. Self hosted, always online, internet enabled cloud backup server.In one of our previous article, we have shared a detailed installation guide on how to install NextCloud in your own home PC / […]
[…] shared couple of articles and tutorial guides in this same topic. Like for example, how to create a NextCloud Backup Server using Virtual Machine at home for backing up your phone media, photos and videos. Furthermore, we have shared a detailed […]