Google Photos is no longer free and a vast majority of the users who are used to cloud backup of their smartphone photos & videos with unlimited space for free to save space in their phones and having always access to their data for free are left with a difficult place to search for alternative
What is NextCloud?
NextCloud is an open source Cloud Backup self hosted server software. It has many features for wide range of users, starting from large business to personal users like you and me. NextCloud offers every feature that one may expect or get from Google Cloud Suite / G Drive / OneDrive / Office 365 or services like Dropbox and such.
NextCloud service can be purchased from many service hosting providers or you can use this open source code software to install in your own virtual server (VPS) in AWS (amazon web services) or at any VPS / Cloud hosting provider.
However the biggest benefit of this software is that you can install it in a computer at home or office and turn that computer into your personal cloud backup server. This gives absolute security and control over your data without sharing it with Google / Microsoft or such companies. A perfect alternative to Google Drive and Google Photos. Self hosted, always online, internet enabled cloud backup server.
In one of our previous article, we have shared a detailed installation guide on how to install NextCloud in your own home PC / Laptop as a virtual machine (VM) and start automatic back-up your smartphone data (mainly photos and videos), just like Google Photos for free and with virtually unlimited space. However, that is good for single person use and that is not connected to internet meaning one needs to be in his local home network to get the setup work.
In this article we shall take this setup a step further and make a proper dedicated home server connected with internet to allow you backup from anywhere in the world and access your data from any device or any place in the world via Internet. A true Google Photos alternative with all the feature it offers.
Prerequisites of this setup
Before you proceed with the setup, make sure you have got all the prerequisites ready. To setup NextCloud personal home backup server as Google Photos alternative and expose your local server to the internet to make it always available, you must be having below mentioned stuff ready.
Hardware Prerequisites
One PC (Desktop / Laptop / Server)
You need to have a Computer dedicated for this setup. Best thing is that you can use any old computer for this setup. You can repurpose an old laptop or a desktop (Intel Core 2 Duo / AMD X2 or higher). But remember, this computer will run 24×7 so try to choose a low powered computer if your server will have just handful of users. In my case, I am using an old laptop since it is really power efficient and offers gigabit ethernet port.
Fun fact, you only need the CPU for regular operation, since Monitor / Keyboard / Mouse etc is not required after the server is setup. For setup process, you can use your primary PC’s display / keyboard / mouse.
NextCloud is a highly scalable software, more the users, more hardware resources you may need. But for our use case, as an alternative to Google Photos, make sure to put a large HDD (or SSD if you can afford). 500GB or higher should be fine for normal home users with 10/12 active users.
One Router (& a RJ45 LAN Cable)
You need to have a router. Now theoretically even a small 4G hotspot routers can work too but for effective setup, you should be having a broadband connection and a router with Lan ports (Gigabit LAN ports preferred). Make sure to use Ethernet (LAN Cable) to connect your PC (in which nextcloud is to be installed) with LAN, try to avoid WiFi Networking.
One USB Pen Drive (4GB or higher)
This is needed for installation of Operating System
Software Prerequisites
We shall be using free software. Absolutely legal & 100% free stuff. No need to pay for any license fee or use crack / pirated software.
* Ubuntu (Linux Operating System)
* NextCloud Server Software
* OpenVPN Software
* Amazon Web Services (AWS) Free account -> (This one needs a debit or credit card for activation)
Setup Overview

Above the setup overview that we are going to achieve with this article / tutorial. We are going to install and create a home server running Ubuntu (Server) as OS and NextCloud as server. This setup will be connected to the home network via router setup and from there on to the internet.
In India, very few ISP gives Public IP to user premises, rather they use WAN (Wide Area Network) setup so most of our home routers are assigned WAN IP under the CG-NAT. Therefore one Public IP is shared between hundreds of internet users and they (like you and me) further share that connection via our local LAN (Router NAT). So its impossible to access your home server from outside (internet).
The easy work around is to create a virtual private network between the home server & a computer having Public IP (preferable Static IP). Then forward all server related traffic from there to the home server via that VPN tunnel.
Here in our setup, we are going to do just that using AWS (Amazon Web Services) via their free account, free of charge. This setup will allow the server to work with any type of internet connection.
Creating AWS A/C and Setting up Ubuntu-OpenVPN Server
Creating AWS free account
There are many online tutorials and youtube videos available on how to create / signup for a free AWS Account. So google for them to follow step by step guide to signup for a free AWS account -> https://aws.amazon.com/
Deploy Ubuntu Virtual Private Server under Free Account
After you have singed up for AWS and created a free account there, visit https://console.aws.amazon.com/ & login as root user into your AWS account. Now after login, you land in the main page, there at the top left hand corner, you may find an option called “services”, click that and in the following menu, click on “EC2”. As shown in below screenshots.
 —>
—> 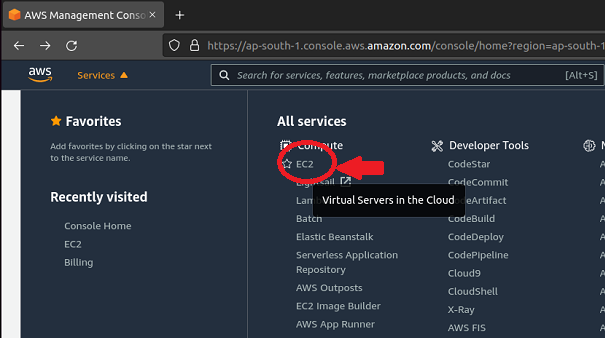
Now in the main landing page of your EC2 dashboard, there are 2 options we shall be playing with for creating an Ubuntu Virtual Server and for configuring Firewall to allow network traffic to flow. Options are given in left hand side as navigation panel and the two options we need are first “Instances” and second one is “Security Groups”. So the first thing to do is to click on Instances.
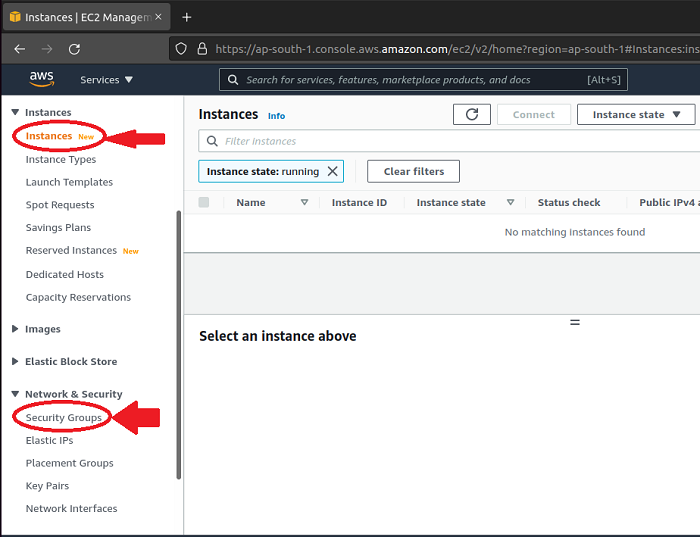

You may see there is a orange color option called “launch instances” at the top right hand corner of the web page, click that to bring up the VPS selection page, there type Ubuntu at the search bar and select Ubuntu 20.04 LTS x86.
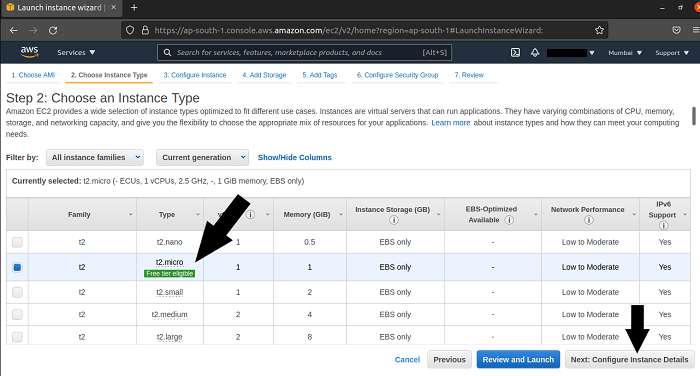
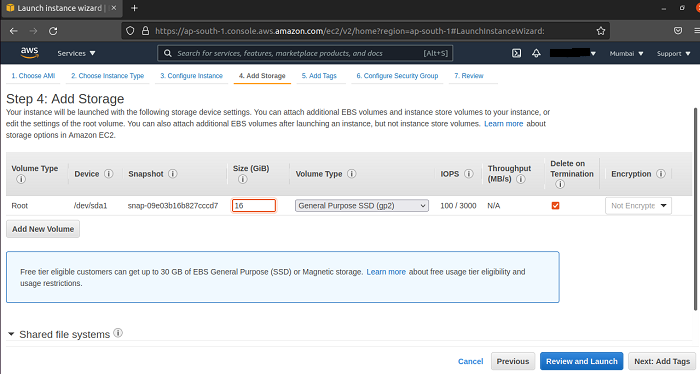
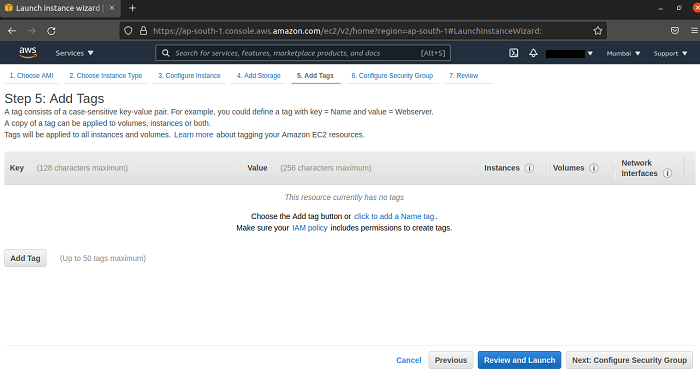
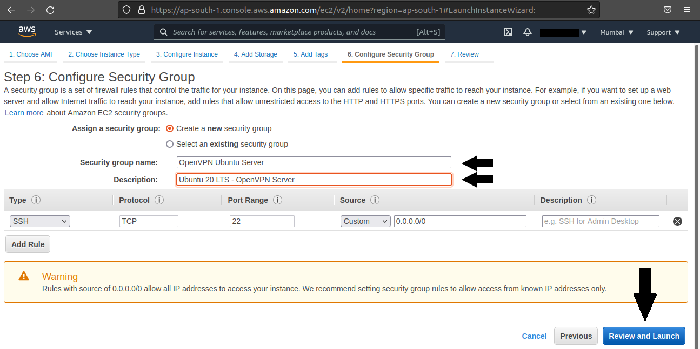
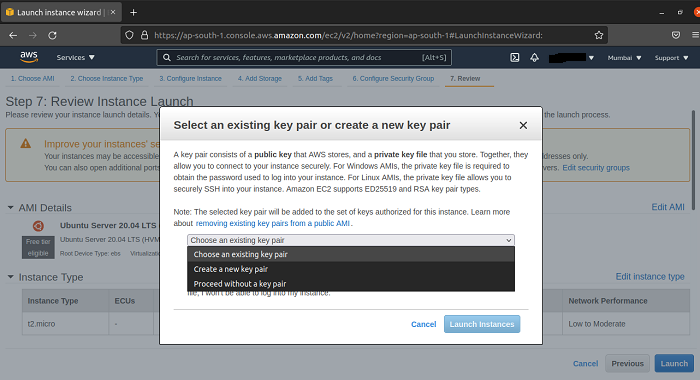
On the next page, select the T.2 Micro free tier eligible option for your VPS & down at the bottom corner click next to move to the next page ——> Now in Configuration details page, touch nothing and just click next button down at bottom. —–> On the next page, just change the storage value from 8 (default) to 16 GB and click next down at the bottom ——> On the next page of adding tags, just leave anything default and click next —-> Now at Security Group Configuration, name your security group, like I have done in my case as an example, and write down the description before click Review & launch —–> Now you shall be prompted to create a new key pair, this is important, name your keypair aws and download that aws.pem file into your computer before clicking final launch button.
Refer to these bellow screenshots for step by step process,

Login and Configure AWS VPS Ubuntu VPN Server
The first step is to figure out the Public IP address of the AWS VPS (Amazon Web Service), which we have just created from the above steps. You can view that from your AWS Control Panel.
* Open https://console.aws.amazon.com (login if you aren’t)
* Click EC2 from the AWS Management Console -> All Services
* On your Left, click instances from the menu
* Select the newly created running EC2 instance (VPS) and click the details option below.
Refer to this below image for clarification,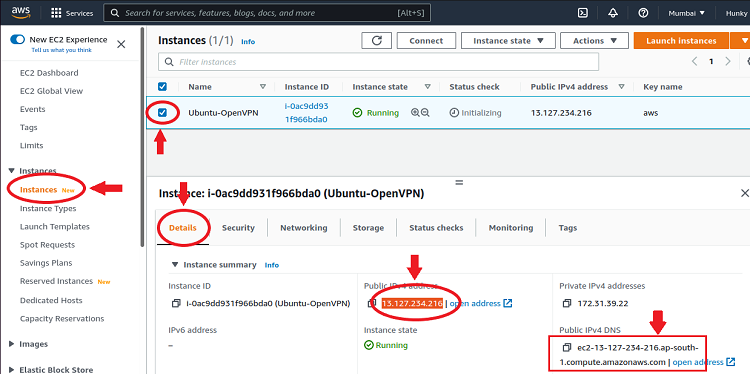
Here, you may note down the Public IPv4 address and the host name as shown above. This IP address or hostname is to be used for Remote login to the AWS VPS Ubuntu Server.
How to login to AWS EC2 VPS Instance?
You can login to the EC2 Server from any Computer running Windows / MAC OSX or Linux. Simply launch the terminal (Linux / Mac) or Command prompt of Windows (with admin rights) in the same directory as your AWS key file, and type in the following command for login.
ssh -i aws.pem ubuntu@13.127.234.216 <- Use your own AWS IP
For example, if you have the AWS Key file in your Windows download folder, then open your command prompt and run the command from your download directory.
Here the aws.pem is your key file (remember, we downloaded that when creating the VPS) and IP address is what you just noted down in above post.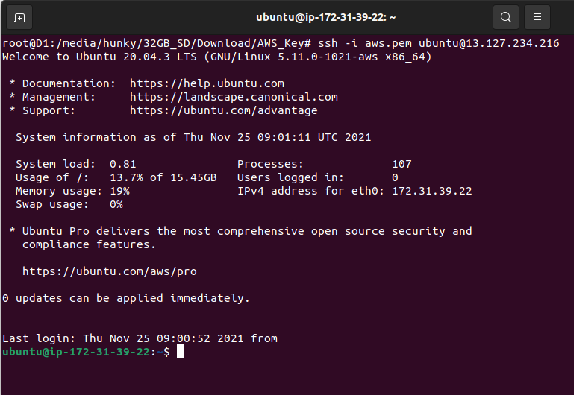
Step 1 -> Update the Ubuntu Server
Type following commands one by one to update the AWS Ubuntu Server,
sudo timedatectl set-timezone Asia/Kolkatasudo apt update sudo apt upgrade -y
once the update finishes, reboot the server,sudo reboot 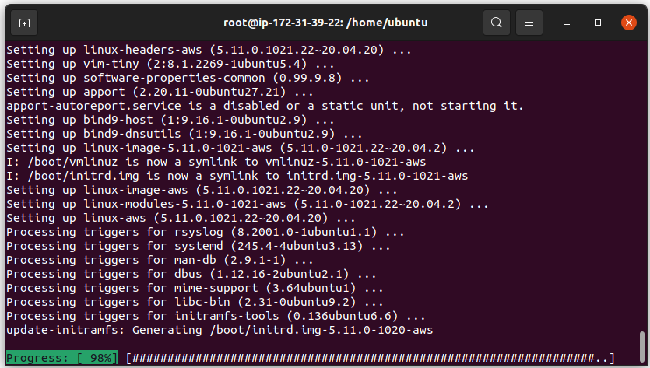
Step 2 -> Installing OpenVPN Server
Open the cmd with admin rights again, and use the login command to login to the AWS Server. Once you are logged in, run the following commands one by one for OpenVPN Server installation and configuration.sudo susudo mkdir vpn
cd vpn
sudo curl -O https://raw.githubusercontent.com/angristan/openvpn-install/master/openvpn-install.sh
sudo chmod +x openvpn-install.sh
sudo ./openvpn-install.sh
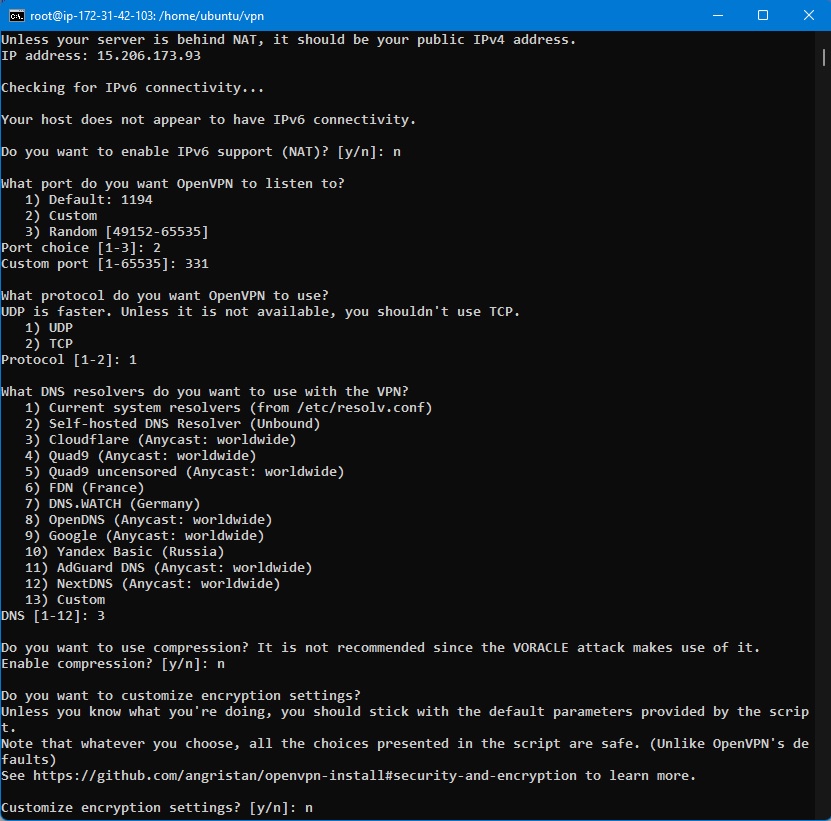
This last command will now launch the OpenVPN installation prompt. Carefully fill in the questions, like multiple choice answers,
Q1 – Host Name -> Type AWS IP & press enter
Q2 – IPv6 NAT -> Type n & Press Enter
Q3 – Port Type -> Type 2 (Custom) & Press Enter
Q4 – Protocol -> Type 1 (UDP) & Press Enter
Q5 – DNS -> Type 3 (CloudFlare) or 9 (Google) & Press Enter
Q6 – Compression -> Type n & Press Enter
Q7 – Encryption Settings -> Type n & Press Enter
Q8 – Client Name -> Type nextcloud & Press Enter
Q9 – Password -> Type 1 (password less) Enter
Now you shall be asked to press enter to start the actual installation process. Once the installation is complete, you client configuration file will be created and saved in root directory.
You shall need to download that client configuration file, in this case, nextcloud.ovpn into your computer.
Step 3 -> Assigning Static IP Address for nextcloud OpenVPN Client
Now we need to create a file with exact same name of the client (in this case nextcloud) and define the static IP inside that, so run following to create the file.cd /etc/openvpn/ccd/sudo nano nextcloud
And paste this -> ifconfig-push 10.8.0.45 255.255.255.0
Press Control + X -> then type Y -> Then Press Enter to save the file.
Step 4 -> Forward all Internet Traffic to your NextCloud Server from AWS VPS
Type reboot to restart the server and log back into your AWS Ubuntu Server. Run following commands one by one.sudo su
iptables -t nat -A PREROUTING -i eth0 -p tcp --dport 80 -j DNAT --to-destination 10.8.0.45:80
iptables -t nat -A PREROUTING -i eth0 -p tcp --dport 443 -j DNAT --to-destination 10.8.0.45:443
This is forward all incoming web traffic from AWS VPS to your NextCloud server via the OpenVPN Tunnel. Caution, iptable command is not saved, so after this step, do not reboot your AWS Server. If you do, you will have to run the iptable commands again.
Step 5 -> Open up the AWS Firewall Ports to allow Port 331/80/443
Open your browser from your local PC and login to aws.amazon.com from there go to EC2 and in your left hand side menu, visit Security Groups.
You should be having 2 security groups, one is default, and another is the one you have created while creating the Ubuntu Virtual Machine in AWS. Select that Security group and in below, click inbound rules and in your extreme right lower corner, you may fine the option to edit inbound rules.

Now click add rules to add these following,
HTTP -> Port 80 -> Source Anywhere IPv4
HTTPs -> Port 443 -> Source Anywhere IPv4
Custom UDP -> Port 331 -> Source Anywhere IPv4
Custom IMCP IPv4 -> Protocol Echo Request -> Source Anywhere IPv4
Then click save rules to exit the page.

Step 6 -> Download the Client Configuration file into your PC from AWS Ubuntu Server
First step is to move the file from root directory to download directory we created before running the OpenVPN installation, so make sure you are logged into the AWS Ubuntu Server using your CMD or Terminal, and run following command,sudo sumv /home/ubuntu/nextcloud.ovpn /home/ubuntu/vpn/
or sometimes, the .ovpn file gets created at /root location, so there you need to run,sudo sumv /root/nextcloud.ovpn /home/ubuntu/vpn/
Now open another command prompt (Windows) or Terminal (in Linux/Mac) in the same directory where you have AWS.PEM file in your local PC and type the following command to connect with AWS Ubuntu Server and copy/download the above mentioned file into your PC. (Remember to replace the IP address show here with your own AWS IP address)scp -i aws.pem ubuntu@35.154.119.150:/home/ubuntu/vpn/nextcloud.ovpn ./nextcloud.ovpn![]()
It will download the configuration file from aws ubuntu server into the directory where you have the AWS key file, like in my case, it is my Windows download folder.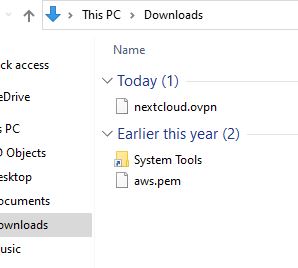
We are done with the AWS Ubuntu OpenVPN Server backend Configuration, We shall never need to login here again, It will continue to run for One full year for free.
Ubuntu 20 LTS and NextCloud Server Installation / Configuration in you Local Server Hardware
First thing you need to do is the selection of hardware for NextCloud server. Beauty of linux is that it allows us to use very old, otherwise rejected hardware and repurpose that into a working and effective server. So you can use you old desktop or laptop for this job.
For example, I am selecting a Pentium Quad Core N3530 based Acer laptop with 500GB HDD and 4GB RAM. This laptop is working fine but unfortunately the configuration is very weak for Windows 10 or 11. It has Gigabit Lan Port and being a laptop, it already has it’s own power backup. Cherry on top, being a weak CPU has it’s own advantage in Server duty, it is extremely frugal in power consumption so it will save a lot in electricity bill for 24×7 operation.
Step 1 -> Installing Ubuntu Server 20.04 LTS
First thing you may need to do is to visit Ubuntu Official Website and download the Ubuntu 20 Server Installation ISO. The download a tool like rufus and use an USB Pen / Thumb drive to create an installation media. Its a very simple job, takes a few click only and there are many good step by step tutorial available, so search and follow any of them.
Once you have got the installation USB ready, plug it in the computer you wish to run the server, make sure to plug in the network cable and turn it on to boot from the USB to start the installation. There are many installation tutorial guide and videos are available, you may search and take help from there, otherwise, installation is very straight forward process, just 3 stages where you need to do some modification,
Setting up a Static IP as per your Internal Network IP Range.
While on installation process, when asked for network settings, edit the network configuration to input a Static IP Address as per your router IP Range.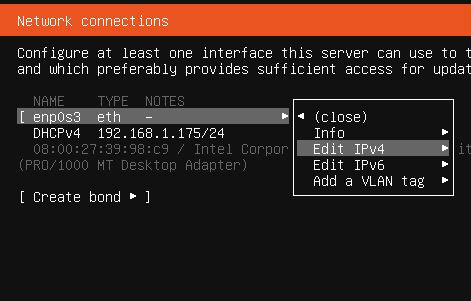
For example, here is mine, how it looks while entering the a Static IP Address as per my router IP range.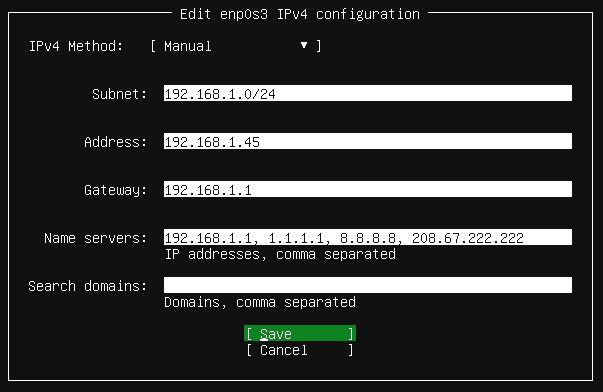
Secondly when on selecting hard disk partition layout, just change one option for disk size.
Ubuntu installation by default leaves out some of the disk as empty, so here just input the max capacity, which is write just left of the input box. Simply write that max value as it is and save to proceed.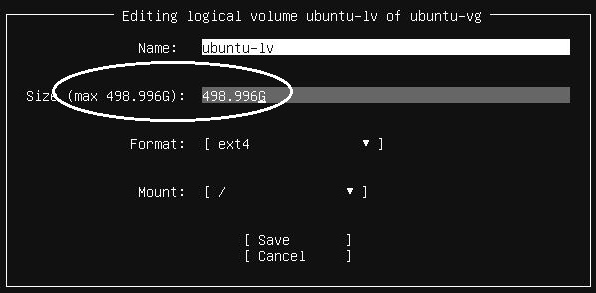
Thirdly, make sure to turn on the SSH Server Installation option and complete the installation without adding anything extra from the optional installation list.
Make sure to setup a strong user name and password & complete the installation process.
Once the setup process is done and your server reboots, you no longer need any keyboard / mouse / monitor. Just keep the network cable connected and you can do all further work from your PC remotely using command line.
Step 2 -> Installing and Setting up NextCloud Server
Just like we can log into AWS Ubuntu Server using Command Prompt (CMD) in WIndows or via Terminal in Linux or MAC, here too, go back to your PC / Laptop and type in following command in your CMD / Terminal Window to login to the Ubuntu Home Server.
ssh username@IPadress
In my case, its like, ssh lazy@192.168.1.45
It will ask for your Ubuntu Home Server password, enter that to login.
Once logged in, run the following commands one by one to first update the server,sudo timedatectl set-timezone Asia/Kolkatasudo apt update
sudo apt upgrade -y
sudo reboot
Once the server reboots, log back in and then run following commands one by one to install NextCloud server,sudo snap install nextcloud
sudo nextcloud.manual-install username password (Replace the user name & password with your own.)sudo nextcloud.occ config:system:set trusted_domains 1 --value=192.168.1.45 (your local nextcloud machine IP)sudo nextcloud.occ config:system:set trusted_domains 2 --value=35.154.119.150 (your AWS IP)sudo snap connect nextcloud:network-observesudo nextcloud.enable-https self-signedsudo reboot
Once the server reboots, your nextcloud home server is now ready but only accessible within your home local network. Now lets connect it with AWS OpenVPN server to expose your local home server to the internet and make it available for access via internet.
Step 3 -> Connecting to AWS OpenVPN Server
We shall be using the client configuration file downloaded from AWS OpenVPN Server and saved in your PC (remember?).
So first log into your Local Home Ubuntu-NextCloud Server from your PC, which has nextcloud.ovpn configuration file saved. (Use CMD or Terminal to type in ssh username@your-Local-IP) and run following commandssudo apt install openvpn -ycd /etc/openvpn
Now in your PC, right click on nextcloud.ovpn file and choose notepad to open with or edit with. Once the file opens in notepad, select all the contains and copy.
Now we shall create a new file called nextcloud.conf in side /etc/openvpn directory, and paste the entire contains of the nextcloud.ovpn file into that. So first run this command,nano nextcloud.conf
Now paste the contains of nextcloud.ovpn file. (You may right click on CMD Window, that will paste whatever you copied). After that Save and Exit (CTRL+X then Y, remember the saving process up top?).
Now you may reboot the server by running sudo reboot
This will make your Ubuntu / NextCloud server fully headless and automated. Even if by any chance it restarts, it will load nextcloud and connect to AWS OpenVPN at start up automatically, ready to be used.
Access NextCloud Personal Home Server via Internet
Let’s test it,
Assuming you are using home broadband connection like AirTel or Jio Fiber or ACT or Hatway or any such at your home, so let’s type in the AWS IP address in your mobile phone browser like chrome or safari (turn of WiFi, and use Mobile data) & use Mobile data to access your home server.
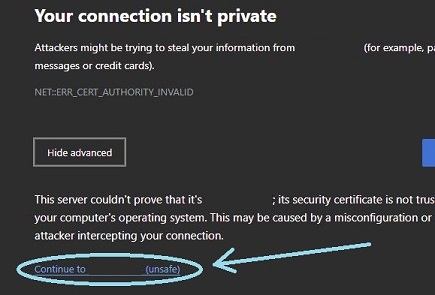
If all went ok, you mobile browser will open up the nextcloud page but with a security warning. This security warning is for the self signed SSL we have used, so agree to the warning and proceed to access the log in page.
You may need to click Continue as unsafe since this SSL certificate is your own, created in your own Ubuntu Server installation, by you. This certificate will not be recognized by the browsers so they throw up this warning.

How to Create & Configure NextCloud Server & Users
Once you have logged into the NextCloud using your nextcloud User ID and password, now you can visit the settings pane and there you may find option to create further user accounts.

Somehow, the NextCloud Server Admin page doesn’t work well with mobile browsers, so we recommend you using your PC / Laptop for this work. Remember, you can access nextcloud via both Internet and your local network (both AWS Internet & Local LAN IP will work)
You may create multiple user name for your family members or house / room partners. However NextCloud works just like Google Photos so every user can use their multiple devices, Android / iPhones / laptop / iPad or tablet using that same user name and password and access all of their individual photos backed up and available at one place. Good thing is that one user account can’t view pictures of another user account. So privacy data security is maintained at highest level.
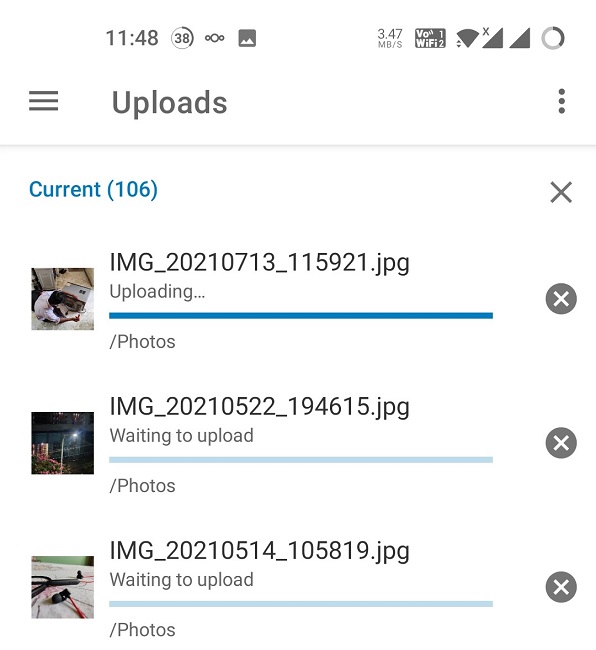
Configuring the NextCloud Mobile App for Auto Uploading Backup
We have given a step by step guide in our previous NextCloud related article. Where, we have shown how you can setup the NextCloud mobile app to auto upload all your images and videos.
Having issues, any question? – Feel free to drop us a comment
Comment section is yours to use. If you have any question, feel free to use it to ask. Similarly if you have any comments on this project, let us now.
hello
thanks for your nice tutorial.
i followed this guide but i can not connect to the nextcloud server from internet. I can connect to the server from inside my network.
i double checked the aws config and everything is exactly as you showed in your guide.
any help would be appreciated.
Hello,
Let’s see if I can help here.
So it’s clear from your comment that you can access the nextcloud via local network. Good, that means the installation went smooth, but you are unable to access from outside the local network so you are correct on pin pointing it on AWS related setup issue.
There are few things what you need to do in AWS, all are written in our tutorial as step by step, tell us if you have done those in right order.
1. Deploy Ubuntu 20 or 22 via AWS launch instance
2. Edit the security groups in AWS to open inbound port 80/443/331
3. Installing the OpenVPN Server in AWS and input those details while installing, (including that 331 port no.) -> it will generate that .ovpn file.
4. Creating that static VPN client IP file in AWS Ubuntu
5. Running that port forwarding commands for forwarding 80 and 443 to that static IP in AWS Ubuntu (never reboot AWS Ubuntu as if you do, run these port forwarding commands again)
6. using SCP command, download that .ovpm file in your local machine
7. Installing OpenVPN in your NextCloud Ubuntu local server
8. Creating a new client config file and pasting the contains of that .ovpn file in it
9. Reboot the local machine
It should now connect to AWS via OpenVPN tunnel and when you open AWS IP in your browser, it will travel via that tunnel to your local server.
Did you do all these steps right?
Thanks.
Hello, I have the same issue, I followed your instruction to a T, question I have with the ifconfig command in the nextcloud file do we the IP you provided or the AWS ip
Hello,
The idea is simple. Following are the network layout as written in this tutorial.
AWS Ubuntu -> Two NICs
NIC 1 (Physical NIC of AWS VPS) -> IP is aws given (no need to change anything here)
NIC 1 (Your OpenVPN Server vLAN) -> Default Static IP 10.8.0.1
NextCloud -> Two NICs
NIC 1 (your physical LAN) -> Static IP 192.186.1.xx (What ever you have)
NIC 2 (Your OpenVPN Client vLAN) -> Static IP 10.0.8.45 (this is what you need to setup at OpenVPN server Client Static IP)
Now two port forwarding commands for forwarding all AWS Physical NIC traffic to OpenVPN vLAN client static IP.
Let me know if anything is required !!
Thanks.
Thank you for you tutorial but I have a problem when I follow to install nextcloud instruction on ubuntu22 (my local server) my system is hang
[…] will just love it. If you are like us, who would be having self hosted services from home, like a NextCloud Home Backup Server, you can setup Dynamic DNS for the such. It supports NoIP, DynDNS and TP-Links own […]
Thank you for you tutorial but I have a problem when I follow to install nextcloud instruction on ubuntu22 (my local server) my system is hang
Error writing nextcloud.conf: Permission denied
Command run as a root user not normal user
https://lazytourer.com/in/how-to-setup-nextcloud-self-hosted-home-backup-internet-server/#comment-18
The “Strict-Transport-Security” HTTP header is not set to at least “15552000” seconds. For enhanced security, it is recommended to enable HSTS as described in the
Hello,
In short, you can ignore the warning.. It is not a major error rather a simple warning..
Thanks.
nano nextcloud.confError writing nextcloud.conf: Permission denied
Hey,
add sudo before it.
sudo nano nextcloud.conf
[…] backing up your phone media, photos and videos. Furthermore, we have shared a detailed tutorial on how setup a nextcloud backup server at home in India and use AWS based VPS VPN setup to make it accessible from external […]
problem with …
Step 3 -> Connecting to AWS OpenVPN Server
add sudo before the command !!
hello sir,
I tried the same configuration in oci as they have a install as always free compared to 1 year on aws, but i could not get it to work, could you please help and suggest changes to be made to accomplish this with oci(oracle cloud) instead of aws.
Hey Kartik,
Process is same with OCI also.. Tell me where are you getting stuck? at which part?
Thanks.
i followed all the step carefully then also i am not able to open nextcloud
Where are you stuck?
After putting this command
sudo snap install nextcloudit says nextcloud already installed so i moved to the next commandsudo nextcloud.manual-install username passwordit shows the error mentioned in the following picture , Since i don’t have profound knowledge in ubuntu i really don’t know how to fix this please help.its been more than 2 days i’m constantly searching solution for this error on google but ic can’t found any solution. PLEASE HELP ASAP
Hello,
As the time of installation of Ubuntu Server, DO NOT select nextcloud as extra app for installation. It seems, you have checked that box and installed nextcloud via that Ubuntu Server installation wizard. So either reinstall Ubuntu Server from clean start and proceed with the tutorial, or run following commands to remove already installed Nextcloud and proceed from there on.
sudo snap remove --purge nextcloudThanks.
sir after installing OpenVPN and moving towards
cd /etc/openvpnandcd /etc/openvpnwhen i’m trying to paste and save the notepad items it gives this error. please helpI manage to install openVPN and i rebooted the server but still i’m unable to able to reach the destination page , I double checked every thing on aws like security groups and inbounded rules , i don’t know what to do please help i google it and it suggest to install ufw and after installing that i also lost my remote access. YOUR HELP IS NEEDED…
it is running when i put server address 192.168.1.45 on my search bar but it is not accessible while using aws ip even on same netwok
Hello,
If the local server is connected to the AWS via VPN and it has obtained the (vpn) static ip address, then at AWS Ubuntu you are to run following commands to allow traffic be forwarded from there to your local server via that VPN
Thanks,
[…] How to setup NextCloud self hosted home backup Internet Server […]