In this guide, we will show you how to build a personal home cloud server in India using low-powered, inexpensive, and old hardware. The server will be accessible from the internet and cost almost nothing to set up.
Why Build a Home Lab Self Hosted Cloud Server?
It can be for work, study or simply enjoyment purpose. You may have your own reason. But generally speaking, a server is meant to perform some specific duties and it is built based on that requirement.
For me, I wanted to have a self-hosted cloud backup server to replace my reliance on Google Drive / Google Photos or Microsoft One Drive or Apple iCloud or such large companies. I want to make sure that my server can automatically backup my phone videos or photos and I can free up space in my phone and view them directly from my server via Internet. Furthermore, I want to stream media, like Prime Video or Netflix, where I can put my movies / videos and stream them in my TVs, iPads or any other device.
We have already shared couple of articles and tutorial guides in this same topic. Like for example, how to create a NextCloud Backup Server using Virtual Machine at home for backing up your phone media, photos and videos. Furthermore, we have shared a detailed tutorial on how setup a nextcloud backup server at home in India and use AWS based VPS VPN setup to make it accessible from external internet.
In this tutorial, we will not only build a personal home cloud server, but we will also perform three additional tasks on a single server setup.
What is a SERVER?
This tutorial will show you that you don’t need expensive rack-mounted equipment or enterprise-level hardware to build a personal home cloud server. In fact, a regular laptop or desktop computer can be used as a server. We will demonstrate this by using low-cost hardware in our setup.
A server is a computer, having same major components as your laptop or PC. CPU / GPU / RAM / HDD / Network / HDD connected to a motherboard with a power supply. However, dedicated server components are built with tougher materials for non-stop 24×7 operations under high load. There is no stopping us from converting our laptop or Desktop PC into a fully functional server since it’s just the Operating System & Software or apps that are different compared to PC and Server.
That is exactly what we are going to do in this tutorial.
Requirements – Minimum Prerequisites
- One Spare Computer -> To make a server
It can be an old Laptop or Desktop or a dedicated server. Any computer with a LAN Port will do. Bare minimum you need to have an Intel Core 2 Duo or AMD Dual Core processor or higher along with 2GB of RAM. You can use any ARM based system boards like Raspberry Pi too. You would only need Display / Keyboard / Mouse for setup process as after that, everything can be done & controlled via network access and server will run in Headless mode. - Switch or Router -> For Remote operation
The Server needs to be connected to a local network with Internet access for internet access & remote operation. - Internet Connection
Any Indian ISP will work. Regardless of the speed and network type like Wireless 4G/5G connection or ADSL or Fiber networks. -> No, you don’t need any Static public IP. It will work even with CG-NAT type connections too. - One Top Level Domain Name
Any domain name will do. Not sub domain, you need Fully Qualified TLD. Any extension will do, so you can purchase the cheapest domain name available. Whatever DOT it is. - Cloudflare FREE Account
One Cloudflare free account. - One Credit or Debit Card
For purchase of domain name & although the Cloudflare account is free but for verification purpose, you need that Debit or Credit Card. Don’t worry, there are no auto bill charging. Card will be used only once for verification. - One USB Pen Drive 4GB or higher
For bootable installation disc making purpose. - List of Software needed
Ubuntu 22 LTS Server / Rufus / Docker / Docker Compose / Nextcloud (Snap) / Photo Prism / Jellyfin Server / Cloudflare Secure Tunnel -> All of these are FREE & Legal software and most of them are open source. - Your Primary Computer
You need your primary computer for prepping the installation ISO USB drive and then operate the server via network remote access. This can be a laptop, desktop, Windows PC, MAC or anything connected to the same local network (via Wireless or LAN) as the server.
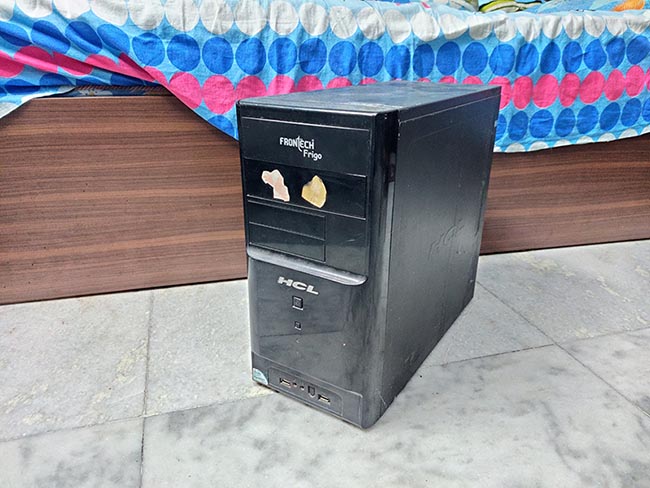
Selection of Server Hardware
I am going to use a 15-year-old Desktop PC with some modern hardware, like SSD and HDD added to it. It is one of my very OLD PC.
| Components | Description |
| CPU (Processor) | Intel Core 2 Quad Q6600 @ 2.4GHz Quad Core / LGA775 / 8MB L2 |
| CPU Cooler / FAN | Silverstone KR03 Krypton Amazon Product link |
| GPU | Motherboard Integrated GPU Intel G41 Chipset |
| RAM | 6 (4+2) GB DDR3 Amazon Product Link |
| Motherboard | Zebronics G41 Generic Board |
| Storage SSD (Boot Drive) | Consistent 256GB SATA SSD Our Review / Amazon Product link |
| Storage HDD (Data Drive) | WD 500 GB 7200 SATA Desktop 3.5inch HDD |
| PCi-E LAN Card | TP-Link PCI-E 1G LAN Card RJ45 / Amazon Product Link |
| PSU (SMPS) | Consistent (generic) 400W |
| Cabinet | Old Generic HCL Cabinet |
| UPS | Cheap UPS |
You can use any thing that is available with you. However, if you are considering purchasing an old 2nd hand PC for this purpose, try to buy Intel Core i5/i7 3rd generation or higher for better performance result.
Domain Purchase / CloudFlare Acc Settings
Step 1 -> Buying a Domain Name
Domain names are usually priced based on their extension. Like .com / .org or .in and so on. If you search for cheap domain names, you may find some lesser known and uncommon extension like .pw or such at dirt cheap price. For example, for this project, at the time of writing this article, I found online domains are sold at USD 1.25.
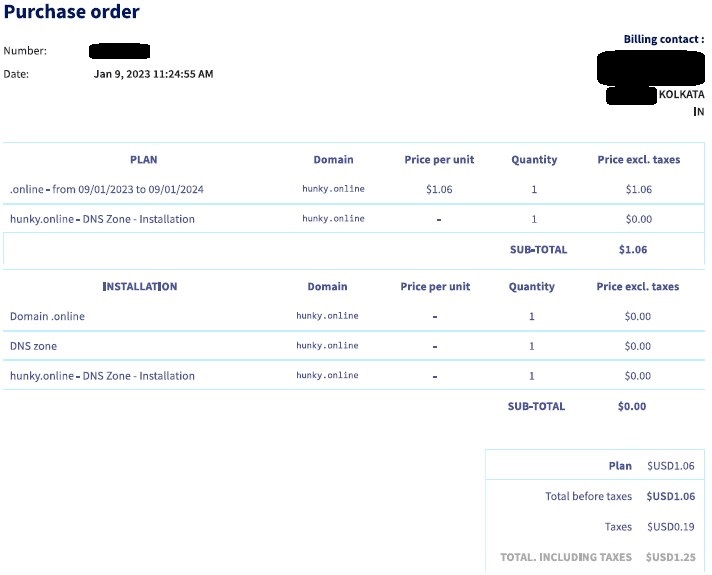
I have registered Hunky.Online domain for one year by paying USD 1.25 only. For yourself, you can register anything that you want, and which is available at lowest cost. Offers vary, choose any extension since that too doesn’t affect the functionality of setup. It just needs to be a TLD or ccTLD.
Step 2 -> Creating CloudFlare Account
Visit Cloudflare website @ https://www.cloudflare.com/ and create your own FREE account. You may need your debit / credit card for activating domain adding feature. Don’t worry, it may charge a few rupees for verification but that too is given refund within couple of days. There are many videos in YouTube on the step-by-step process of creating this account. If you need, you can search and follow them. But generally speaking, it’s very simple. Just liking creating an email account or amazon account.
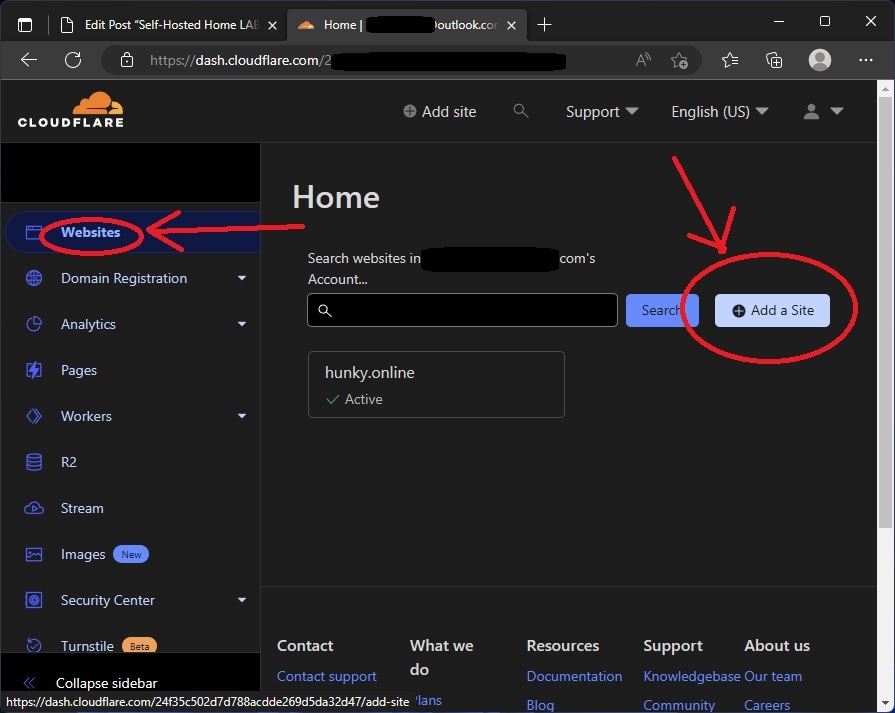
Step 3 -> Adding your Domain into Cloudflare Account
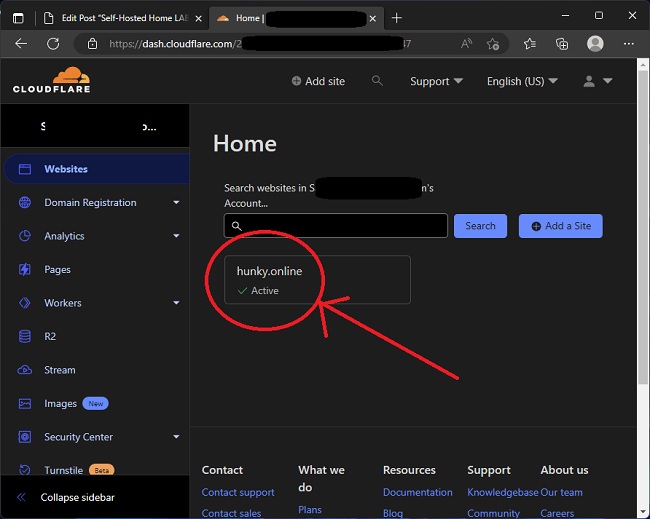
Once logged, at the Cloudflare dashboard page, click the left hard side bar option “Websites” and add your domain name there. It may generate error or warn you that name servers aren’t matching, ignore and continue the adding process. DO NOT allow it to copy any existing DNS records, add this domain with fresh / empty DNS records.
Process won’t be completed till the DNS records are updated so Cloudflare will generate following message for you.

Time to go back to that website from where you can bought & registered the domain. There under your domain control DNS panel, change the “Name Server / NS Records” to Cloudflare given one. After that return here and click that Done, Check nameservers. It may take a few hours for things update and reflect back here.
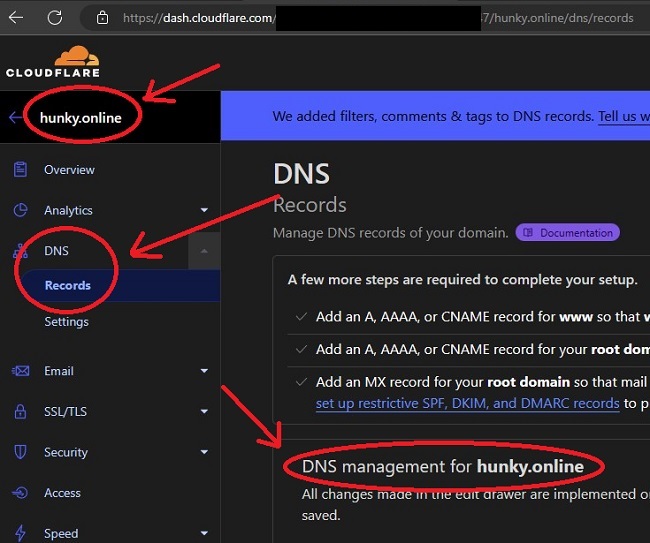
Within few hours of these updates, system should show your domain is added to the Cloudflare dashboard (network). Here is mine, and there click your domain & visit the DNS section to ensure that no DNS entry is present, it is showing empty apart from NS Records.
Step 4 -> Creating tunnel code & Sub domains
Once the domain is active in your Cloudflare account, it is time to generate the code for tunnel and creating the subsequent sub-domains to run the services.
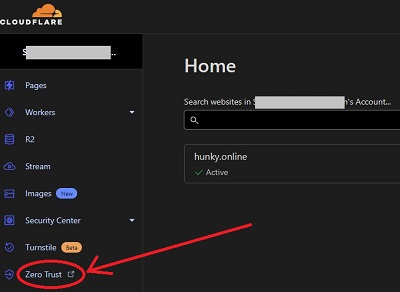
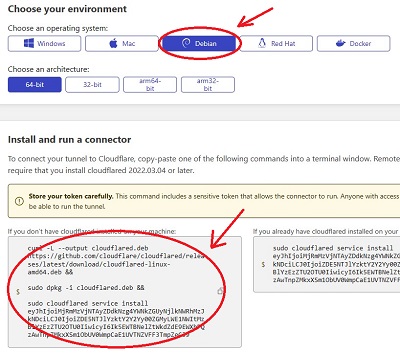
Under your Cloudflare dashboard page left hand side, you may find an option called “Zero Trust”. Click that to open the Zero Trust dashboard. There, click “Tunnels” at the LHS menu items.
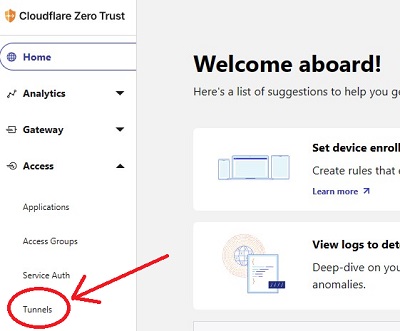
Click Create Tunnel -> Provide a name -> Click Save Tunnel -> This will generate the installation code. You need the Debian x64 code, so copy that code to a notepad (save it) and click next to proceed toward creating host name (sub domains)

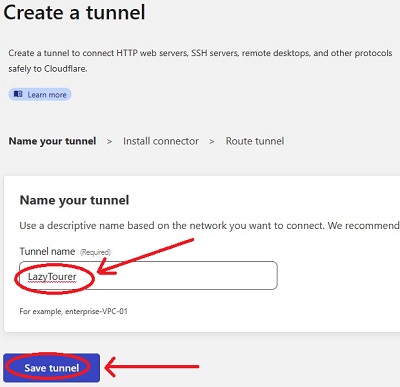
Do not create any Host Name / Sub domain as of now, just save the tunnel and exit. We will come back here after our local server is ready for host name / sub domain creation.
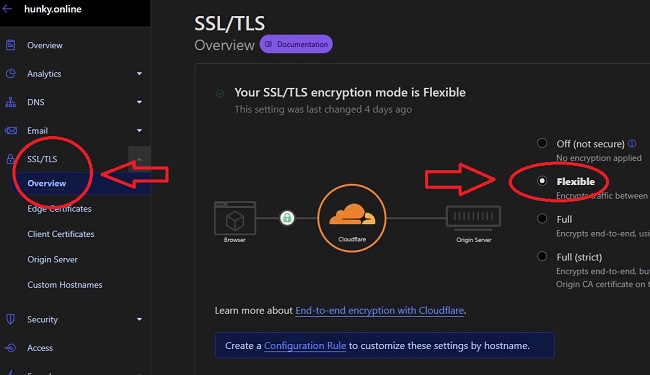
Step 5 -> Enabling SSL Certificate Encryption
Go back to the main dashboard page of Cloudflare and click option SSL/TLS -> There select Flexible to turn on the SSL Certificate and Encryption.
Ubuntu Server – Installation / Configuration
Step 1 -> Ubuntu Server 22 LTS Installation Disk (USB)
Task is simple. Visiting Ubuntu Website and downloading the Server Installation ISO for latest LTS release. As of writing this article, it is 22 LTS. Once the image is downloaded in your primary PC, download a small program called Rufus from their website @ https://rufus.ie and run it to create your Ubuntu Installation USB. There are hundreds of videos and article on how to do this, it’s really simple but if you still want to, you can search Google or YouTube & follow any of those step-by-step instructions.
Step 2 -> Installing Ubuntu Server 22 LTS
Connect your monitor & keyboard / mouse to the PC you intend to use as server, in case you are reusing a laptop then you can proceed directly since it has its own built-in display / keyboard / mouse. In my case, since I have multiple Disks in my server, just for safety, I am only connecting the SSD and leaving the HDD unplugged for the installation.
Installation process is simple. You just need to boot into the USB by changing the BIOS to allow the system boot from USB and then proceed with the installation prompts. Once again, you can find tons of step-by-step guide via Google or YouTube searching for any help you require.
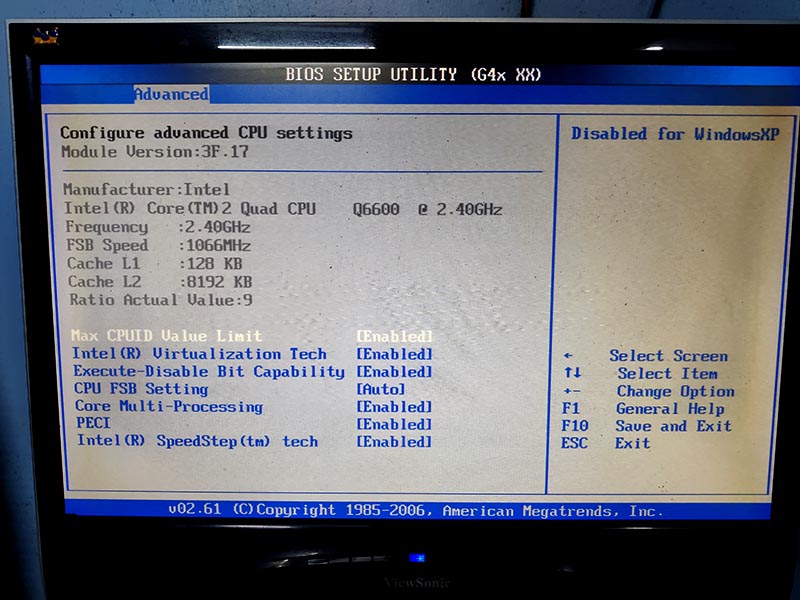
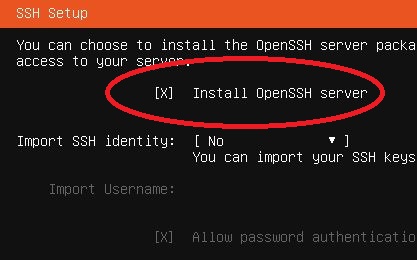
Pro-tip -> While you are in the installation wizard, everything needs to be default except couple of things that you need to do. First, note down the “MAC Address” of your server Network Card. Secondly, Ubuntu by default doesn’t allocate the entire disc so at partition prompt, just change one entry under ubuntu-lv and edit that value to change it to maximum available. Thirdly, ensure to check box the option for OpenSSH Server installation.
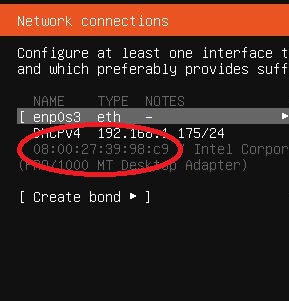

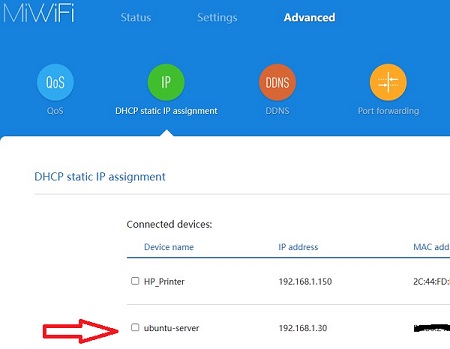
Step 3 -> Static Local NAT LAN IP for the Ubuntu Server
Although it is not mandatory in this setup, but for ease of use (remote access), it is better to setup a Static Lan IP in your server. There are two ways of doing it. Either you can setup the Static IP directly in Ubuntu or use your router to send a specific static IP to this server. I prefer the second method. So, log into your home router and look for option called DHCP and there you can use that MAC address (remember, something you noted down while installing Ubuntu) to assign the server a Static LAN NAT IP.
In my case, it is set to 192.168.1.30 -> for my installation.
Step 4 -> Updating the Server
Once you have set the Static IP for your server, it is time for first remote login. You can use a tool called Putty or you can simply start Widows Command Prompt or Terminal (by typing CMD in Start Search Bar) & type following command to log in,
ssh user-name@IP-Address -> Replace the username and IP with your own.
Enter Password when prompted to login. Once you have a successful login, then run following commands to update the system.
sudo su
sudo timedatectl set-timezone Asia/Kolkata
sudo apt update && sudo apt upgrade -y
After the update the finishes, run following command to reboot the system.
sudo reboot
Step 5 -> Docker / Docker Compose Installation
Run the following command one by one for docker installation,
sudo su
sudo apt install lsb-release ca-certificates apt-transport-https software-properties-common -y
sudo curl -fsSL https://download.docker.com/linux/ubuntu/gpg | sudo gpg --dearmor -o /usr/share/keyrings/docker-archive-keyring.gpg
sudo echo "deb [arch=$(dpkg --print-architecture) signed-by=/usr/share/keyrings/docker-archive-keyring.gpg] https://download.docker.com/linux/ubuntu $(lsb_release -cs) stable" | sudo tee /etc/apt/sources.list.d/docker.list > /dev/null
sudo apt update && sudo apt install docker-ce -y
sudo mkdir -p ~/.docker/cli-plugins/
sudo curl -SL https://github.com/docker/compose/releases/download/v2.23.3/docker-compose-linux-x86_64 -o ~/.docker/cli-plugins/docker-compose
Pro-Tip -> For the above command, visit https://github.com/docker/compose and replace version number with the latest release. At the time of writing this article, the latest version is v2.15.1 but it will change to newer release when you would be reading this article.
sudo chmod +x ~/.docker/cli-plugins/docker-compose
Step 6 -> Adding / Formatting / Mounting the Data HDD
This is optional and only applies to someone who has setup like me with multiple HDDs / SSDs in their server. If you remember, at the time of installation, I only connected and SSD SATA Cable and now it is time to shut down the server & connect the second disk, my 500GB HDD. Unlike Windows Linux will not automatically mount or load a drive and show it to you. You have to manually mount it.
If you are using converting a PC / Laptop as server with single disc, they you can skip this process but since I have a sperate data drive of 500GB Hard Disk, so here is how it is formatted at mounted on to Ubuntu.
First is to ensure that Ubuntu has detected the drive. Run command sudo lsblk to check second HDD showing. It should now be visible as sdb – 500 GB. If not, you need to shutdown the server and check your hardware / physical connections. Once you see it is showing via that command, then proceed towards the next step to format and mounting by running following commands one by one.
sudo mkdir /media/500GB -> It will create a mount point for drive loading with name 500GB
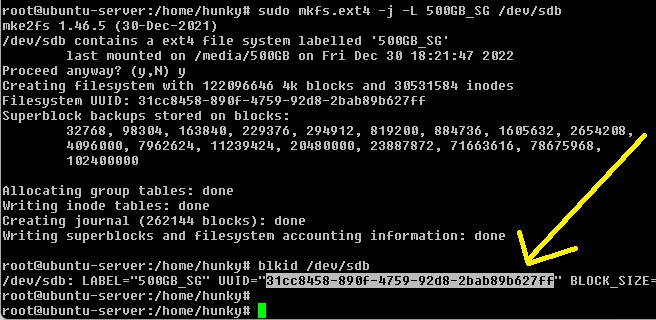
sudo mkfs.ext4 -j -L 500GB /dev/sdb -> This will format the HDD with a single partition with EXT4 file system
sudo blkid /dev/sdb -> It will show UUID output like below screenshot of my system. You need to use your mouse to select that UUID string and press enter to copy it. Then go to note pad and paste it there.
sudo nano /etc/fstab -> It will open a Linux configuration file in CLI text editor. Use your keyboard arrow keys to get down to the last line. Here you need to paste (right click to paste) following -> /dev/disk/by-uuid/4006fe68-879a-41ed-b4da-cc0e6bc6b4bb /media/500GB auto nosuid,nodev,nofail,x-gvfs-show,x-gvfs-name=NewHDD 0 0 -> Remember to replace the UUID with the one you have got. DO NOT change or modify anything else on this file. After pasting, press CTRL + X, then type Y and “enter” to save and exit the file.
sudo mount -a -> This will mount the drive. If something is wrong, it will through an error.
Nextcloud installation / Configuration
Run the following commands one by one to install / configure Nextcloud snap version and (optional) move the storage from boot disk to data disk.
sudo su
sudo snap install nextcloud
sudo nextcloud.manual-install user password -> replace the username and password with your own.
sudo snap connect nextcloud:network-observe
sudo snap connect nextcloud:removable-media
sudo nextcloud.occ config:system:set trusted_domains 1 --value=192.168.1.30 -> Replace the IP address with your own Server IP.
sudo nextcloud.occ config:system:set trusted_domains 2 --value=nextcloud.hunky.online -> Replace the sub-domain name with your own (the one you wish to create at Cloudflare)
sudo nextcloud.enable-https self-signed
sudo snap set nextcloud ports.http=880 ports.https=1444 -> This is to change Nextcloud from default web ports to some non-standard free ports.
This is optional to my setup. This is to move user data from SSD boot drive to my HDD data drive. Run command, sudo nano /var/snap/nextcloud/current/nextcloud/config/config.php -> This will open up Nextcloud configuration file in a CLI text editor. Be very careful, DO NOT change or modify it in anyway apart from one line called “DataDirectory” change the value to -> /media/500GB/ncdata/data Press CTRL + X then type Y and press enter to save and exit.
sudo mkdir /media/500GB/ncdata then run, sudo mv /var/snap/nextcloud/common/nextcloud/data /media/500GB/ncdata/ then run sudo chown -R root:root /media/500GB/ncdata and sudo chmod 0770 /media/500GB/ncdata
Reboot the system -> sudo reboot
Jellyfin Server Installation
We are going to use Docker and Docker compose for Jellyfin installation. We have already installed both Docker and Docker Compose with our ubuntu server installation. All it remains is to create the configuration file to start the container. In my case, since I have a separate data disc, so I am creating it there. If you have single disk server configuration, you can run it in your boot disc user directory. Just create a directory for that.
sudo su
sudo mkdir /media/500GB/jellyfin
sudo nano /media/500GB/jellyfin/docker-compose.yml -> This will create an open an empty configuration file in a CLI text editor. Paste (Right mouse click) the following,
version: '3.5'
services:
  jellyfin:
    image: jellyfin/jellyfin
    container_name: jellyfin
    network_mode: 'host'
    volumes:
      - ./config:/config
      - ./cache:/cache
      - ./media:/media
      - ./media2:/media2:ro
    restart: 'unless-stopped'
    # Optional - alternative address used for autodiscovery
    environment:
      - JELLYFIN_PublishedServerUrl=http://example.com
    # Optional - may be necessary for docker healthcheck to pass if running in host network mode
    extra_hosts:
      - "host.docker.internal:host-gateway"
After pasting, in your keyboard, press CTRL+X then SHIFT+Y and press ENTER to save and exit.
We are not yet starting this server container since there is a small change that we need to make for Nextcloud integration before staring it. This to allow Jellyfin use a Nextcloud upload folder as it’s media library.
PhotoPrism Installation
Photo Prism is going to run via Docker & docker compose. We have already installed both Docker and Docker Compose with our ubuntu server installation. All it remains is to create the configuration file to start the container. In my case, since I have a separate data disc, so I am creating it there. If you have single disk server configuration, you can run it in your boot disc user directory. Just create a directory for that.
sudo su
sudo mkdir /media/500GB/photoprism
sudo nano /media/500GB/photoprism/docker-compose.yml -> This will create an open an empty configuration file in a CLI text editor. Paste the following, but make sure to change the user name and passwords. For better understanding, all passwords are here written as “ChangeMe” -> Make sure to enter your own.
version: '3.5'

# Example Docker Compose config file for PhotoPrism (Linux / AMD64)
#
# Note:
# - Hardware transcoding is only available for sponsors due to the high maintenance and support effort.
# - Running PhotoPrism on a server with less than 4 GB of swap space or setting a memory/swap limit can cause unexpected
#   restarts ("crashes"), for example, when the indexer temporarily needs more memory to process large files.
# - If you install PhotoPrism on a public server outside your home network, please always run it behind a secure
#   HTTPS reverse proxy such as Traefik or Caddy. Your files and passwords will otherwise be transmitted
#   in clear text and can be intercepted by anyone, including your provider, hackers, and governments:
#   https://docs.photoprism.app/getting-started/proxies/traefik/
#
# Setup Guides:
# - https://docs.photoprism.app/getting-started/docker-compose/
# - https://docs.photoprism.app/getting-started/raspberry-pi/
#
# Troubleshooting Checklists:
# - https://docs.photoprism.app/getting-started/troubleshooting/
# - https://docs.photoprism.app/getting-started/troubleshooting/docker/
# - https://docs.photoprism.app/getting-started/troubleshooting/mariadb/
#
# CLI Commands:
# - https://docs.photoprism.app/getting-started/docker-compose/#command-line-interface
#
# All commands may have to be prefixed with "sudo" when not running as root.
# This will point the home directory shortcut ~ to /root in volume mounts.

services:
  photoprism:
    ## Use photoprism/photoprism:preview for testing preview builds:
    image: photoprism/photoprism:latest
    depends_on:
      - mariadb
    ## Don't enable automatic restarts until PhotoPrism has been properly configured and tested!
    ## If the service gets stuck in a restart loop, this points to a memory, filesystem, network, or database issue:
    ## https://docs.photoprism.app/getting-started/troubleshooting/#fatal-server-errors
    restart: unless-stopped
    security_opt:
      - seccomp:unconfined
      - apparmor:unconfined
    ports:
      - "2342:2342" # HTTP port (host:container)
    environment:
      PHOTOPRISM_ADMIN_USER: "admin"                 # superadmin username
      PHOTOPRISM_ADMIN_PASSWORD: "Change@Me"          # initial superadmin password (minimum 8 characters)
      PHOTOPRISM_AUTH_MODE: "password"               # authentication mode (public, password)
      PHOTOPRISM_SITE_URL: "http://localhost:2342/"  # server URL in the format "http(s)://domain.name(:port)/(path)"
      PHOTOPRISM_ORIGINALS_LIMIT: 5000               # file size limit for originals in MB (increase for high-res video)
      PHOTOPRISM_HTTP_COMPRESSION: "gzip"            # improves transfer speed and bandwidth utilization (none or gzip)
      PHOTOPRISM_LOG_LEVEL: "info"                   # log level: trace, debug, info, warning, error, fatal, or panic
      PHOTOPRISM_READONLY: "false"                   # do not modify originals directory (reduced functionality)
      PHOTOPRISM_EXPERIMENTAL: "false"               # enables experimental features
      PHOTOPRISM_DISABLE_CHOWN: "false"              # disables updating storage permissions via chmod and chown on startup
      PHOTOPRISM_DISABLE_WEBDAV: "false"             # disables built-in WebDAV server
      PHOTOPRISM_DISABLE_SETTINGS: "false"           # disables settings UI and API
      PHOTOPRISM_DISABLE_TENSORFLOW: "false"         # disables all features depending on TensorFlow
      PHOTOPRISM_DISABLE_FACES: "false"              # disables face detection and recognition (requires TensorFlow)
      PHOTOPRISM_DISABLE_CLASSIFICATION: "false"     # disables image classification (requires TensorFlow)
      PHOTOPRISM_DISABLE_RAW: "false"                # disables indexing and conversion of RAW files
      PHOTOPRISM_RAW_PRESETS: "false"                # enables applying user presets when converting RAW files (reduces performance)
      PHOTOPRISM_JPEG_QUALITY: 85                    # a higher value increases the quality and file size of JPEG images and thumbnails (25-100)
      PHOTOPRISM_DETECT_NSFW: "false"                # automatically flags photos as private that MAY be offensive (requires TensorFlow)
      PHOTOPRISM_UPLOAD_NSFW: "true"                 # allows uploads that MAY be offensive (no effect without TensorFlow)
      # PHOTOPRISM_DATABASE_DRIVER: "sqlite"         # SQLite is an embedded database that doesn't require a server
      PHOTOPRISM_DATABASE_DRIVER: "mysql"            # use MariaDB 10.5+ or MySQL 8+ instead of SQLite for improved performance
      PHOTOPRISM_DATABASE_SERVER: "mariadb:3306"     # MariaDB or MySQL database server (hostname:port)
      PHOTOPRISM_DATABASE_NAME: "photoprism"         # MariaDB or MySQL database schema name
      PHOTOPRISM_DATABASE_USER: "photoprism"         # MariaDB or MySQL database user name
      PHOTOPRISM_DATABASE_PASSWORD: "Change@Me"       # MariaDB or MySQL database user password
      PHOTOPRISM_SITE_CAPTION: "AI-Powered Photos App"
      PHOTOPRISM_SITE_DESCRIPTION: ""                # meta site description
      PHOTOPRISM_SITE_AUTHOR: ""                     # meta site author
      ## Run/install on first startup (options: update https gpu tensorflow davfs clitools clean):
      # PHOTOPRISM_INIT: "https gpu tensorflow"
      ## Hardware Video Transcoding:
      # PHOTOPRISM_FFMPEG_ENCODER: "software"        # FFmpeg encoder ("software", "intel", "nvidia", "apple", "raspberry")
      # PHOTOPRISM_FFMPEG_BITRATE: "32"              # FFmpeg encoding bitrate limit in Mbit/s (default: 50)
      ## Run as a non-root user after initialization (supported: 0, 33, 50-99, 500-600, and 900-1200):
      # PHOTOPRISM_UID: 1000
      # PHOTOPRISM_GID: 1000
      # PHOTOPRISM_UMASK: 0000
    ## Start as non-root user before initialization (supported: 0, 33, 50-99, 500-600, and 900-1200):
    # user: "1000:1000"
    ## Share hardware devices with FFmpeg and TensorFlow (optional):
    # devices:
    #  - "/dev/dri:/dev/dri"                         # Intel QSV
    #  - "/dev/nvidia0:/dev/nvidia0"                 # Nvidia CUDA
    #  - "/dev/nvidiactl:/dev/nvidiactl"
    #  - "/dev/nvidia-modeset:/dev/nvidia-modeset"
    #  - "/dev/nvidia-nvswitchctl:/dev/nvidia-nvswitchctl"
    #  - "/dev/nvidia-uvm:/dev/nvidia-uvm"
    #  - "/dev/nvidia-uvm-tools:/dev/nvidia-uvm-tools"
    #  - "/dev/video11:/dev/video11"                 # Video4Linux Video Encode Device (h264_v4l2m2m)
    working_dir: "/photoprism" # do not change or remove
    ## Storage Folders: "~" is a shortcut for your home directory, "." for the current directory
    volumes:
      # "/host/folder:/photoprism/folder"                # Example
      - "./Pictures:/photoprism/originals"               # Original media files (DO NOT REMOVE)
      # - "/example/family:/photoprism/originals/family" # *Additional* media folders can be mounted like this
      # - "~/Import:/photoprism/import"                  # *Optional* base folder from which files can be imported to originals
      - "./storage:/photoprism/storage"                  # *Writable* storage folder for cache, database, and sidecar files (DO NOT REMOVE)

  ## Database Server (recommended)
  ## see https://docs.photoprism.app/getting-started/faq/#should-i-use-sqlite-mariadb-or-mysql
  mariadb:
    ## If MariaDB gets stuck in a restart loop, this points to a memory or filesystem issue:
    ## https://docs.photoprism.app/getting-started/troubleshooting/#fatal-server-errors
    restart: unless-stopped
    image: mariadb:10.10
    security_opt: # see https://github.com/MariaDB/mariadb-docker/issues/434#issuecomment-1136151239
      - seccomp:unconfined
      - apparmor:unconfined
    command: mysqld --innodb-buffer-pool-size=512M --transaction-isolation=READ-COMMITTED --character-set-server=utf8mb4 --collation-server=utf8mb4_unicode_ci --max-connections=512 --innodb-rollback-on-timeout=OFF --innodb-lock-wait-timeout=120
    ## Never store database files on an unreliable device such as a USB flash drive, an SD card, or a shared network folder:
    volumes:
      - "./database:/var/lib/mysql" # DO NOT REMOVE
    environment:
      MARIADB_AUTO_UPGRADE: "1"
      MARIADB_INITDB_SKIP_TZINFO: "1"
      MARIADB_DATABASE: "photoprism"
      MARIADB_USER: "photoprism"
      MARIADB_PASSWORD: "Change@Me"
      MARIADB_ROOT_PASSWORD: "Change@Me"

  ## Watchtower upgrades services automatically (optional)
  ## see https://docs.photoprism.app/getting-started/updates/#watchtower
  ## activate via "COMPOSE_PROFILES=update docker compose up -d"
  watchtower:
    restart: unless-stopped
    image: containrrr/watchtower
    profiles: ["update"]
    environment:
      WATCHTOWER_CLEANUP: "true"
      WATCHTOWER_POLL_INTERVAL: 7200 # checks for updates every two hours
    volumes:
      - "/var/run/docker.sock:/var/run/docker.sock"
      - "~/.docker/config.json:/config.json" # optional, for authentication if you have a Docker Hub account
Press CTRL+X then type SHIFT+Y and ENTER to save and exit.
cd /media/500GB/photoprism
sudo docker compose up -d -> This will spin up the container and start it.
Setting up CloudFlare Tunnel in Local Server
Creating Host Name / Sub-Domains
Remember the tunnel code we had generated from Cloudflare panel and saved that into a notepad file for later use?
Well now is the time.
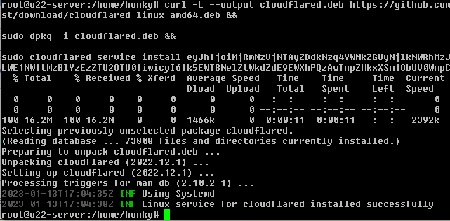
So in your local server, first run sudo su, then just copy paste that code and run it.
Once it is done and your server is connected to the Cloudflare Network. You can now open Cloudflare account dashboard again and visit the Zero Trust section. There under tunnels, it should now show the tunnel is up and healthy.
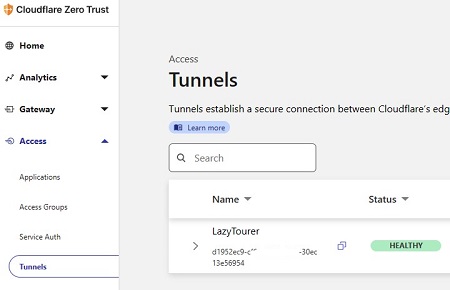
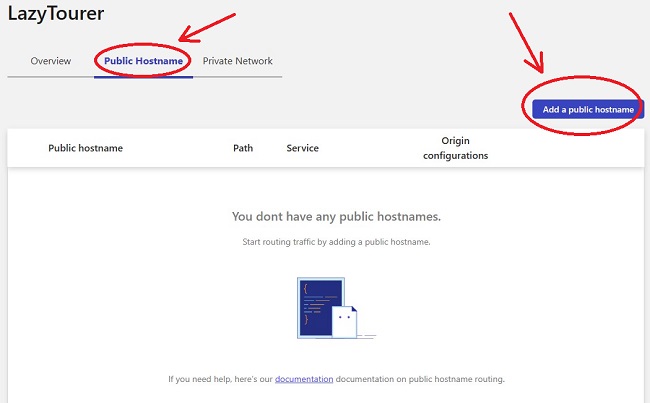
Click Configure -> Then click Public Host Name -> Then click Add a Public Host Name. This should bring up the page to enter domains about your sub domains and their respective service locations.
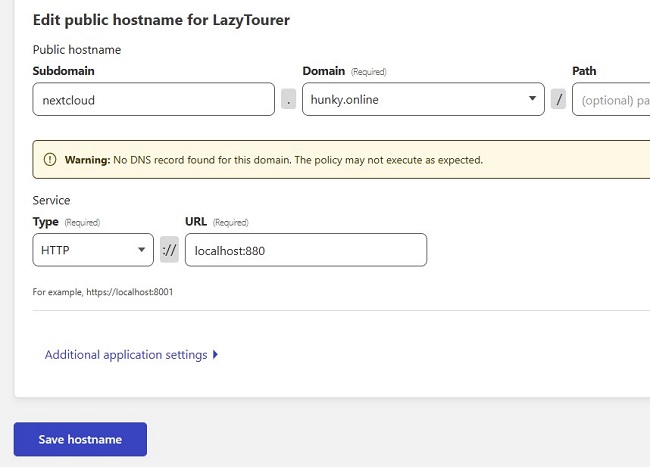
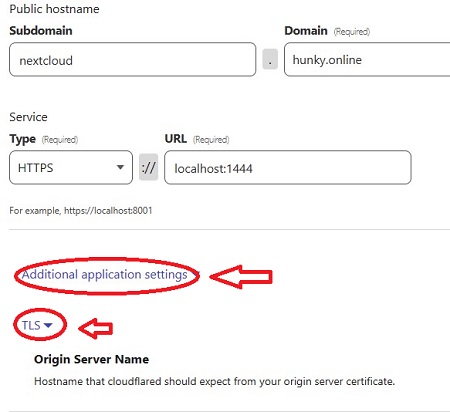
Enter the host name / public sub domains as per this format. Make sure to select your domain name that you have added into Cloudflare. In my case, it is hunky.online. You can have any subdomain value as per your liking. For me, my setup looks like this.
| Options | Nextcloud | PhotoPrism | Jellyfin |
| Subdomain | nextcloud | gallery | movie |
| Domain | hunky.online | hunky.online | hunky.online |
| Path | nothing / blank | nothing / blank | nothing / blank |
| Type | HTTPS | HTTP | HTTP |
| URL | localhost:1444 | localhost:2342 | localhost:8096 |
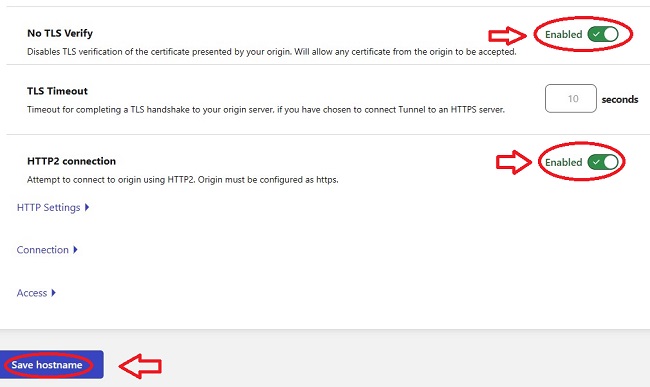
For nextcloud there is one additional step needed for end to end encryption to work. Under “Application Additional Settings”, go to TLS option, and there turn on “No TLS Verify” and “HTTP2 Connection”. Then click “Save Hostname”.
Our setup is now complete. Server is now under full auto mode. You can reboot, restart the server and everything should load automatically and be ready for use.
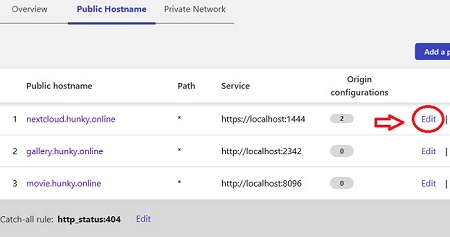
Accessing Individual Services
Server is now online and accessible from anywhere from the world via Internet. There is no need for CLI as everything can now be accessed via browser or respective apps. Following are the three addresses for this example setup,
| nextcloud.hunky.online | gallery.hunky.online | movie.hunky.online |
| Our Nextcloud Server | The PhotoPrism Online Gallery | Jellyfin Streaming Server |
| 192.168.1.30:880 | 192.168.1.30:2342 | 192.168.1.30:8096 |
You can access the server and respective services via local IP and port when you are accessing via your local LAN Network.
Configurations -> NextCloud + Jellyfin Integration
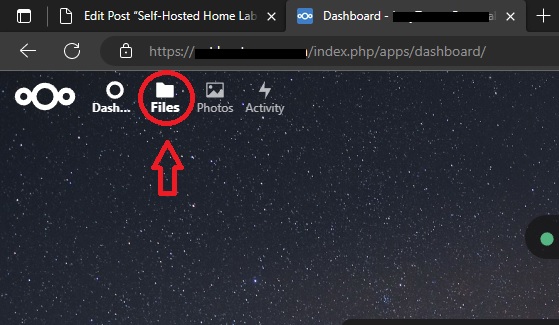
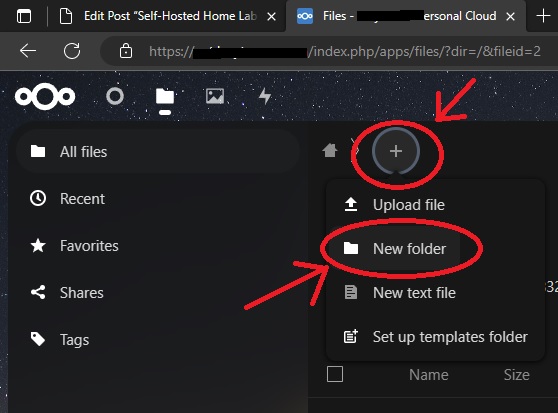
We can now open up the browser and access Nextcloud via the access URL address. Either via the Internet address or by using local LAN address. Sign in using the username and password you used for installation of Nextcloud. Once inside, click the file icon in upper left corner and click the plus sign to create a new folder called “Jellyfin_data”.
Now Login to your Ubuntu Server using SSH via CMD. Run following commands,
cd /media/500GB/jellyfin/
sudo nano docker-compose.yml -> This will open the Jellyfin server configuration file in CLI text editor. We need to edit one line, “./media:/media” -> delete ./media and write /media/500GB/ncdata/data/username/files/Jellyfin_data/ -> Press CTRL+X then type SHIFT+Y and press ENTER to save and exit. Dont forget to replace this “username” with the user name of your nextcloud account.
Start the Jellyfin -> sudo docker compose up -d
Jellyfin Server Setup / Configuration
Visit the address of Jellyfin via Internet or via local LAN IP. On first opening, it will ask you to create admin user account and password. Do it. Now there are various guide and videos in internet on how to do media management. You can refer there. Basically, anything you upload into that Jellyfin_data Folder of your Nextcloud will be accessible to Jellyfin for streaming. You need to create a Library name and add those into it.
Jellyfin has app for any device you can think of. Android Phone, Tablets, TVs, iOS, iPad OS, iPhone and everything else. You can sign in using the URL or LAN IP if that device is within your local network. You can certainly access Jellyfin Server via any browser too.
Configuring Nextcloud Mobile App for Auto Upload
We have already covered the same in one of our previous guides about Nextcloud here -> Nextcloud Server as VM. You can refer there for details and step by step instructions.
Configuring PhotoPrism
You can access it via web URL using any browser. Specially in Mobile. Log into it by using username “admin” and password as you have entered in that configuration file.
On the left-hand side, click settings, then at the upper right tab menu, click services. That will open up a dialog box to enter your Nextcloud user account credential details. Click OK to add it for integration.

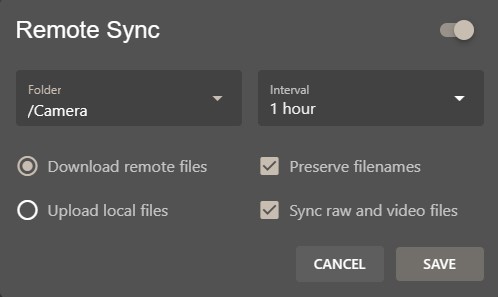
Now select the auto upload folder of yours and set interval to 1 hour and click ok to start building the Photo Prism database of your images.
Install PhotoPrism Mobile Web App for Gallery Viewing
Here is the simple guide by Photo Prism team on how to easily install their viewing / Galley web app in your mobile (iOS / Android) -> Mobile App (PWA) – PhotoPrism
Afterthoughts
Setup is now active and running in headless mode. That means you don’t have to use any more CLI and just keep using it via browser and apps. However, there are some things you should know about this particular setup of mine.
Great Performance – But it is old hardware
Users won’t even notice the age of the server hardware since at front end with browser access or via app access and movie streaming, performance is excellent. However, it is a very old hardware. In a server environment, number of active and simultaneous users matters. More there are, higher the processing power required. So, if in case number of users grow in my setup, this hardware won’t be enough. I have to get better CPU and more RAM. But for now, with handful of users, like me and my family members, this is sufficient. On the brighter side, I have just recycled and saved some E-Waste by making it useful and without throwing it to the landfill dustbin.
Backup needs backup too
Server may have older hardware but being a desktop, it is very easy to repair by simply replacing the failed part. But when it comes to your data, replacing the HDD won’t bring it back. So ideally speaking, data disks should always be in mirror RAID / parity setup. If one HDD fails, another will always have your data ready for use. My setup doesn’t have it yet. Planning to add 2 x 2TB HDDs in near future to increase the storage with redundancy.
Power Consumption
Although most of the time a home server stays idle, no heavy power-hungry CPU / GPU usage but being such old hardware, it is much higher than a newer CPU/GPU setup. This Q6600 based setup is consuming around Rs. 350-400/- per month of electricity for 24×7 operation. If you are using some modern hardware, they can lower it much further since modern hardware is much more energy efficient.
Any Problem?
Feel free to Ask
If you have any questions, feel free to drop a comment below. We shall try our best to help out.
Hurree……
I am not a tech savvy. But I successfully created my home cloud server. Your guide is a very easy and 0 errors.
Thank you so much sir.
sir
what should our url to access photoprism, jellyfin server. I am getting bad gatware Host error or 502 error.
Hi,
Those host names, when you are setting up cloudflare tunnel, are your URL to access individual services.
Thanks.
Thank you for your reply. Yes my Nextcloud URL opens and I can do my cloud access all users individual services (for users and admin) But I am unable to access gallery, photopeiam etc. I created 5 public hostnames in those except Nextcloud all other shows 502 bad gateway error.
Should I give Tunnel name same as my surver name?. I attached error screen shots.
I have installed Ubuntu server 22.04 in 250GB Hard drive and my data is on 1TB Hard drive. Now I am planning to install Ubuntu server on 256SSD to make it fast. Please make a video of back-up and restore of the Nextcloud data including user accounts and their data.
Sorry for lengthy query. Help me.
Thank you.
Now I fixed all the errors and all my Public Host names are working . But the folder in Nextcloud Jellyfin_data . The media files I am adding are not showing in Jellyfin media library and showing Playback error. “this client isn’t compatible with the media and the server isn’t sending a compatible media format”. Please help me to how to fix it. I am so disappointed at final stage because of this error.
That is a client side issue. Under your settings, there are 3 options, like native, web and 3rd party, like installed players of VLC, MX and so on. Change that to native or web and alter between them. One of them will work depending on your client device CPU / GPU and software versions.
Thank you. I will check that.
Thank you sir.
In between I moved my HDD with your guided Ubuntu server to a new upgraded CPU but I am facing no ethernet and internet and no SSH. I searched internet all the ways to get fix it. But unsuccessful. But the same CPU working all with Windows 10 installed HDD. I’m crying 😭.
Thank you. Today I get back my server online after losing glass of my sweat 💦😅. But please make a video of adding another storage HDD for Nextcloud media.
in jellyfin step i got this error Error response from daemon: invalid mount config for type “volume”: invalid mount path: ‘media/media/3.6T/ncdata/data/sanu7210/files/Jellyfin_data’ mount path must be absolute
root@cloudserver:/media/3.6T/jellyfin#
in jellyfin step i got this error Error response from daemon: invalid mount config for type “volume”: invalid mount path: ‘media/media/3.6T/ncdata/data/sanu7210/files/Jellyfin_data’ mount path must be absolute
root@cloudserver:/media/3.6T/jellyfin#
jellyfin not opening
Thanks thanks & thanks a lot my dear elder Brother , i really need this from the long time , as i am a Electronics Engineer and 15 years developer , i am also a bike as well as Professional DJ music Producer , this is my main electronics development channel , i have own Electronics Research Lab. i have 2 desktop one Apple Mac book , one smart tv ,4 mobile and a old dell mini notebook so i need a central server to storage data and fetch whenever i need something in any of those device in outdoor or in indoor local network . this old dell mini 1018 notebook which has 2 TB inbuild storage internally (after upgradation) and i have attached a usb External HDD of 4TB, which also attached with this system and showing at “Step 6 -> Adding / Formatting / Mounting the Data HDD”
but when i assigned jellyfin server with this external hdd it shows a error not connect the server , cloud functionality works well but i got error on “Configurations -> NextCloud + Jellyfin Integration” this step when i enter this code Start the “Jellyfin -> sudo docker compose up -d”
time of mounting my HDD i replace sdb and inserted sda as it shows when i enter this commend “sudo lsblk” my 3.6TB usb external hdd listed on sda and in whole tutorial written 500GB on your website i replace with 3.6TB wherever in commend line you wrote .
stile i am not sure my next cloud server acquiring the both 3.6TB and internal 1.7 TB or not
mainly still i have 3 problem that i faced
1) not sure my both HDD internal 1.7 TB and usb external 4TB attached with my next cloud server or not ( i share some screen shout pleage go though this )
2) jellyfin server installation on usb external HDD 3.6TB failed got a error , about this i have wrote on your website
3)i don’t know how to add my family members to access this cloud storage server
(1) HARD DISK BOTH ACCESS BY THE NEXTCLOUD STOAGE OR NOT DONT KNOW SO I SHARE THOSE SCREENSHOT PLEASE CHECK THIS BRO :
https://drive.google.com/file/d/1G8VAurHaj6NMf4D-9kDN_3EeVRPo5ZMT/view?usp=sharing
https://drive.google.com/file/d/1Zadd1owtOgf8DDoeqln80krrq-LMXgbR/view?usp=sharing
https://drive.google.com/file/d/1uL8u84zYm0MOjZpDGrlSokqCF2jewG5Z/view?usp=sharing
https://drive.google.com/file/d/1H9D_BoApnKtUIYrcPyEjjcct-Oj8dRP6/view?usp=sharing
https://drive.google.com/file/d/1TSqqf_ESP8MNcpUGVfWDzZe2A702L_1Z/view?usp=sharing
https://drive.google.com/file/d/1yEiz4Y65DluvrHIYBtH9L-KC6z4jJLse/view?usp=sharing
JELLYFIN SERVER CONFIGURATION ERROR SCREENSHOT :
https://drive.google.com/file/d/1eGZQ6924pBuNtld-VbtoOm-qTYoztPQ3/view?usp=sharing
Show less
Hello,
Drop me a message on Instagram or Twitter DM.. ID at both is @LazyTourer
Thanks.
Bro,
Can we install and integrate ONLYOFFICE to our self hosted nextcloud server ? If you it is possible why don’t you make a tutorial video of the same. I would be grateful🙏 to you.
Hello,
Sorry for the late reply. For you need, I would suggest to check out this tutorial -> https://youtu.be/qksr4Ls78jU
We have covered uptill nextcloud. Now Collabora or OnlyOffice server can be installed along side nextcloud, as shown in the video, in similar process (easy clicks) and then just connect them together inside nextcloud admin panel with OnlyOffice or Collabora service URL and credentials !!
Thanks.
Hello,
I’m running successfully my self hosted nextcloud server. But while adding media to library in jellyfin server, only folders (of Jellyfin_data) viewing and not scanning or taking longer time and lastly showing 👇this path/permission error. How to fix this. Thank you in advance.
Hi
Really sorry for the late reply. Didn’t get time to catch up with things. I do apologies for the delay.
The media location seems to be having mounting issue. Can you please post the docker-compose.yml file of JellyFin here? Ensure the media directory path is correct. For example, in our case, we need to edit it like this,
./media:/media-> Edit it like bellow./media/500GB/ncdata/data/username/files/Jellyfin_data/:/media-> user name is that your nextcloud user.Dont forget to add that dot ahead..
Thanks.
Nextcloud page is giving error below Error
Your data directory is invalid.
hello,
When you change the data directory, ensure to first move the old directory content to the new location and check ensure to put the correct path into the config file when editing for the location change.
This error is common when there is some mistake happening with the data directory location change process
Thanks.
gallery is showing this error please help solve the same
rest all is perfectly up and running … thank a lot for the tutorial
Hi Varun,
Is your PhotoPrism working locally via LAP IP and port?
Thanks
no its not
It’s not but dono what is the problem … I did all the steps properly plz help
its showing this
Hello Varun,
Address is just not the IP, you need to add the port number as well.. Can you try with IP:Port as address for your photoprism?
Also, run command
sudo docker psto check if PhotoPrism and related database contains are running or not in your Ubuntu Server consoleThanks.
result
Hi Varun,
Docker PS command is showing your containers are running properly. Before you proceed to next troubleshooting step of checking the Docker Compose file for any username / password / config (Database connection) related error, can you try to open this (local access, IP:Port) with a different browser under incognito mode?
Thanks.
no i can not open it on any other device or other browser either
i checked the docker-composer.yml for ids and passwords … they look good too … can it be that it is not configured to the port or the ip address correctly
i really appriciate all the help u r doing for me
thank you
Hi,
This kind of wired issues does happen time to time in software industry. Where everything looks fine yet things are not working. Sometime the error or issue is right infront of the eyes but we often overlook. In these conditions, it is better to start from the scratch, in a fresh install.
Usually one should use Virtual Machines to practice the deployment first to iron out the issues before deploying it in a production server.
Before I request you to start fresh with a clean install, your screenshot shows no reboot in many days. Update the ubuntu & reboot the system to check,
sudo apt update && apt upgrade -y && rebootThanks.
can this be the reason for not it to be not working
if yes help me fix it …
thanks
Hello,
Sorry for the late reply, I went up to the devs at github to enquire about the AVX and no, it doesn’t depend on that and neither the docker would need to execute the container. This isn’t due to CPU limitation.
Thanks
All fixed thanks a ton for all the help
Please post a backup and restore tutorial
how to update nextcloud 26 winter update
Hey Sarang,
If you are using the Snap nextcloud deployment, as shown in this video, then please note, the Hub 26 is not yet released within Snap environment. Snap runs little late for production stability
Snap is designed to update itself by default so please wait till the feature is pushed into snap
For time line, you may refer to the github page of snap nextcloud
Thanks.
1yr ke bad mera motherbord damage hua hai to nextcloud data recover kaise karte hai uspe video banva sir
apka video dekha ke maine nextcloud server banya tha or raid mirror may tha 2 hdd 2tb data but motherboard hi working may nahiye or repair bhi nhi ho sakta
Hey Sarang,
This video doesn’t show RAID setup, so I am not sure which type of RAID you have. There are multiple types of RAID, software and hardware. If it is a hardware RAID, you just need same exact model motherboard as replacement. Replace the motherboard in your current setup and ensure to connect the drives using same exact order (in same ports) as previous and then start the PC. It should work plug n play
Software RAID recovery may require different step as how the drives were mounted and configured. Process here is also simple just little different for each type
However, if you have some kind of encryption enabled, then things will be difficult to recover as that requires additional steps with your decryption key first decrypt and then proceed with RAID restore
Thanks
after new motherboard install nextcloud running ..
thank you for ur support
Cheers..
Happy Self Hosting 🙂
mujhe Nextcloud AIO install karna hai to kaise karu..
same step jo video may apne batya usme nextcloud AIO
Hello Sarang,
Please refer here-> https://youtu.be/fNyC9NG2qHw?si=RvfgGWu4cwg8FLPs
Thanks.
i have airtel internet i cant access port forwarding
can i use without port forwarding.
and use without static ip
Hi,
Instead of using snap, you can simply use docker to deploy the AIO
Rest of the process stays same.
Thanks.